Digital Information - Lesson 8: Color Images
Overview
This is a second opportunity for students to interact with the Pixelation Widget, but this time they will work with color pixels. Students start off learning that each pixel uses red, green, and blue lights that can be turned on or off using bits. They will create more color variants using an increasing amount of bits per pixel, and apply their learning by approximating an analog color image using the widget.
Goals
Students will be able to:
- Explain how bits can be used to represent the individual pixels of a color image
- Explain how digital data is used to approximate real-world analog data
Purpose
This lesson continues the story of how bits are used to represent digital images. Much like in the last lesson, students will use the Pixelation Widget to attempt to make digital approximations of analog images, this time in color. These images are produced using layers of abstraction, with each layer relying on the other to perform its process.
Students will begin to realize that analog color images have values that change smoothly and subtly, while digital images do not. The number of digital colors is also limited by the number of bits per pixel, whereas analog colors are unlimited.
Resources
Getting Started (5 minutes)
Prompt: How many different shades of the color blue can you name? How many do you think there are in total?
Discuss: Have students share with a partner. Then, invite a few students to share what their partner said.
Discussion Goal: Start with having students name shades, but quickly transition to how many they think exist altogether. The goal here is to have students begin to wonder if computers can represent all of the vast number of shades of colors in our world. This should be a quick discussion. You can move on as soon as this point is made.
Remarks
- Great job! We came up with many different shades of blue. As we continue today, let's keep thinking about whether there is a limit to the number of shades of blue there are in the world, and whether a computer can display all of those shades.
Activity (35 mins)
For today's activity, students will again use the Pixelation Widget, which can be found in the CSP-Widgets Repository. While using the widget, students should use the "Full Color" setting for the challenges.
Note: This lesson includes color images in a number of places. See the teaching tip on the right for some additional guidance that may be useful when supporting students who are color-blind.
Teaching Tip
In Levels 2, 4, and 5: The directions are written in so that students who are color-blind do not need to be able to distinguish between colors to be able to complete the task. That being said, students who are color-blind may not be able to visually check their work in the same way as other students. You can suggest that students who are color-blind ask a partner to check their work at the end of each of these levels.
In Levels 6 and 7: It is recommended that students who are color-blind do the black and white gradient image.
Challenge 1
- Last lesson, we used 1 bit for each pixel. That meant we had only two choices for each pixel -- when the bit was "off" the pixel was black, and when the bit was "on" the pixel was white.
- Today, we will use 3 bits for each pixel. Each bit will control a different color of light: red, green, and blue.
- With 3 bits, this means we will have 8 choices of color for each pixel. Let's see if you can make all 8 colors!
Do This: Each student should try to make all 8 unique colors using 3 bits per pixel.
- In the Pixelation Widget, the Color Mode should be set to "Full Color".
- The Bits per Color field should be at 1.
- Hint: Students should try turning on more than one bit at a time.
Challenge 2
- Now let's use 2 bits to control each color of light. This means there will be 6 bits total for each pixel.
Do This: In the Pixelation Widget, make three rows of pixels. Generate all the shades of red in the first row, and then do the shades of green and blue in the last two rows.
- Students should set the Bits per Color field to 2 in the widget.
- With two bits per color, there are 4 possible options for each color. To show every shade of each color, students will need 3 rows of 4 pixels each.
Teaching Tip
Students who are struggling with the binary sequences should be encouraged to take out their Flippy-Do to help them count.
Challenge 3
- Let's gain even more control by using 3 bits per color this time, or 9 bits per pixel!
Do This: Students should again generate each shade of red, green, and blue in separate rows, this time using 3 bits per color.
- Students should set the Bits per Color field to 3 in the widget.
- With three bits per color, there are 8 possible options for each color.
Challenge 4
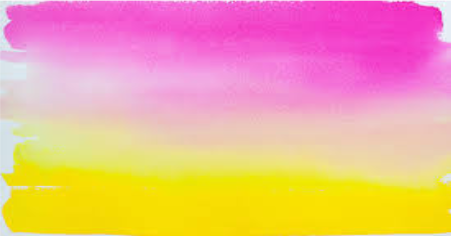
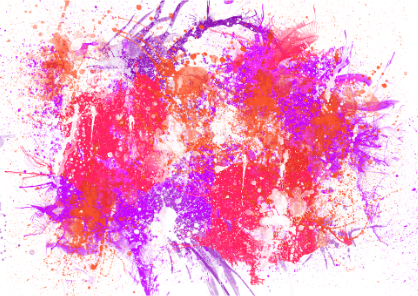
- Let's see if we can take a sampling from a piece of an image. Try your best to match the colors using the widget and reproduce the gradient. Don't worry if it doesn't match exactly! Remember, you can adjust the settings of the widget and experiment!
Do This: Show students the images below. Then, each student tries to reproduce an image of their choice using the Pixelation Widget. They can try to reproduce the whole image or just a part of it.
Teaching Tip
Not all students can see images, so this lesson embeds alternate descriptions that can describe the images to these students. Students that can see the images may explore these alts or come up with their own to see how they work.


Teaching Tip
Students may become frustrated if they feel they cannot match the analog images. Reassure them this is fine. Remind them about the discussion from the warm up and ask if it's possible that digital images ever look exactly like analog images. You may also ask the students if their representation would be improved if they use more bits per pixel.
Wrap up (10 Minutes)
- So as we saw in the last two lessons, the digital versions of images we produce differ from the original analog images. Analog images change smoothly and continuously. With digital images, we are limited by the number of bits we use. Even if we use a lot of bits, we can still only represent a finite number of colors, and gradual color changes can only happen discretely through a finite set of pixels.
Prompt: How is an image represented on a computer?
Discussion Goal: Students should understand how sampling, pixels, and binary work together to make a digital approximation of an analog image. They should also understand that while analog images are able to change color values smoothly and continuously, digital images rely on pixels to change from a fixed number of color values discretely using squares of equal size.
Journal: Students record the layers of abstraction in their journals.
- Digital Image Layer: Displays a digital approximation based on a sampling of an analog image.
- Sampling Layer
- Pixel Layer
- Binary Layer
Remarks
- We can see that a digital image is made up of several layers that work together to represent the analog image. This is an example of abstraction because we don't always look at the details of what's going on in all of these layers, but they are working behind the scenes. Let's watch a video of how this works.
Assessment: Check for Understanding
For Students
Open a word doc or google doc and copy/paste the 2 following question.
Question 1
Which statement about analog and digital images is true?
- With advances in technology, digital images look exactly like the analog images they represent.
- Sampling an analog image more frequently produces a digital image with a better representation.
- Analog images come from data that is measured at regular intervals.
- Digital images come from data that is measures continuously.
Question 2
Describe how the process of sampling, RGB pixels, and binary sequences work together to display a digital color image.
Standards Alignment
- CSTA K-12 Computer Science Standards (2017): CS - Computing Systems: 3A-CS-02 - Compare levels of abstraction and interactions between application software, system software and hardware layers.
- CSTA K-12 Computer Science Standards (2017): DA - Data & Analysis: 2-DA-07 - Represent data using multiple encoding schemes, 3A-DA-09 - Translate between different bit representations of real-world phenomena, such as characters, numbers, and images.
- CSP2021: DAT-1.A.9 - The use of digital data to approximate real-world analog data is an example of abstraction.
Next Tutorial
In the next tutorial, we will discuss CSP Digital Information Lesson 9, which describes losslessly compressing information.