Introduction to Platformer Games
This lesson will introduce you to computer science through platformer games.
Overview
In this lesson, you will be introduced to the field of computer science. The focus is on the big picture, but with an emphasis on computer games. You will learn how to use what is often called an Integrated Development Environment to create a platformer style game of your own design. In the process, you will learn about the field broadly and two concepts within it called objects and action calls.
Goals
You have the following goals for this lesson:
- Learn how to use Quorum Studio for game programming
- Learn about the platformer gaming
- Learn about Objects and Action Calls
Warm up
Computer gaming is a fun activity that many enjoy. There are many kinds of games out there with many different styles, activities, and approaches. What categories of games have you played and what style do you find to be the most fun?
Vocabulary
You will be learning about the following vocabulary words:
| Term | Definition |
|---|---|
| Computer Science | The study of computers and computational systems. This includes issues like information processing, automation, and algorithms. |
| Platformer Game | A type of computer game, often in 2 dimensions, where a player moves, jumps, and typically completes activities and levels. |
| Integrated Development Environment | Software that includes many common functions involved in the process of creating your own inventions. |
| Project | An organized set of files, like source code files, images, movies, graphics scenes, sounds, or other items, that work together when creating software. |
Code
You will be using the following new pieces of code:
| Quorum Code | Explanation |
|---|---|
| Use Templates.SkyHopper.all | A command that gives a program access to all of SkyHopper’s features. |
| Application app | Creates an object to represent the game itself |
| Level level1 | Creates an object that represents a single level in the game. |
| AddShortPlatform(50,300) | An action that tells a level it should have a platform at 50,300 (x,y). |
| AddKey(300, 400) | An action that adds a key at 300, 400 (x, y). |
| AddBouncer(300,250) | An action that adds a bouncer at 300, 250 (x, y). |
| AddPortal(100,100,500,600) | This action adds a portal. It is located at position 100, 100, and will teleport the player to 500, 600 (x,y). |
CSTA Standards
This lesson covers the following standards:
- 3A-CS-01: Explain how abstractions hide the underlying implementation details of computing systems embedded in everyday objects.
- 3A-CS-02: Compare levels of abstraction and interactions between application software, system software, and hardware layers.
- 3A-AP-16: Design and iteratively develop computational artifacts for practical intent, personal expression, or to address a societal issue by using events to initiate instructions.
- 3A-AP-17: Decompose problems into smaller components through systematic analysis, using constructs such as procedures, modules, and/or objects.
Explore
In this lesson, you are going to explore the field of computer science. Many of you may be familiar with computers. They are part of your daily life in many ways, from cars, to tablets, or even refrigerators. These devices have hardware, like the car itself and this hardware is built by electrical engineers, mechanical engineers, and others. You, however, will be focusing these lessons on the software, which is the piece that computer scientists create. This split, the hardware and the software, allows a physical device to stay the same, while meaningfully changing what it can do or how a user interacts with it.
One common misconception with computer science, however, is that it is about using software. For example, you may be familiar with Microsoft Word or Excel. Computer scientists generally want people to know about how to use such software and many do, but a crucial skill in computer science is how to invent software. Inventing software requires a very different way of thinking than using it does, because you need to learn one of the many languages that computers speak.
Fortunately, modern computer scientists do not start from scratch. They have invented software for, weirdly, inventing software: tools called Integrated Development Environments (IDE). Such environments come in many forms and with games specifically there is a wide variety that exist. Here is an example of a game editor in Quorum Studio to layout and display aspects of a 3D game, just as an example:
Quorum Studio has a variety of functions you can use to create your software. Many of these functions you can learn as you go. Creating games and how to do so is a very broad area of computer science with a surprisingly large number of facets. This includes graphics, animation, artificial intelligence, art, media, and human computer interaction. In the next set of tutorials, you will learn about one small piece of this larger puzzle: objects and action calls.
Downloading Quorum Studio
Throughout the lessons, you will use Quorum Studio to write code, create games, and learn about the fundamentals of computer science. First, you will need to download Quorum Studio.
You can get Quorum Studio from the downloads page. Click the blue Download Quorum Studio button, then after the download is finished, run the installer. Once Quorum Studio is installed, you have everything you need to write code. Before you do, though, you should know the basics of the environment.
Menus and Toolbar
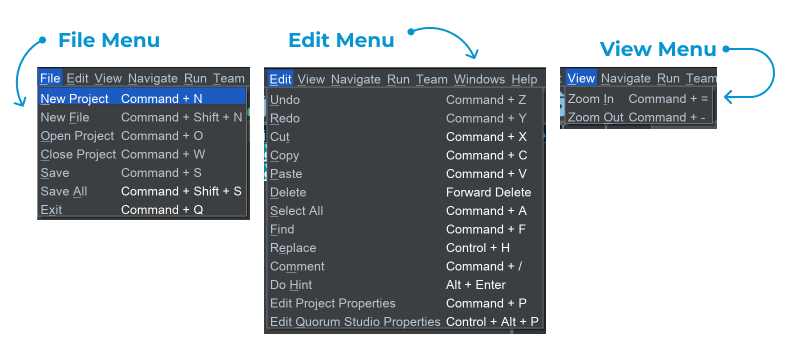
There are several menus in Quorum Studio. The first is the File menu, for creating, opening, and closing projects. Projects are collections of code and resources used for creating and running programs. Any time you are using code, you will be working inside a project.
The next menu is the Edit menu. The Edit menu includes many common things you might find in text editors, like Cut, Copy, and Paste, as well as Undo and Redo. It also lets you change the Quorum Studio properties, which has extra features such as Light or Dark mode. Throughout the lesson, you will see screenshots of Quorum Studio in Dark mode, but the difference is purely visual – the environment works exactly the same way whether it uses light or dark colors.
The View menu contains options for zooming in or out, which is useful if you want to make text larger (so it is easier to see) or smaller (so more fits on the screen at once).
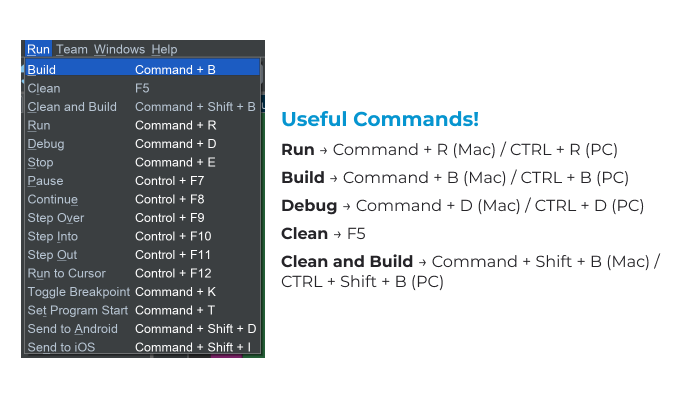
One important menu you may use a good deal is Run. This menu lets you run or stop the programs you invent. It also contains many options for the debugger, a tool used by programmers to inspect running programs and track down problems. You will not need the debugger for these lessons, but it is a useful tool to have.
The final three menus are used less often. That said, the teams menu is used for controlling various versions of the software you write on popular websites like Github, whereas the window and help menus provide navigation controls across the application and some extras like automatically checking for updates.
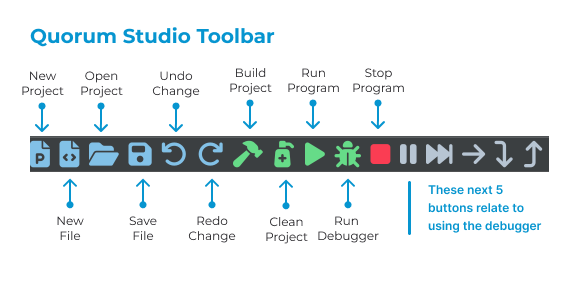
Below the menus is the toolbar. The toolbar has a set of buttons that perform the most commonly used functions. From left to right, the buttons make a new project, make a new file, open a project, or save a file. The next two allow you to undo or redo a change.
The green buttons hold a purpose related to running the software you are making. The hammer builds your program, while the soap dispenser cleans it, which means it deletes anything the environment has made for you behind the scenes and starts over. The rightward triangle, called the play button, runs your program, while the bug runs the debugger. The red stop button stops a running program.
The final five buttons on the toolbar are gray and related to running a debugger, which you will not need for these lessons.
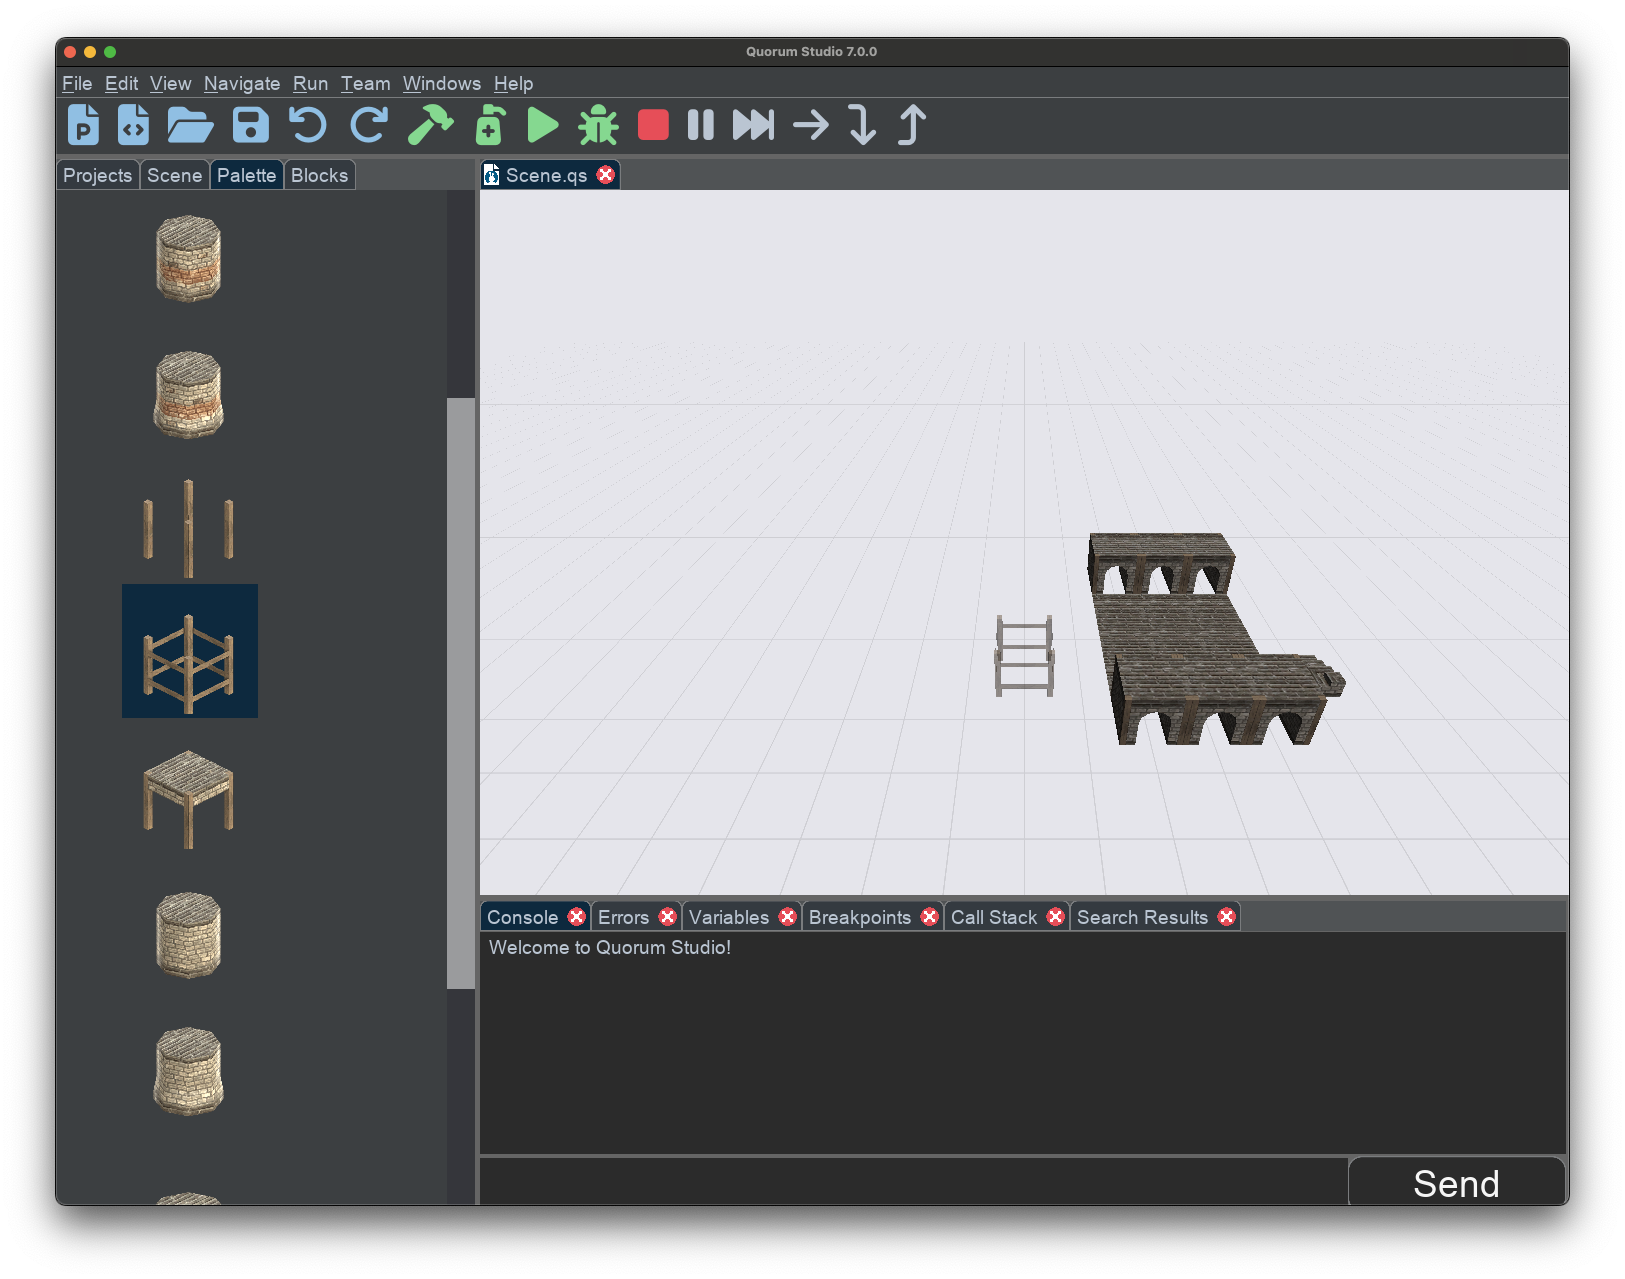
Project Tabs
Below the toolbar on the left hand side is the project pane. If you are navigating with a keyboard, you can jump to the pane with the hotkey COMMAND + 1 on Mac or CTRL + 1 on Windows. The pane has four tabs: the Projects tab, the Scene tab, the Palette tab, and the Blocks tab.
The Project tab shows the projects and files that you are currently working with. This is where you can find your files when you start writing code, and it is also where you will find the resources for your games.
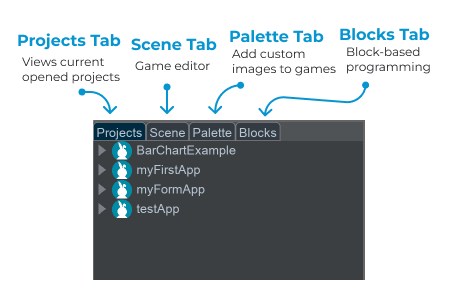
The middle two tabs, Scene and Palette, are used with the Quorum scene editor. The scene editor can be used to create 2D or 3D environments for use in games. You will not be using the scene editor during these lessons.
You will use the final tab, however. The Blocks tab is for block-based programming. This tab provides code you can use in your program, and it can also provide hints and information. You will learn more about how to use this tab to create games as the lessons progress.
Creating a Program
Before you begin working with games, it is important to learn about project. Suppose you wanted to create a program that outputs a message to the console. This first program in Quorum Studio will help you understand how to work with projects and run code.
To make a new project, you can do this by selecting New Project in the File Menu, selecting the New Project button in the toolbar (the file icon with a “P” on it), or by using the hotkey (COMMAND + N on Mac, or CTRL + N on Windows). This will open the New Project dialog.
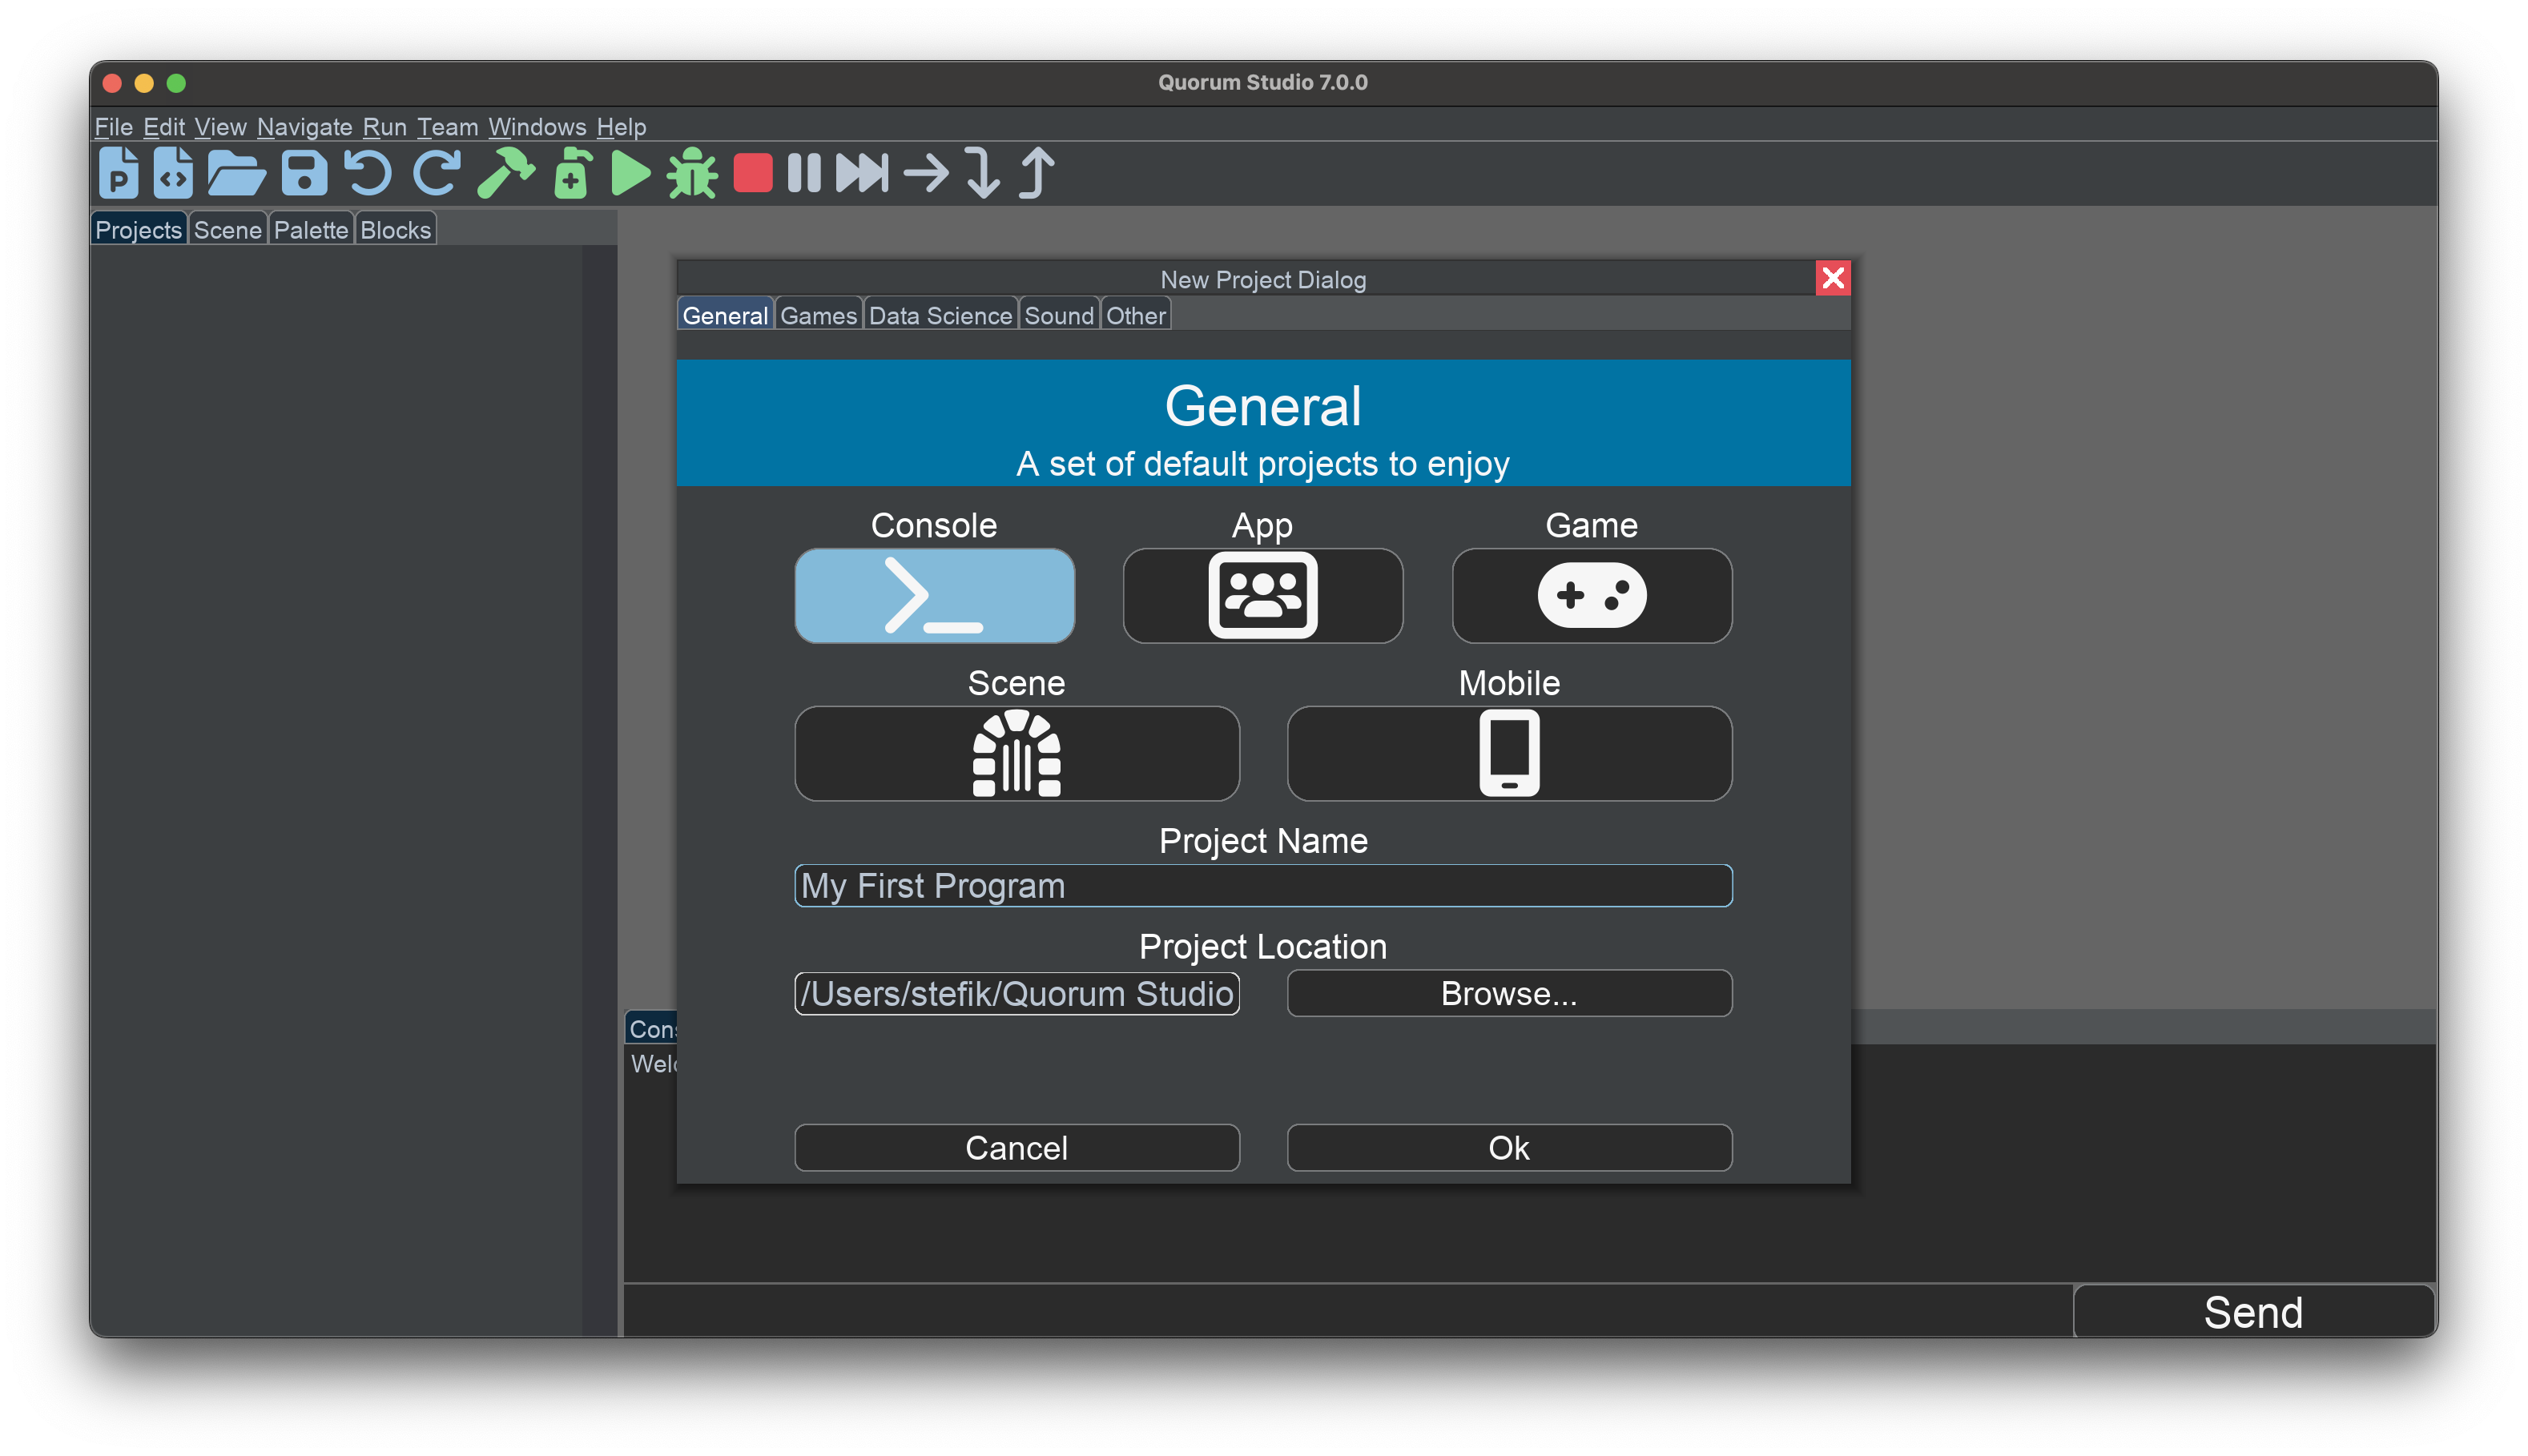
There are several options for project types. Selecting Console creates a blank project. You can give it a name by putting text into the Project Name field. Then, pressing enter or selecting the Ok button at the bottom of the dialog will make a project.
Creating a new project will cause it to appear in the Project Pane on the left side, under the Projects tab. Adjusting the arrow next to the project will expand it. Inside the Source Code folder is a file called Main.quorum. This is a Quorum file and is where your source code will go. You can open a file with the mouse by double clicking or the keyboard by pressing enter.
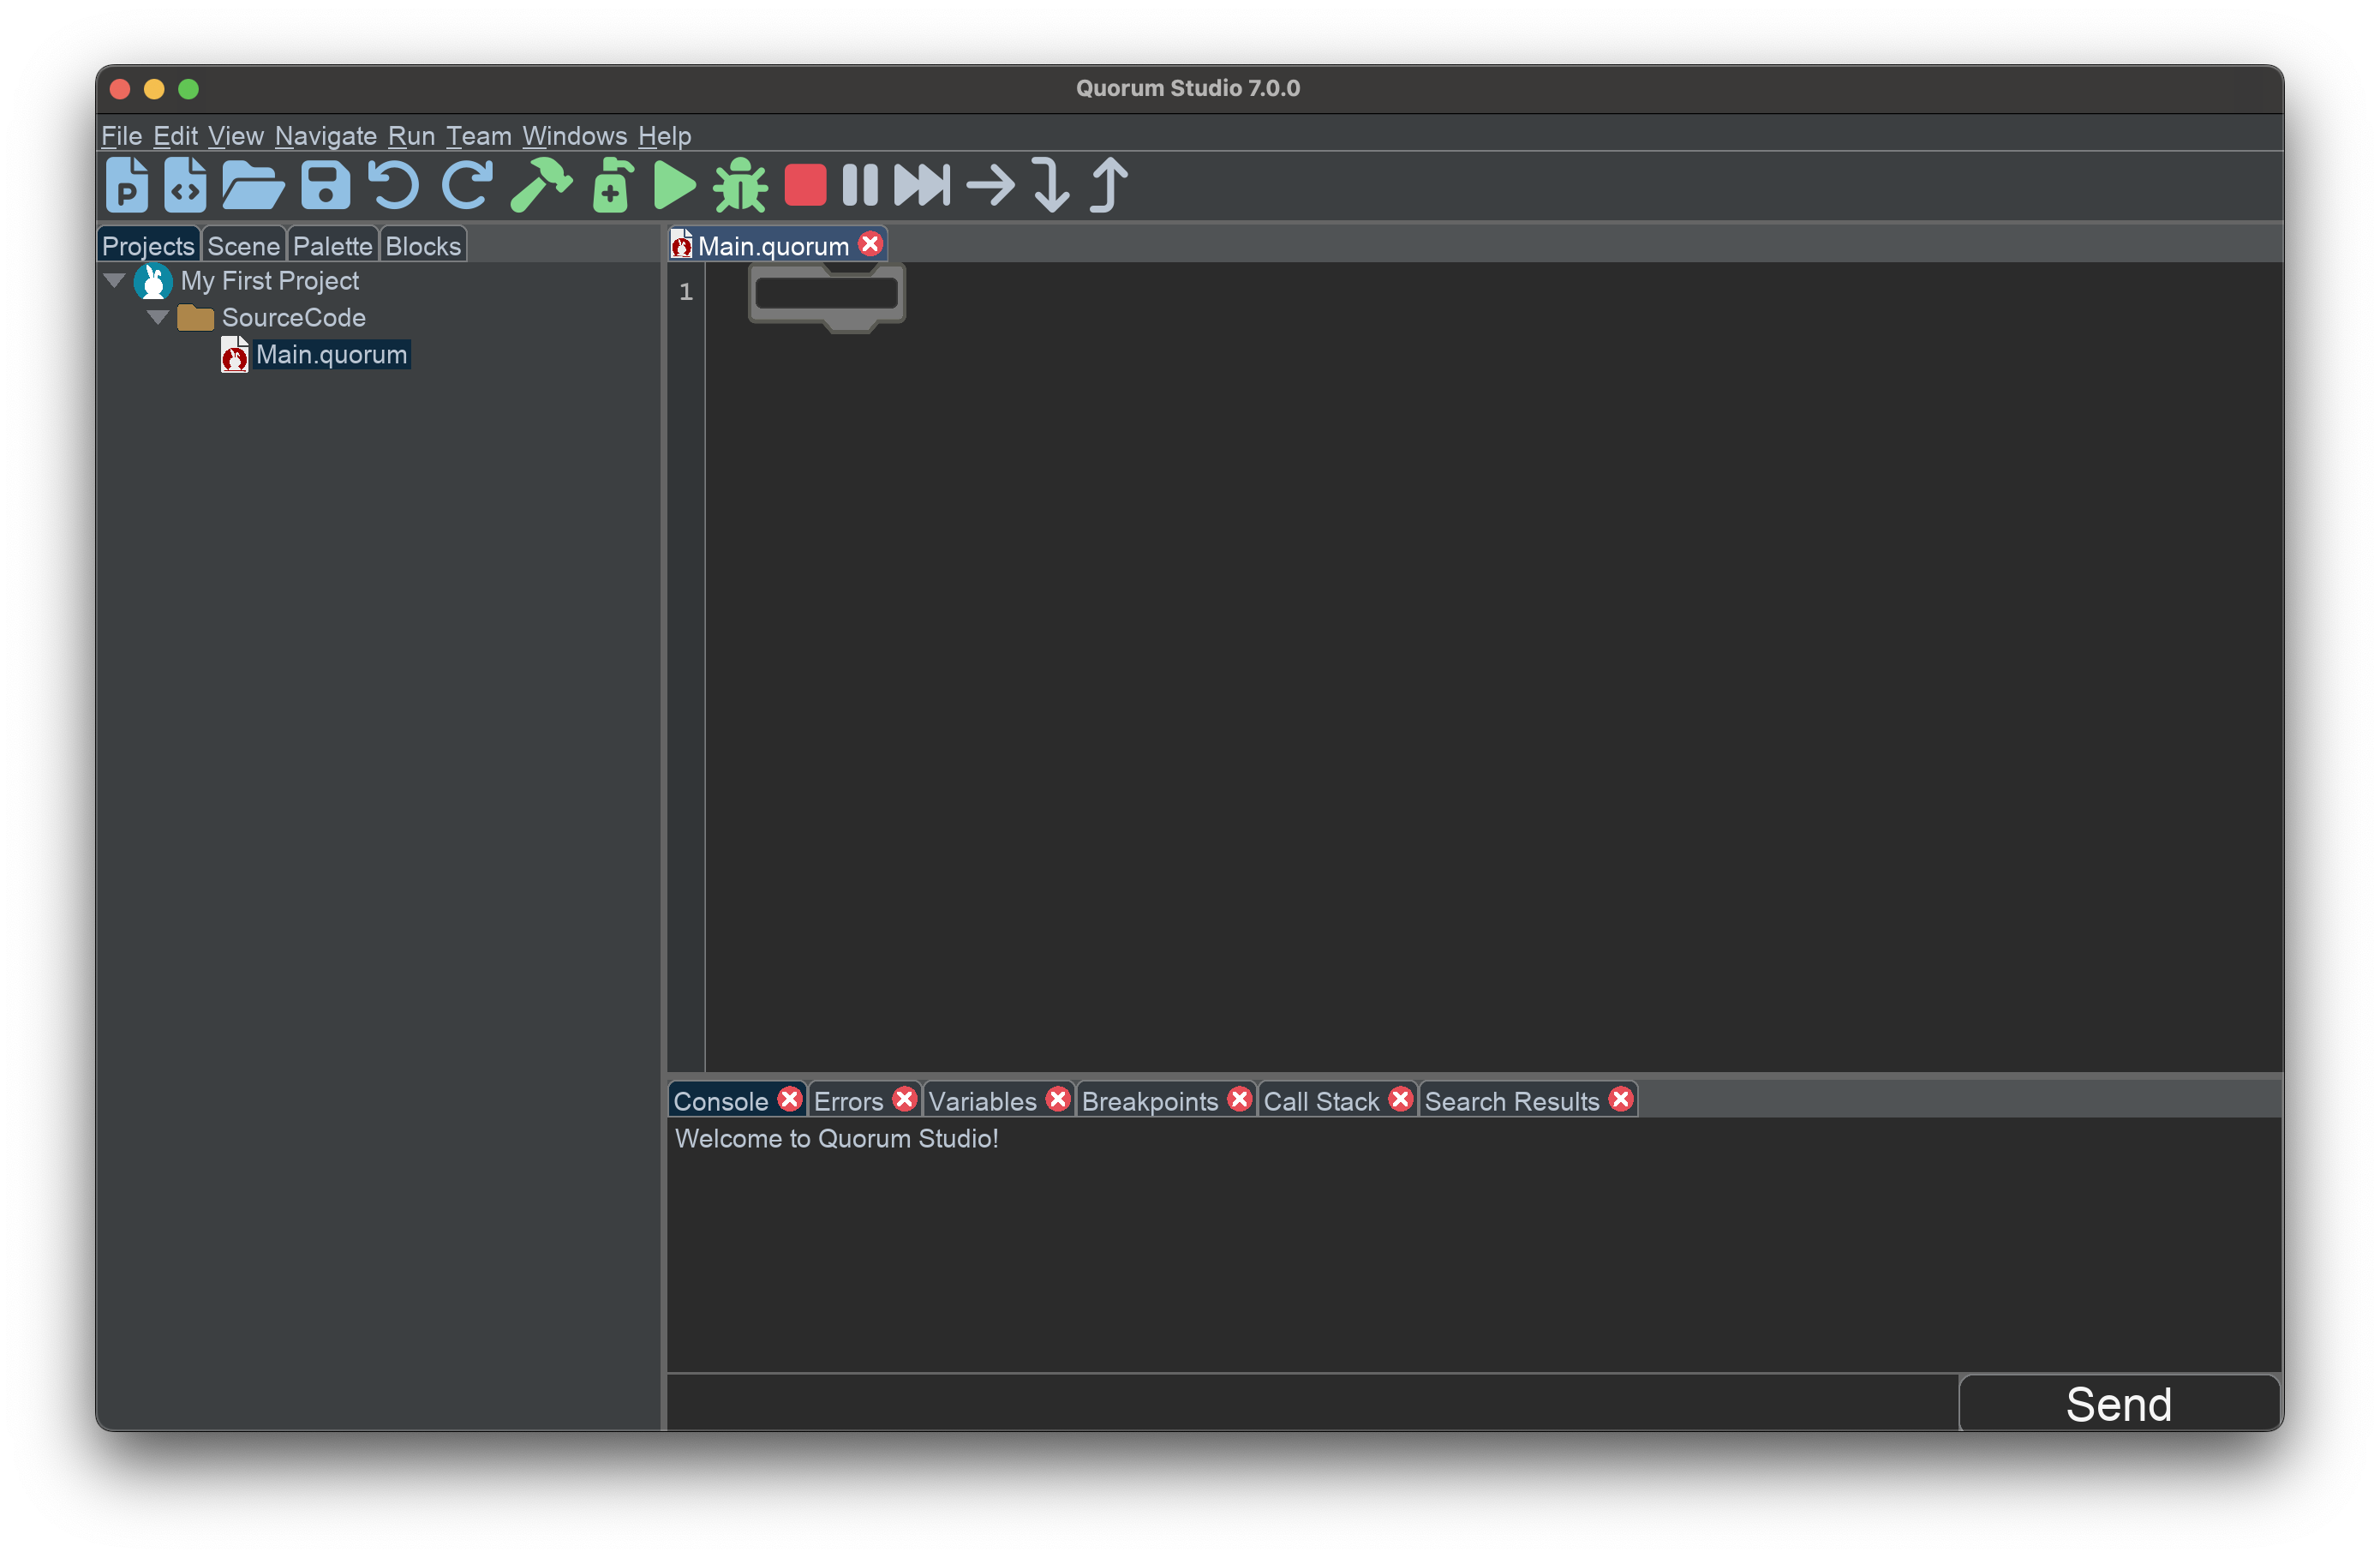
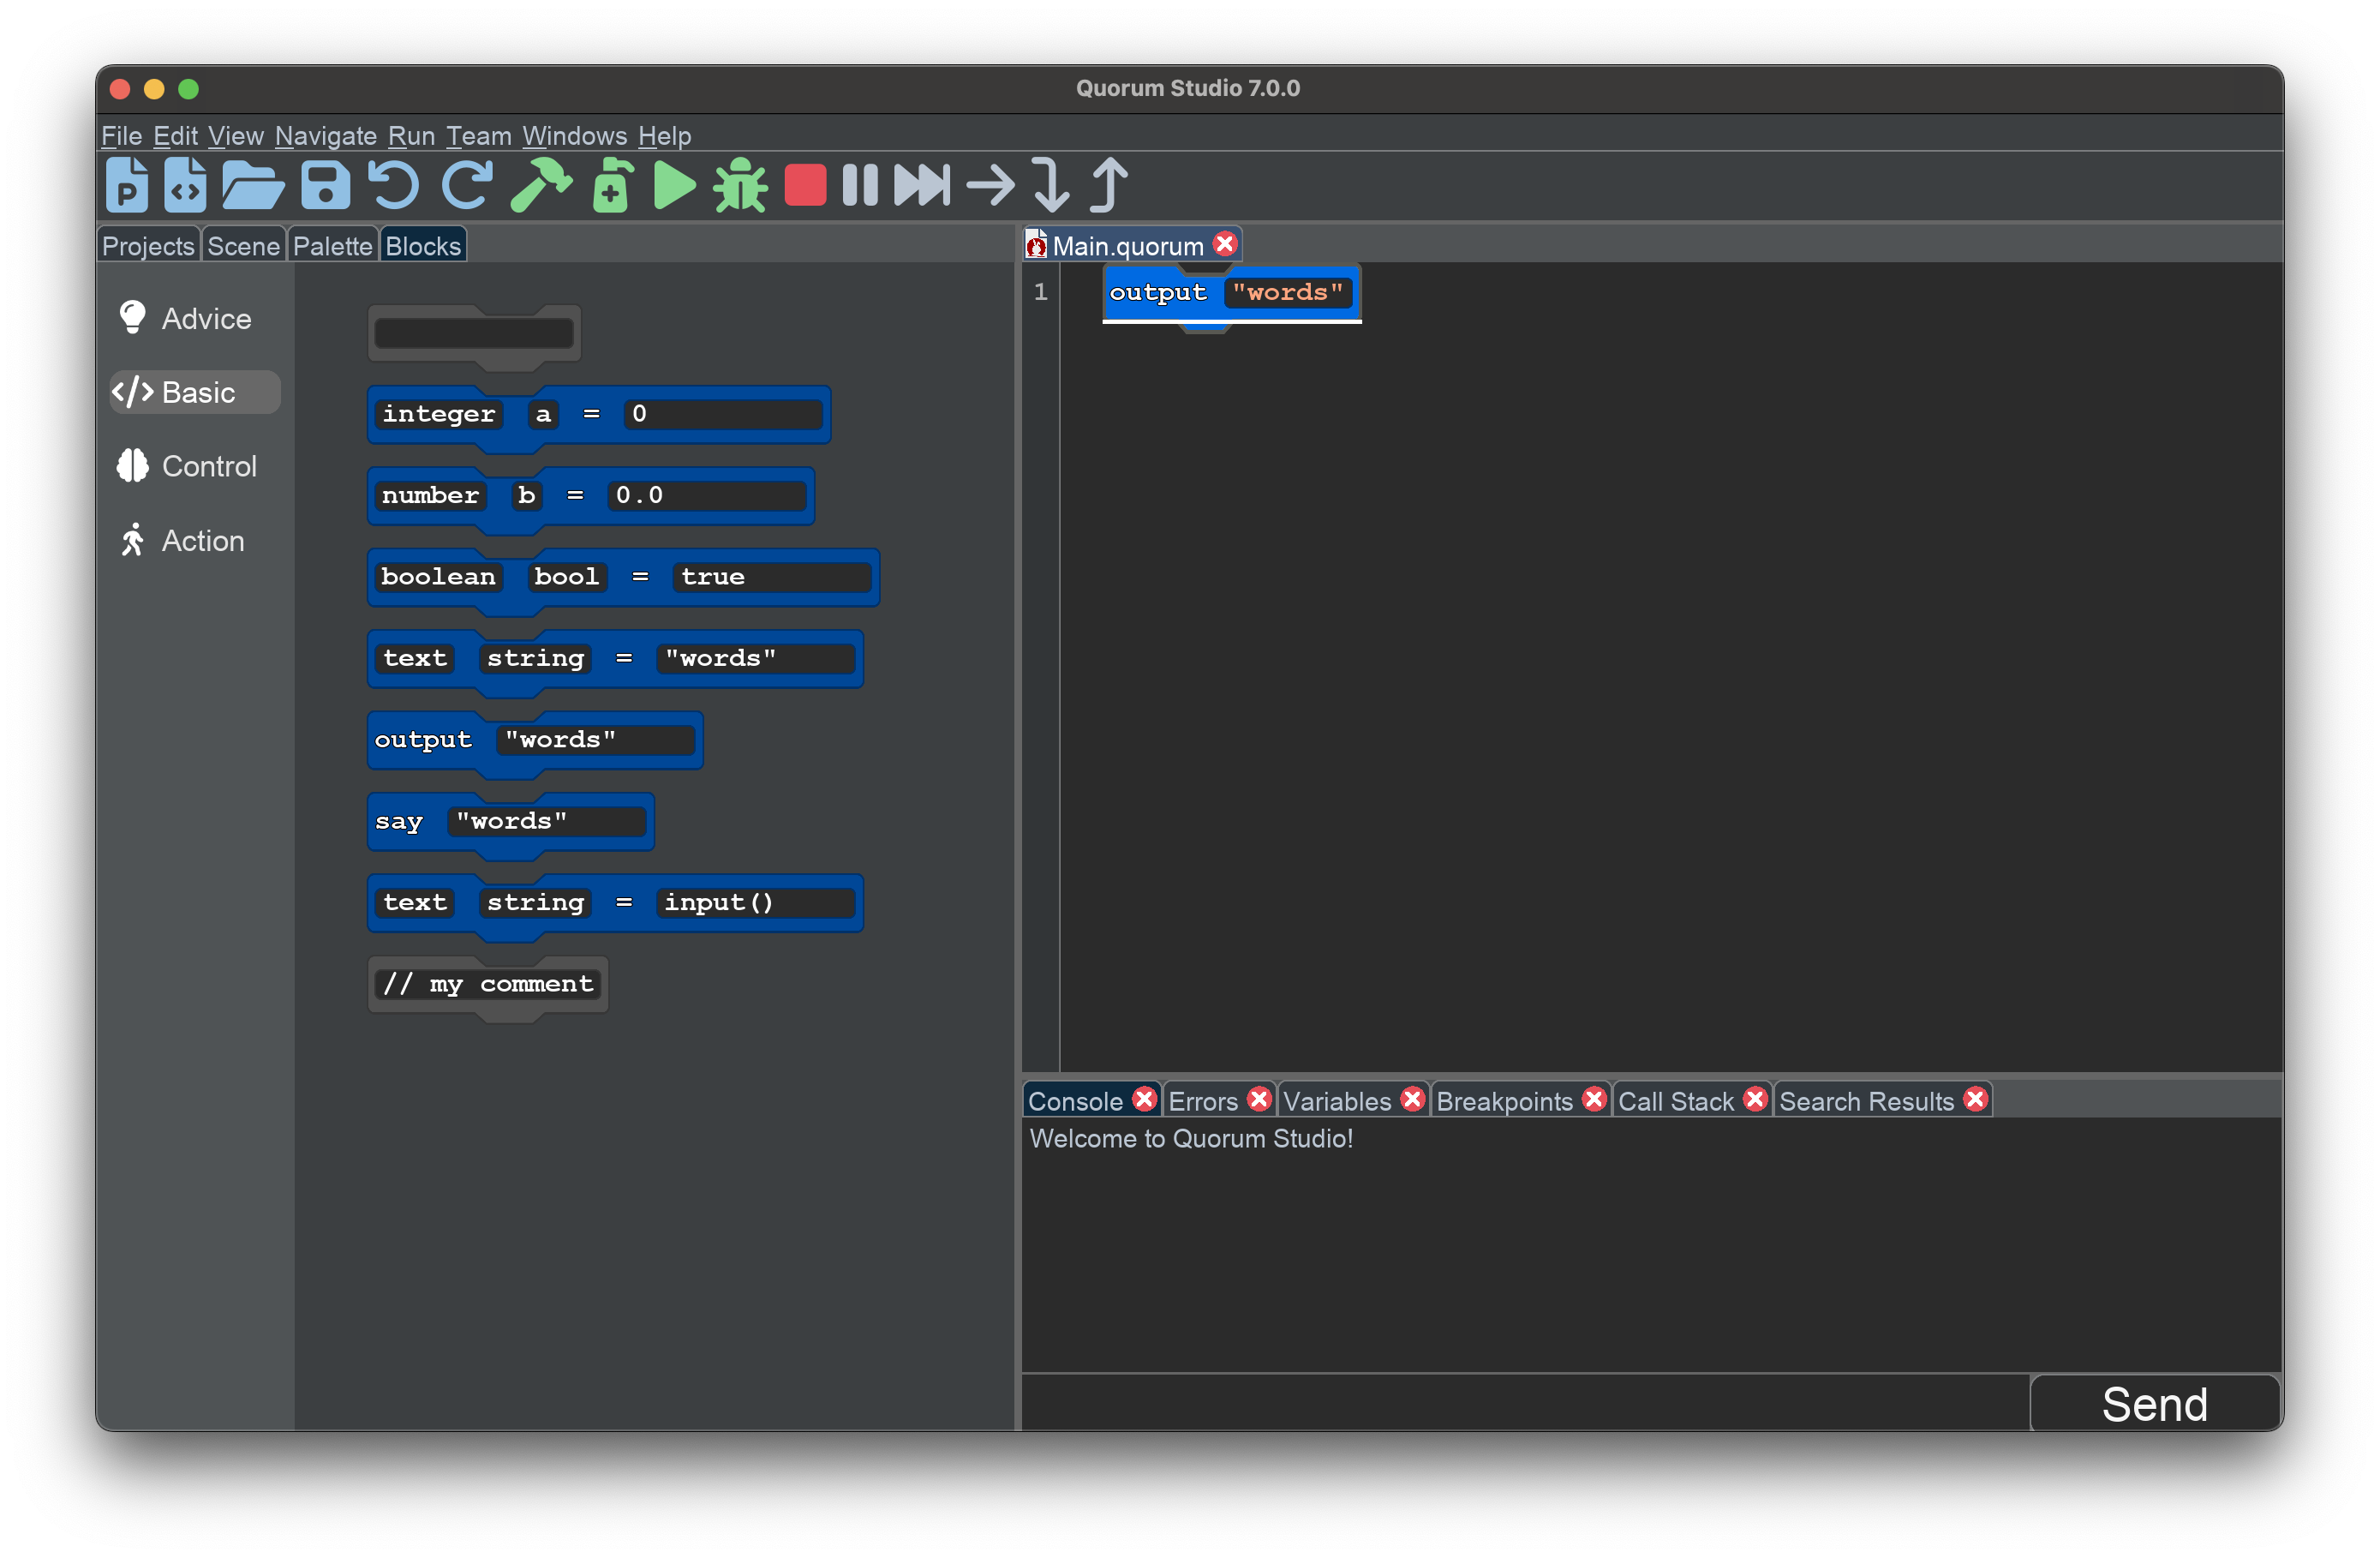
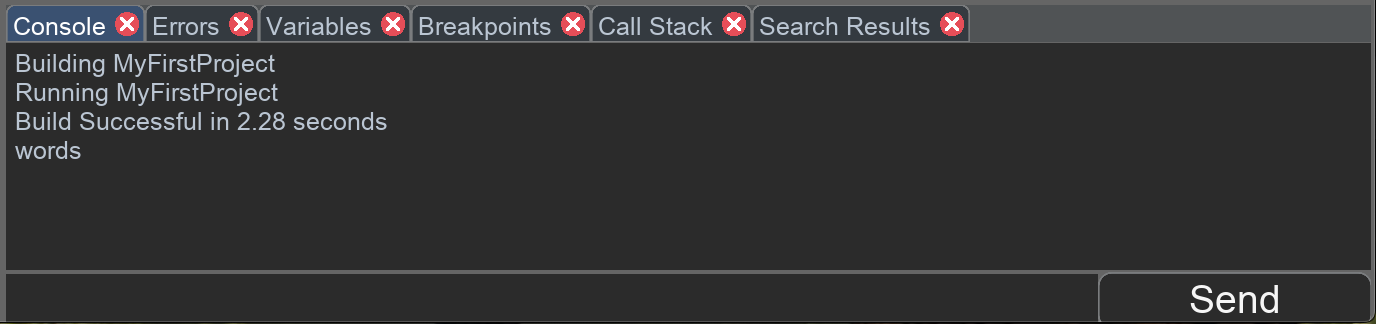
This image shows a project and an empty file. One way to explore adding code is to select the Blocks tab in the Project Pane to show the available blocks. On the left side of the pane, different categories of blocks are available. If you were to select the Basic category, it would show a variety of options. One of the blocks is an output block, which says:
output "words"To put a block in the editor, you can just type this code. Alternatively, if you are using the mouse, you can drag the block from the left side onto the editor on the right side. If you are using the keyboard, you can also navigate to the output block, then press Enter to move it onto the editor, then Enter again to confirm its placement. Either way, the result should look like this:
If you were to run this program, it would execute and put words on the screen. You can run a program by clicking the Play button in the toolbar, selecting Run from the Run menu, or by using the hotkey (COMMAND + R on Mac, CTRL + R on Windows).
If the program successfully runs, the Console should inform you that the project was built and runs, and you should see words appear at the bottom.
Sky Hopper
During these lessons, you will be working with existing projects to create and modify games. The first game is a platformer called SkyHopper. If you followed along in the previous section, feel free to close the project you made previously. You will be using SkyHopper instead.
To get the game, you can download its full source code directly on Github. To do so, go to the SkyHopper page, select the code button and download the zip file. Alternatively, if you are familiar with Git or Github, there are many other ways to download the materials and you can use them as you see fit. For example, Github itself provides tutorials on using the terminal to clone repositories, as well as using Github Desktop to do the same thing. If you are using this tutorial for a course, you may also be provided the source code by your teacher.

Once you have it, you can open the Sky Hopper project. To do this, you can select the Open Project button on the toolbar, select Open Project from the File menu, or use the hotkey (COMMAND + O on Mac, CTRL + O on Windows). This will open a file browser window. Navigate to the SkyHopper folder, open the Project folder, then select the Project.qp file. Opening this file will open the project in Quorum Studio.
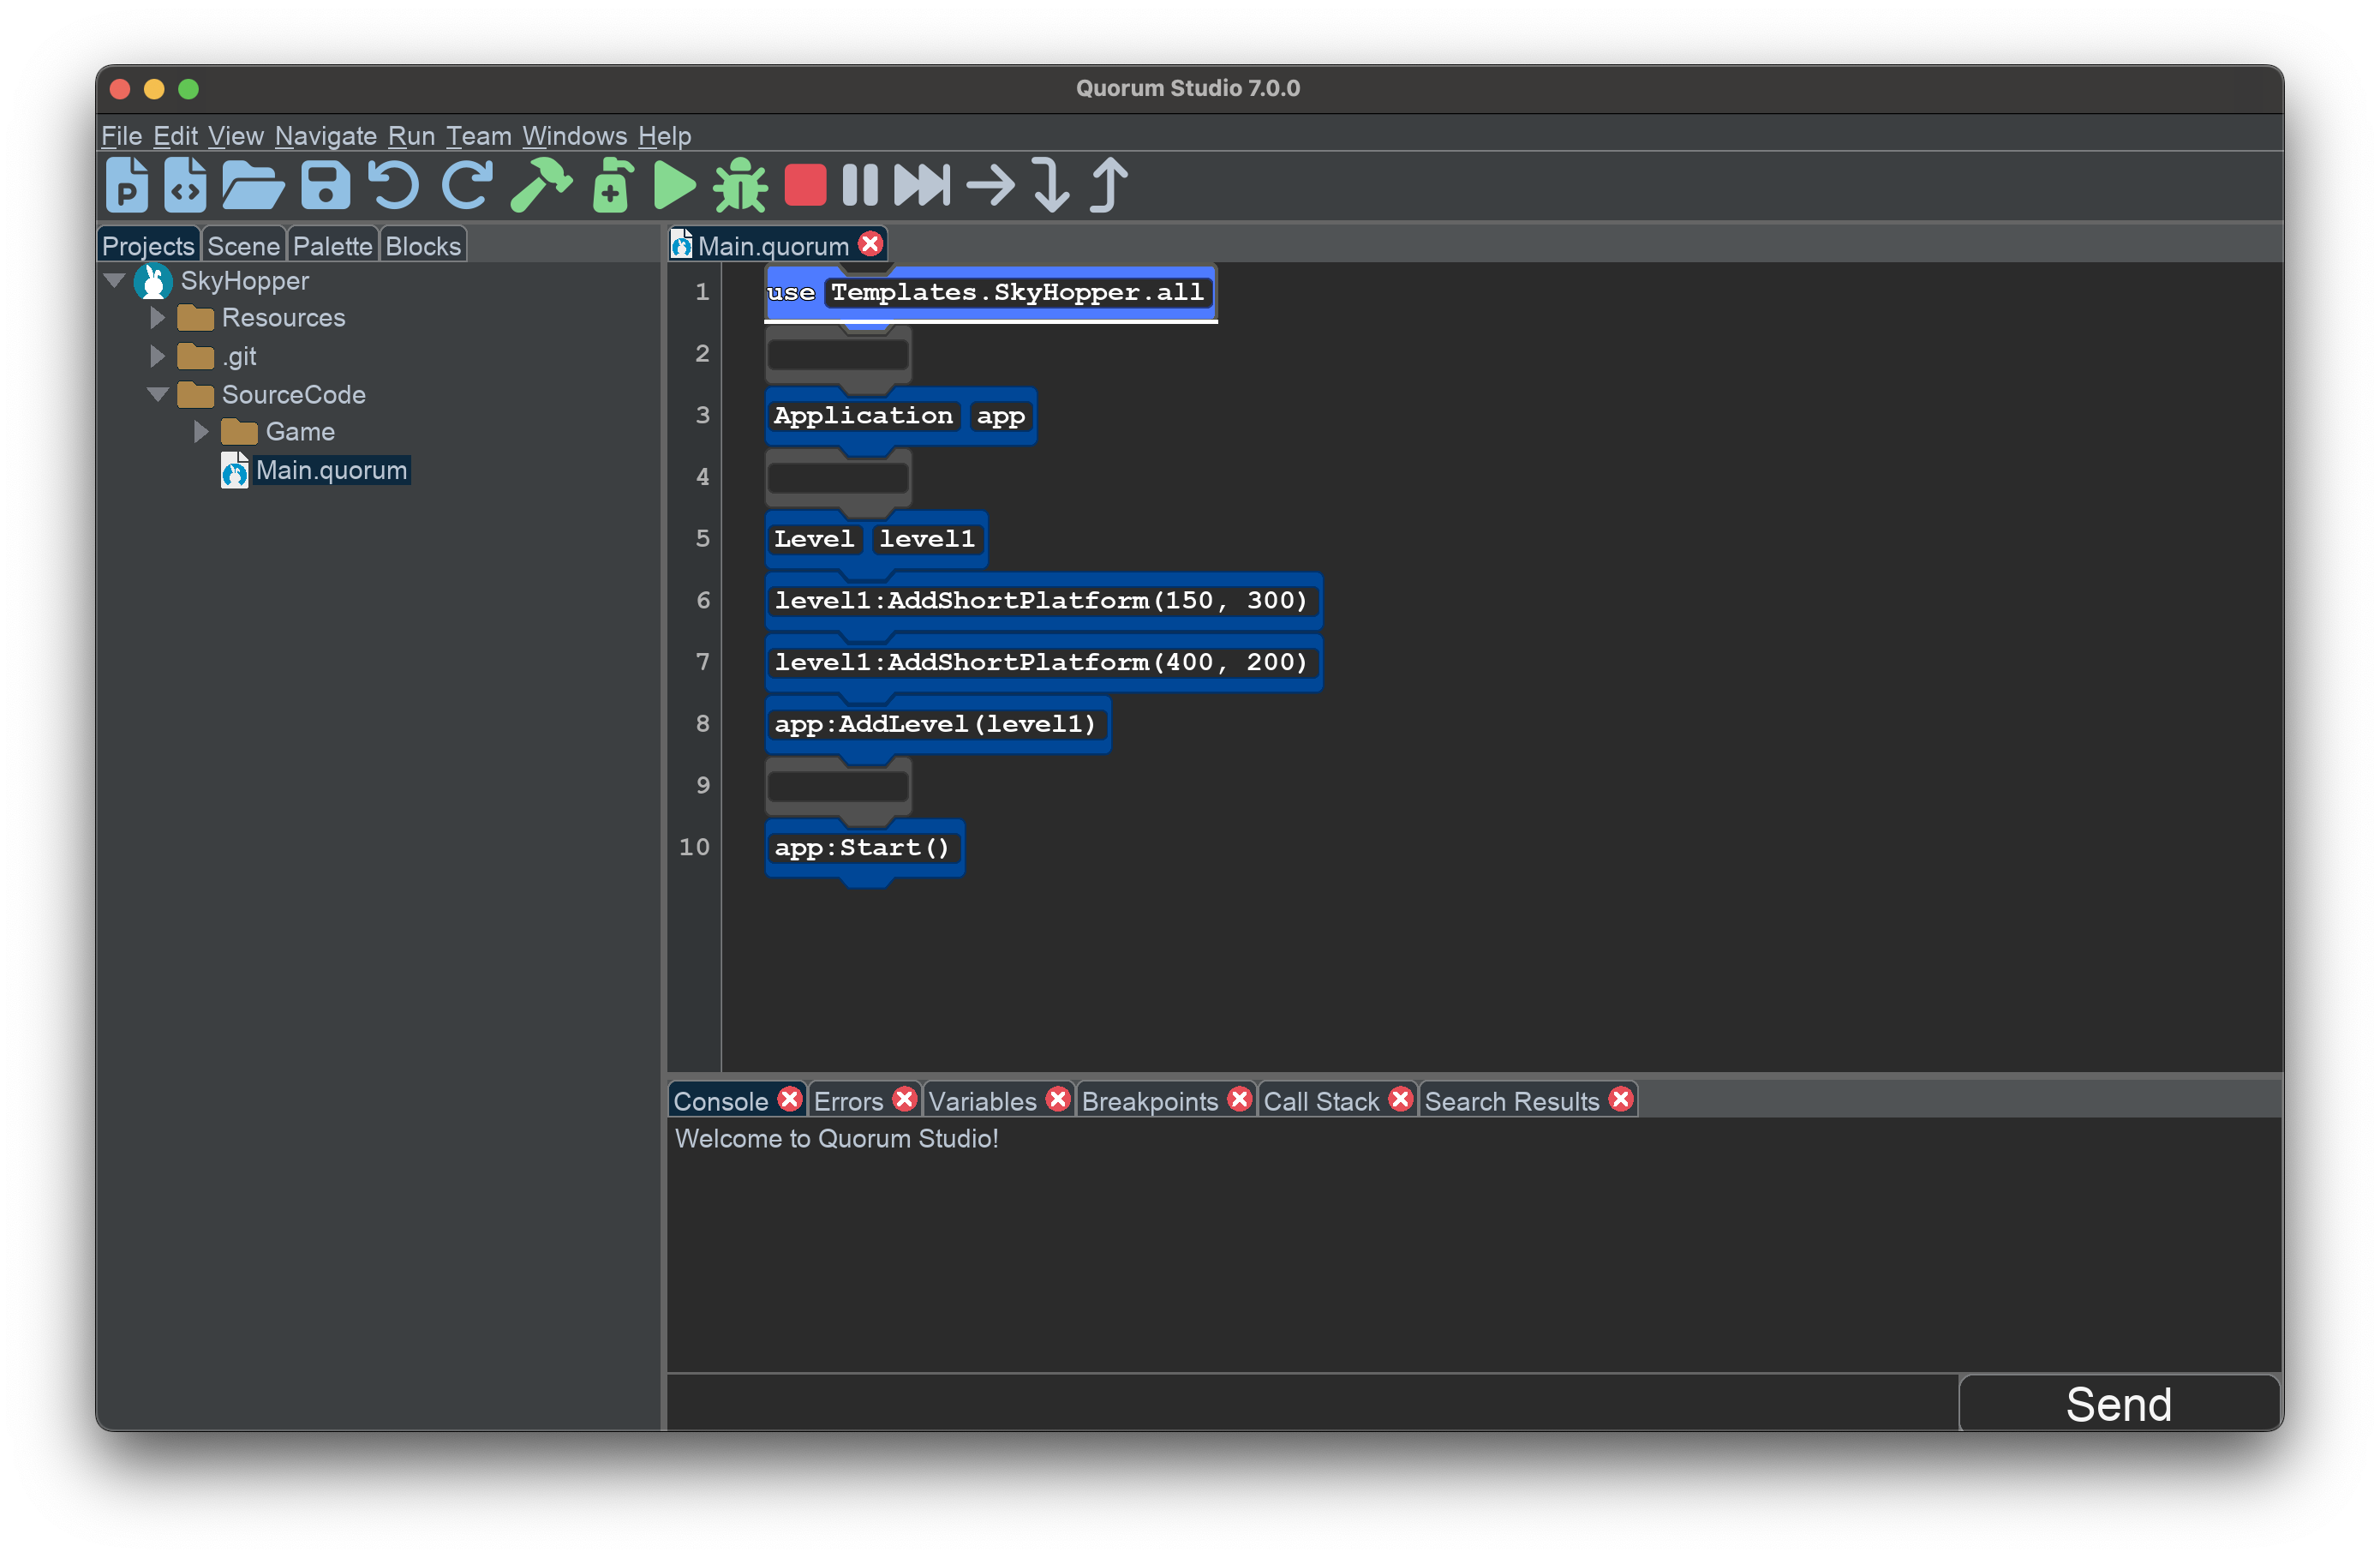
The SkyHopper project should now appear in the Project Pane on the left side. If you expand the project, you will see it has more folders than the project you made previously. For now, the only file you should consider is the Main.quorum file. If you open it, you will a program like this:
Now, if you were to run the project, it would appear as so:
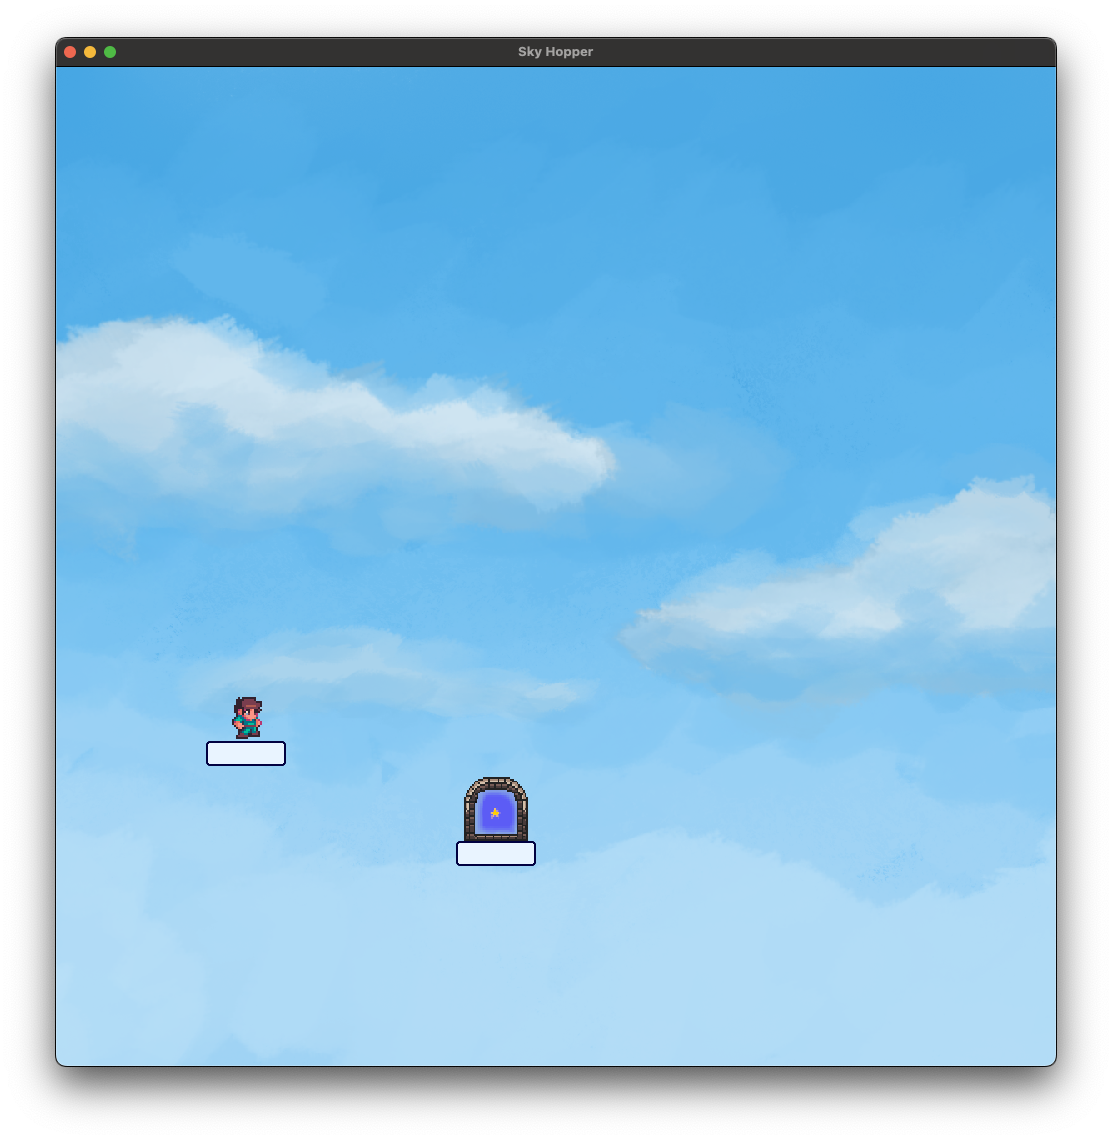
In this image, there is a background, which is blue and has clouds. There are also two platforms, one of which has a person on it and the other a doorway.
Controls
To control the character in the game, you can use the keyboard, as shown in the following table:
| Key | Purpose |
|---|---|
| Left Arrow | Move left |
| Right Arrow | Move right |
| Space | Jump |
| Tab | If a screen reader is on, it will read information about what is on the screen |
The goal is to reach the doorway by moving left or right and jumping. In the default level, this is relatively simple, but over the course of the lessons you will learn new ways to expand levels with extra platforms, obstacles, and tricks.
The Code So Far
Now consider the source code in the file Main.quorum for the game. There are ten lines of code, which appear as so:
use Templates.SkyHopper.all

Application app

Level level1
level1:AddShortPlatform(150, 300)
level1:AddShortPlatform(400, 200)
app:AddLevel(level1)

app:Start()
When run all together, these lines create the game. To understand how, consider what each line does. For now, you can skip the first and second lines of code, as they are less important. Examine the third line of code, Application app. This is what is known as an Object. Objects are kind of like nouns in grammar. They represent something that is capable of doing things. In this case, we are creating an Application, which is the window that our game will appear in.
Objects have a type and a name. Just like you might have a dog named Spot, this program has an Application named app. Good app.
The fifth line of code, Level level1, is similar. It creates a new level for the game and its name is level1. Levels are important because levels contain the platforms and other obstacles that will make the game interesting.
The next two lines of code are known as Actions:
level1:AddShortPlatform(150, 300)
level1:AddShortPlatform(400, 200)
If Objects are like nouns, then Actions are like verbs. Actions are used to make Objects do something. To use an action, the code first states the name of an Object, then a colon, then the name of an action. There are a number of actions available to each Object, which you will discover later. An action always ends with parentheses, which sometimes, but not always, contains extra information like numbers that tell the action what to do.
In this case, these two lines of code add small platforms to the level. The two numbers between the parentheses tell the action where the platform should go on the screen. You will learn what exactly those numbers mean in more detail later.
The eighth line of code is app:AddLevel(level1). This is another action. The name to the left of the colon tells you what Object is taking the action, and the name to the right of the colon tells you what it is doing. This line thus adds the level to the game.
At the very bottom of the program, the last line is app:Start(). This action starts the game. Note that, even though the action does not need any extra information like numbers, it still needs the parentheses.
These are the most important lines of code in the program to understand. The first line that was skipped in the explanation, use Templates.SkyHopper.all, tells the program to use extra code that we have stored elsewhere. This is known as a library. In this case, this line is stating that you want to access SkyHopper.
The second, fourth, and ninth lines of code contain blank blocks. These lines do nothing, but the extra padding can make it easier to read the code, just like adding white space between paragraphs in an essay. Blank blocks can be freely typed inside, so if you prefer to type code rather than using blocks from the tray, you can use blank blocks to write your programs. You can add blank blocks on any line of the editor by using the Enter key, just like adding new lines to a text document.
Engage
In these engage sections, you will work on modifying games in small ways to try and get a sense of both how to play and how to make. The big idea here is that in modern games, you almost never write all of the code yourself. That is done through a game engine. In this case, Quorum is the game engine and Sky Hopper is the game you or your team is working on. For this lesson, you will modify the first level.
Directions
The goal of this lesson is to modify the level in the game and explore how the existing code works. Try these steps:
- By dragging blocks in the editor with the mouse, or by using cut and paste, rearrange the order of the blocks. What changes?
- Try changing the names of the Objects. What happens?
- Modify the numbers between the parentheses in the AddShortPlatform actions. How does changing the numbers change the platforms?
Once you have explored, try adding extra platforms by typing or using copy and paste on the AddShortPlatform actions. You can add as many platforms as you like in making a level. Don’t be afraid to experiment, and don’t be afraid of breaking things. Trying things and finding unexpected results or creating errors is a normal part of computer science. Try to get a sense of how the game works. You will expand the game in the upcoming lessons.
Wrap up
Over the next few lessons, you will be picking one of two games. The first one under discussion is this platformer and the second is a puzzle game. If you were to expand on the platformer, what kind of levels do you think would be fun to invent?
Next Tutorial
In the next tutorial, we will discuss Creating A Platformer with Block Scaffolds, which describes how to create your own platformer with block scaffolds.