Layers in Quorum
This is an optional tutorial on Layers in Quorum.An Introduction to Layers in Quorum
This tutorial will cover items, working with layers, and using 2D and 3D layers together
Items
In Quorum, many of the objects we would add to our games: Drawables, Models, Audio objects, cameras, point lights, etc. inherit from one of two classes: Item2D or Item3D. Drawables and Audio2D objects inherit from Item2D. Models, Audio3D objects, cameras, and point lights inherit from Item3D. Many of the actions in both of these classes are the same, Add() and Remove(), for example, or simply have an additional parameter for the Item3D like SetPosition() and Move().
Recall the Drawing in 2D and the Drawing in 3D tutorials. When we add Drawables to our game, they are, by default, positioned in the bottom corner of our game screen. When we add models however, they are positioned, by default, in the center of the game screen. The reason that these items have different defaults is that they exist on different layers.
Layers
In Quorum and many other drawing applications, one image is made up of multiple layers. Layers tell Quorum the order in which to draw objects on the screen. All of the items in a particular layer will be rendered at the same time. When there are multiple layers, Quorum will draw them back to front. This is how we can draw objects in front of other objects. Each layer in Quorum is either a 2D layer or a 3D layer. We can add as many layers as we choose, and in any order.
Working with Layers
A Quorum game has two default layers, a Layer3D and a Layer2D. By default, each of those is our current layer for objects of that kind (CurrentLayer3D and CurrentLayer2D). The game draws the 3D layer first followed by the 2D layer, so any items on the 3D layer will be behind items on the 2D layer and may be hidden. When we call the action Add() and pass it an item, the layer that the item is added to is determined by whether it inherits from Item2D or from Item3D. For example, Drawables will be added to the 2D layer and Models to the 3D layer.
Each layer has its own camera that can be moved and directed specific to the items on that layer. We can also add more layers to our game, by instantiating the layer, then calling either the AddLayer2D() or the AddLayer3D() actions, and passing the new layer. When we call the Add() action, it will add the item to the appropriate current layer. To change the current layer, we call SetCurrentLayer2D() or SetCurrentLayer3D() and pass the layer.
To change a layer’s camera, we use the layer action SetCamera(). We should be sure that the camera is 2D for a 2D layer or 3D for a 3D layer. To assign a camera on a 3D layer for example, the line of code would be:
layer:SetCamera(camera)Now that we have discussed the basics of layers, let’s try using 2D and 3D layers together.
Combining 2D and 3D Layer
We are going to practice with layers by creating a 3D object and a status bar. When the status bar reaches 0, the object disappears from the screen. We will only need the default layers in order to complete this example.
First, we need to create a new Quorum Game Application. We will need the libraries (use statements) for Drawable, Model, Camera, Color, and Vector3. We also need to instantiate two drawables, one model, two cameras, a color, and an integer that holds the maximum stat for our status bar (600).
This is what our code should look like to start:
use Libraries.Game.Game
use Libraries.Game.Graphics.Camera
use Libraries.Game.Graphics.Drawable
use Libraries.Game.Graphics.Model
use Libraries.Game.Graphics.Color
use Libraries.Compute.Vector3

class Main is Game
    Drawable status_bar
    Drawable status
    Model character
    Color color
    integer stat = 600
    Camera cam3D = undefined
    Camera cam2D = undefined

    action Main
        StartGame()
    end

    action CreateGame
    end

    action Update(number seconds)
    end
end
Now, in the CreateGame action, we need to set up our cameras, Load our status bar and our character, and Add these items to the game. Remember that our status bar will be added to the 2D layer and our character will be added to the 3D layer. This is what our CreateGame action should look like:
action CreateGame
cam3D = GetCamera3D()
cam2D = GetCamera2D()
//our status bar is by default at the bottom left of our screen.
//this moves it to the low center of the game screen
status_bar:LoadRectangle(stat, 50, color:White())
status_bar:SetPosition(100, 50)
Add(status_bar)
//Load full status and add it to the status bar
status:LoadFilledRectangle(stat, 50, color:Green())
status:LoadFilledRectangle(stat, 50, color:Green())
status_bar:Add(status)
//we add our character to the center of our screen
character:LoadBox(3, 3, 3, color:Purple())
Add(character)
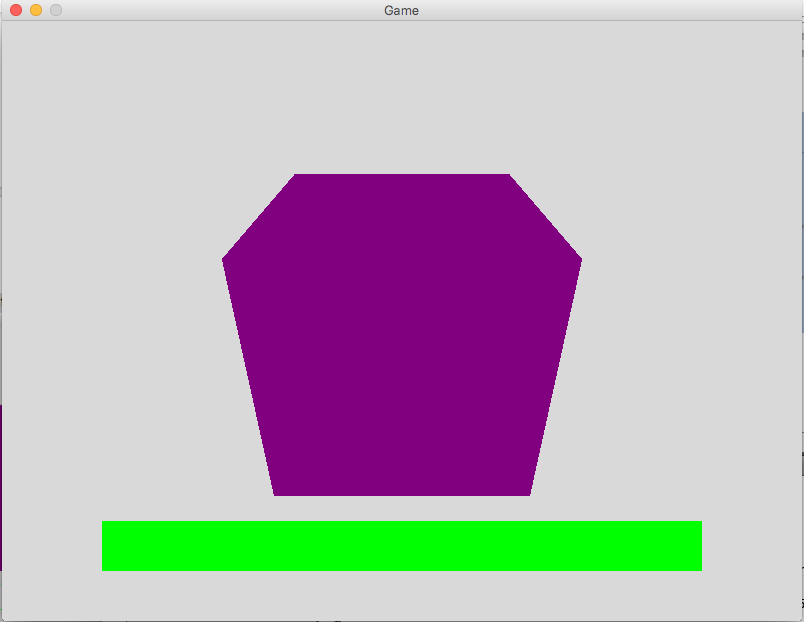
endThe image below is the result of that code.
Now, we will add the rest of our code to the Update action. We are going to decrease stat by 1 each frame and then load our status as a filled rectangle. When our status is below 200, the status will turn red. When the status is 0 our character will be removed from the game.
We will have each camera do something different:
- The 3D camera will rotate around around our character.
- The 2D camera will move so that the status bar goes toward the center of the screen when the status becomes low
Here is what our Update action will look like:
action Update(number seconds)
Vector3 yAxis
yAxis:Set(0, 1, 0)
cam3D:RotateAround(character:GetGlobalPosition(), yAxis, 1)
stat = stat - 1
if stat > 0
if stat < 200
status:LoadFilledRectangle(stat, 50, color:Red())
cam2D:Move(0, -1, 0)
else
status:LoadFilledRectangle(stat, 50, color:Green())
end
else
Remove(character)
end
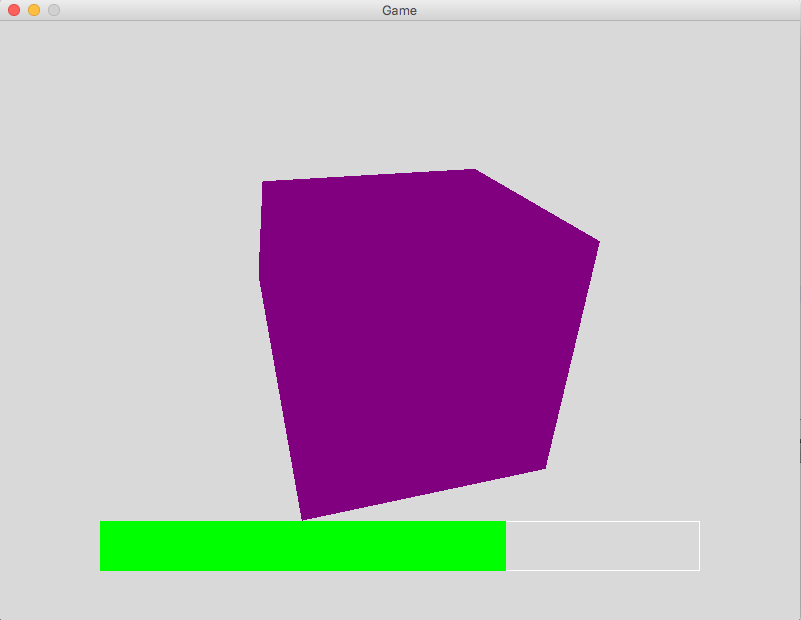
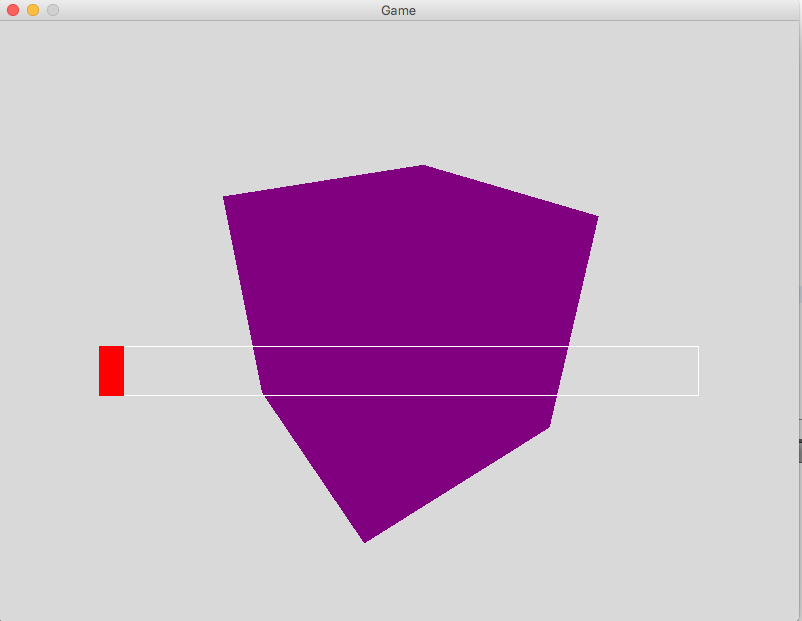
endThe images below capture two different times during our game.
In this tutorial we have learned how to work with layers, and how 2D and 3D layers can work together in a game.
Next Tutorial
In the next tutorial, we will discuss Screen Resolutions, which describes how to change the screen resolution and window size.