Intro to App Design - Lesson 2: Introduction to Interface Design
Overview
Students work through a progression of levels to build an understanding of how to layout an app. The final challenge has students setting up the screen of an app by attempting to copy an image of an app.
Goals
Students will be able to:
- Use meaningful names for element ids
- Set up the User Interface of an app including buttons, text, and images
Purpose
This lesson introduces students to the code used to build apps, as well as the different kinds of screen elements and properties at their disposal. This lesson not only builds up skills in designing a user interface but also sets students up to begin designing an app of their own in the following lesson.
Resources
Getting Started (5 minutes)
Discuss: What is a common app that you use? Take a minute to sketch the User Interface of the main screen. Note how the user interacts with the app.
Teaching Tip
Students who are blind or visually impaired may not be able to sketch a user interface, but they can still engage with the core lesson. Emphasize the question of how users interact with the app. What kind of elements does the user interact with? How do they move between them? Have students describe or list the process of using the app.
Do This: Compare your sketch with a partner and discuss common elements that both of your apps share.
Discussion Goal
This prompt is designed to bring out students' prior experiences working with apps. If students aren't sure what app to choose, you can even ask them to pick a website, such as
Code.org. This discussion can pull out the fact that most apps contain images, buttons, and text that help users find and interact with information and content.
Remarks
- Yesterday we took a look at a few different apps and talked about input and output. We also discussed the User Interface. Today we are going to learn how to build a user interface ourselves.
Activity (30 minutes)
Running the Challenges
For today's activity, students will use a number of apps from the CSP-Widgets Repository. Unlike the previous lesson, this time students will inspect and modify the code of the apps. Each app is a carefully scaffolded challenge that teaches a small portion of the overall tools that will be used later.
For full instructions on downloading and running the apps, including downloading the Quorum Studio environment, see the Getting Started with CSP Widgets help page.
Challenge #1: Review an App
Open a Project: Have students open the "Lesson2_App1" project. In the SourceCode folder, students should open "Main.quorum".
Challenge: This project is one of the apps from the last lesson. This time, we'll explore the code. Spend some time looking around and change some of the properties.
Discuss: After the students have had some time to explore, pull the class back together to discuss their findings. What did they discover? Was there anything they found interesting or wanted to know more about?
Discussion Goals: There's lots of code in the app, and students won't understand all of it yet. When discussing their observations, here's a few things they might notice:
- The app is organized into pages, where different elements are put into different pages.
- Each element has different properties that can be changed depending on the type of element. For example, a label element supports text, icons need to be loaded from images, etc.
- Other properties are available on every element, like SetName or SetPixelX.
Challenge #2: Changing App Properties
Open a Project: Have students open the "Lesson2_App2" project. In the SourceCode folder, students should open "Main.quorum".
Challenge: Read the comments (the grayed out text) in the code starting on line 17. Then follow the instructions to change some of the app's properties.
Challenge #3: Changing Colors
Open a Project: Have students open the "Lesson2_App3" project. In the SourceCode folder, students should open "Main.quorum".
Challenge: Read the directions beginning on line 22 in the code. Then follow the instructions to change the colors of the components in the app.
Challenge #4: Using Custom Assets
Open a Project: Have students open the "Lesson2_App4" project. In the SourceCode folder, students should open "Main.quorum".
Challenge: Read the instructions on line 7. Then, upload a custom image into the app by following the instructions on line 26, or upload a custom sound by following the instructions on line 48.
Challenge #5: Making and Positioning Elements
Open a Project: Have students open the "Lesson2_App5" project. In the SourceCode folder, students should open "Main.quorum".
Challenge: Follow the instructions on line 39 to update the properties of an icon in the app. Then follow the instructions on line 64 to create a brand new icon and set its properties.
Challenge #6: Setting Useful Names and Descriptions
Open a Project: Have students open the "Lesson2_App6" project. In the SourceCode folder, students should open "Main.quorum".
Challenge: Read the instructions on line 25. Then, change the name of each item in the app, and set meaningful descriptions on the icons.
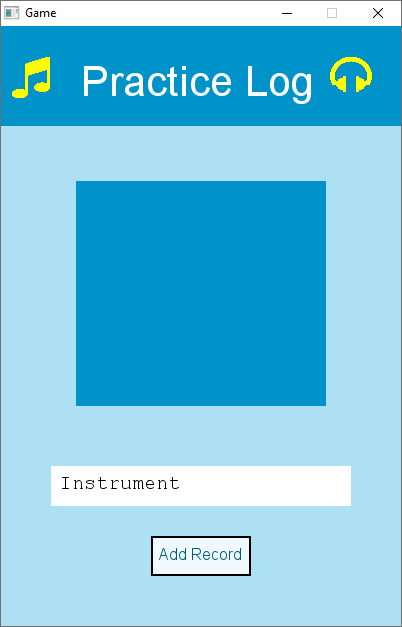
Challenge #7: Putting it Together -- Recreate an App
Open a Project: Have students open the "Lesson2_App7" project. In the SourceCode folder, students should open "Main.quorum".
Challenge: Now that we've spent some time exploring how these apps work, it's time to build one from scratch. Read the instructions starting on line 33. Then, using the comments and everything you've learned so far, create an app that looks like this picture.
Teaching Tip
Looking Back: If students are having trouble putting together the code for this challenge, encourage them to reference the code in the previous challenges. Understanding how to copy and modify existing code is a useful tool for students and professionals alike!
Teaching Accessibly: For blind students, rather than using the picture to recreate the app, you can have them build off of the "feature list" on line 45 of the app template. Alternatively, you can have all of the students work from the feature list without seeing the picture -- students' apps will look different when they're done, which can make for an interesting point of discussion later.
Wrap up (10 Minutes)
Discuss: Have students answer the following:
- What elements collect input?
- What elements display output?
- Do you think there are elements that can do both?
Assessment: Check for Understanding
For Students
Open a word doc or google doc and copy/paste the following question.
Question
Why is it important for element IDs to have meaningful names?
Standards Alignment
- CSTA K-12 Computer Science Standards (2017): 3A-AP-16
Next Tutorial
In the next tutorial, we will discuss Code.Org Unit3 Lesson 3, which describes Begin designing your own app.