Drawing in 3D with Quorum
This tutorial tells you how to draw 3D objects on the screen in QuorumDrawing in 3D
This tutorial will cover 1) loading primitive shapes, 2) basic camera setup, and 3) basic lighting. These topics will help the reader learn to load basic 3D shapes and view and light a 3D scene in the Quorum Game Engine. You can download this program template which contains the image we will use. You may also use the IDE below.
Quorum's 3D Coordinate System
Before we begin to draw 3D objects in Quorum, we have to understand the 3D space in which our objects will live. 3D objects are called 3D because they have three dimensions. A 2D object has width and height and a 3D object adds depth. In 2D animation, the position and size of an object on the screen can be explained using two measurements: one horizontal across the center of the screen (the x-axis) and one vertical across the center of the screen (the y-axis). When we add a third measurement for 3D, it runs from the user through the screen, getting farther away (we call this the z-axis). All 3D modeling is based on these three axes, but different programs use them differently.
In general, there is a right-hand coordinate system and a left-hand coordinate system. In both systems, the y-axis is positive in the up direction and the x-axis is positive to the right. The difference between the two is the z-axis. In the left-handed system, the z-axis is positive away from the user. In the right-handed system, the z-axis is positive toward the user. Quorum uses the left-handed coordinate system. This is important because if we want an object to move closer or farther away, we need to know if we should increase or decrease the z coordinate. Below is an image that represents the left-handed coordinate system using a computer monitor.

Loading Primitives
3D Drawing is very similar to 2D drawing. The template you downloaded or any new game application will already have the use statement for the game library. Now, just like we need to tell Quorum where to find the code to create a 2D image (a Drawable), in order to draw a 3D shape (or a Model in Quorum), we need to add the use statement:
use Libraries.Game.Graphics.ModelThis tells the compiler where to find the commands for the standard library Model class. We will also use the Speech library in order to give our box a description.
use Libraries.Sound.SpeechThen, we need to instantiate (or create and name) our model and our speech object:
class Main is Game
    //Create a Model object
    Model model
    //Create a Speech object
    Speech speech

    action Main
        StartGame()
    end

    action CreateGame
    end

    action Update(number seconds)
    end
end
Quorum has some primitive 3D shapes that are ready to be used: a box or a cylinder for example. Let’s start by loading a box. We could have a box that is one solid color, but in order to add a file to texture the outside of our box, download the Logo.png file and let’s put that in our project directory. In the template, it is provided in the media folder.
Inside the CreateGame action we will use the code below to load a box and set its description:
In order to make Quorum read the description of our box when the space key is pressed, we can use input polling (For more information on handling input see the Events tutorial). This can be done with just a few extra lines of code. First, we need two use statements:
use Libraries.Game.InputMonitor
use Libraries.Interface.Events.KeyboardEvent
Then we need an object to monitor the input of the game (e.g., keystrokes). We can do that like this:
//Create an InputMonitor object
InputMonitor monitor
//Create a KeyboardEvent object
KeyboardEvent keys
Finally, we need to add code into our update loop to check when the space bar is pressed. We do that like this:
action Update(number seconds)
    //This code uses input polling to see if the space key is pressed.
    //When the space key is pressed, Quorum reads our box's description.
    if monitor:IsKeyPressed(keys:SPACE)
        speech:Say(model:GetDescription())
    end
end
And this is what our game code should look like altogether:
use Libraries.Game.Game
use Libraries.Game.Graphics.Model
use Libraries.Sound.Speech
use Libraries.Game.InputMonitor
use Libraries.Interface.Events.KeyboardEvent
class Main is Game
//Create a Model object
Model model
//Create a Speech object
Speech speech
//Create an InputMonitor object
InputMonitor monitor
//Create a KeyboardEvent object
KeyboardEvent keys
action Main
StartGame()
end
action CreateGame
//We load a box by giving the action LoadBox 4 parameters: width,
//height, depth and a color or texture)
model:LoadBox(1.5, 1.5, 1.5, "media/Logo.png")
model:SetDescription("This is a box which has the image of a rabbit wearing glasses on each side.")
//Tell Quorum to add our box to the game
Add(model)
end
action Update(number seconds)
//This code uses input polling to see if the space key is pressed.
//When the space key is pressed, Quorum reads our box's description.
if monitor:IsKeyPressed(keys:SPACE)
speech:Say(model:GetDescription())
end
end
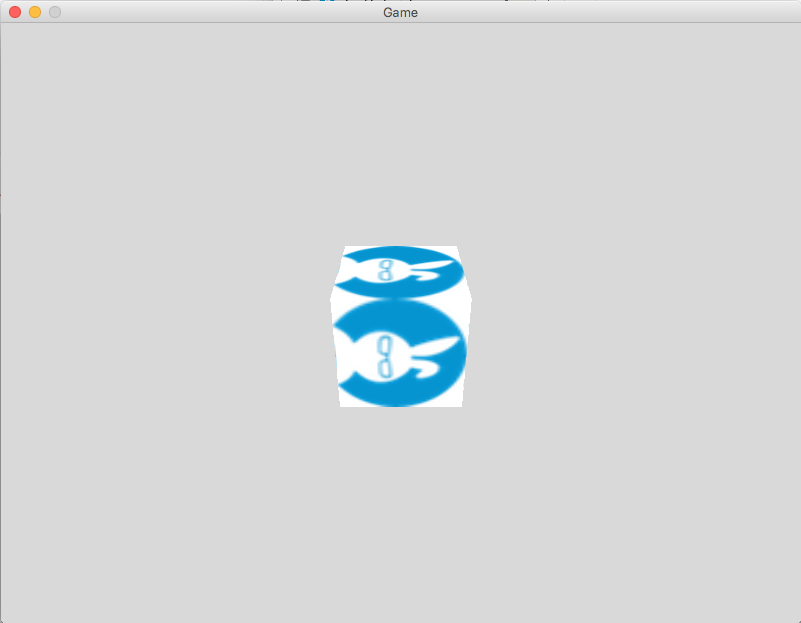
endNow Quorum will read the description of our box when the space key is pressed. If we run this program just like that, the rendered box is pretty boring:
There are two important aspects of a 3D scene that we have not set up yet: the camera and lighting.
//We load a box by giving the action LoadBox 4 parameters: width,
//height, depth and a color or texture)
model:LoadBox(1.5, 1.5, 1.5, "media/Logo.png")
model:SetDescription("This is a box which has the image of a rabbit wearing glasses on each side")
//Tell Quorum to add our box to the game
Add(model)
Basic Camera
Our scene has a default perspective, but we can move the camera in order to see our box from another angle. First add this use statement for the Camera object:
use Libraries.Game.Graphics.CameraThen, in the CreateGame action, we can set up our camera like this:
//We create a camera object and then we give it a position and
//a point to look at using (x, y, z) coordinates.
Camera camera = GetCamera3D()
//This moves our camera up and to the right of our box
camera:SetPosition(2, 2.5, 4)
//This tells our camera to look at the center of the 3D scene
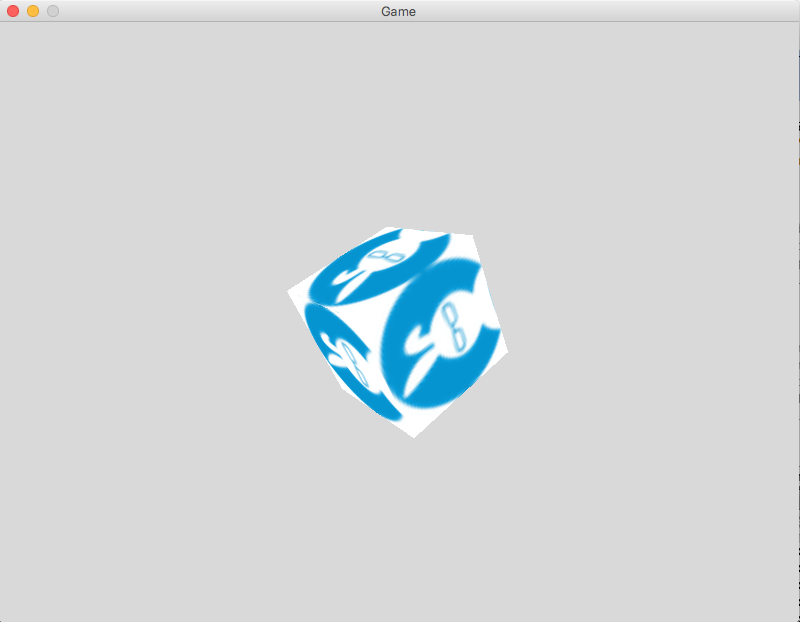
camera:LookAt(0, 0, 0)Now we have a completely different perspective on our box:
Basic Lighting
Our final step that will make our box even better is adding lighting to our scene. Quorum has a few different kinds of light we could add, but for our box we will use directional and ambient lighting. Neither of these types of lighting has a specific origin point. Directional lighting comes from a certain direction and ambient lighting is the light that is present in a scene without a specific source. We can add some directional light coming from the right, and some ambient light to our scene, but we first have to add these use statements so that Quorum can find the lighting code:
use Libraries.Game.Graphics.AmbientLight
use Libraries.Game.Graphics.DirectionalLight
Then in our createGame action we will add the code to create the lights (and let’s not forget to update our box description). Here is what our code will look like altogether now:
use Libraries.Game.Game
use Libraries.Game.Graphics.Model
use Libraries.Game.Graphics.Camera
use Libraries.Game.Graphics.AmbientLight
use Libraries.Game.Graphics.DirectionalLight
use Libraries.Game.InputMonitor
use Libraries.Interface.Events.KeyboardEvent
use Libraries.Sound.Speech
class Main is Game
Model model
Speech speech
InputMonitor monitor
KeyboardEvent keys
action Main
StartGame()
end
action CreateGame
Camera camera = GetCamera3D()
camera:SetPosition(2, 2.5, 4)
camera:LookAt(0, 0, 0)
model:LoadBox(1.5, 1.5, 1.5, "media/Logo.png")
model:SetDescription("This is a 3D box with the image of a rabbit wearing
glasses on each side. The bottom of the box is shaded.")
Add(model)
//This code adds a directional light from a direction using (x, y, z)
//coordinates and gives it a color using a RGBA value
DirectionalLight light
light:SetDirection(1, -4, -3)
light:SetColor(0.8, 0.8, 0.8, 1)
Add(light)
//This code gives the scene ambient lighting which has no source or direction
AmbientLight ambient
ambient:SetColor(0.4, 0.4, 0.4, 1)
SetAmbientLight(ambient)
end
action Update(number seconds)
if monitor:IsKeyPressed(keys:SPACE)
speech:Say(model:GetDescription())
end
end
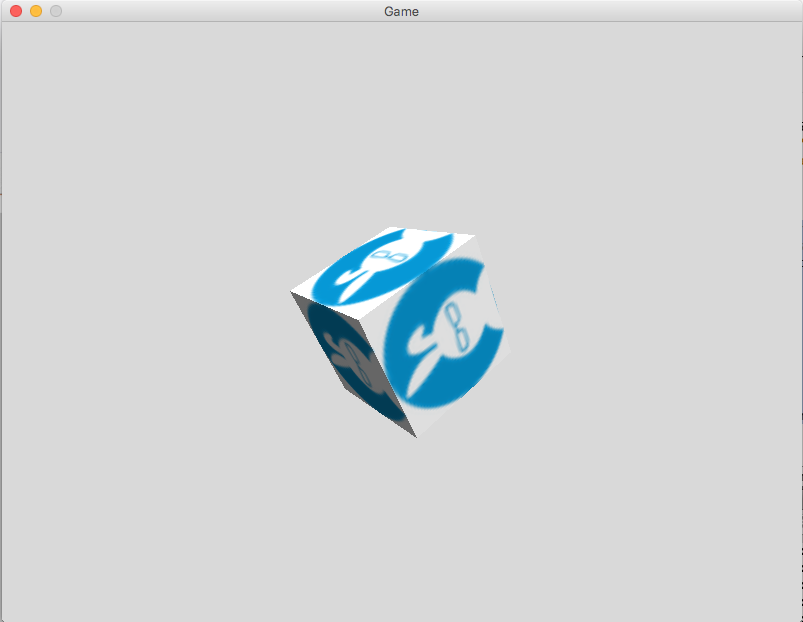
end When we run this code we can see how important lighting is to 3D animation:
Now we can load primitive shapes and setup basic cameras and lighting!
Next Tutorial
In the next tutorial, we will discuss 3D Animation, which describes how to use animation in 3D.