Using Image Sheets in Quorum
This tutorial tells you how to create and draw image sheets.Image Sheets
In computer graphics, the computer can sometimes render (put on the screen) images faster by using what are often called Texture atlases. We call them ImageSheets in Quorum. ImageSheets allow OpenGL to reduce the amount of loading that it has to do (which can be a very expensive process that must be done on each frame). In this tutorial, we will not get into the details of when to use, or not use ImageSheets, as this is a complicated discussion related to graphics hardware. We will say, however, for the types of 2D games Quorum's engine currently supports, using ImageSheets can often speed up a program. Many aspects of Quorum use image sheets behind the scenes (e.g., fonts). This tutorial require Quorum Studio.
To make an ImageSheet, let's first add a second image to our game application in Quorum Studio. This one is also creative commons and works for this example:

To make an ImageSheet, we need to open the properties for our application, which can be done by opening the context menu (right click on the project or navigate to the projects window (CTRL+1), select the project, hit the context menu button), then select "properties". From there, we navigate using the keyboard or mouse to the Games window on the left pane, which looks like this:
On the left pane of this window, there are two categories of options, Project Information and Games. If Games is selected, the right hand side contains information that tells Quorum to automatically generate ImageSheets. There are several options, which are listed below:
- Enable ImageSheet Support: If this option is disabled, Quorum will not store any settings related to ImageSheets.
- Rebuild on Compile: If this option is selected, Quorum will rebuild ImageSheets whenever a program is compiled. This is not necessary, but can be handy if the images are being changed regularly by artists.
- Build Path: This option lets us change where the ImageSheets will be generated.
- Image Sheets: This is a list we create of what ImageSheets should be generated by the system.
- Images: This is a list of images that will be put inside of a particular ImageSheet.
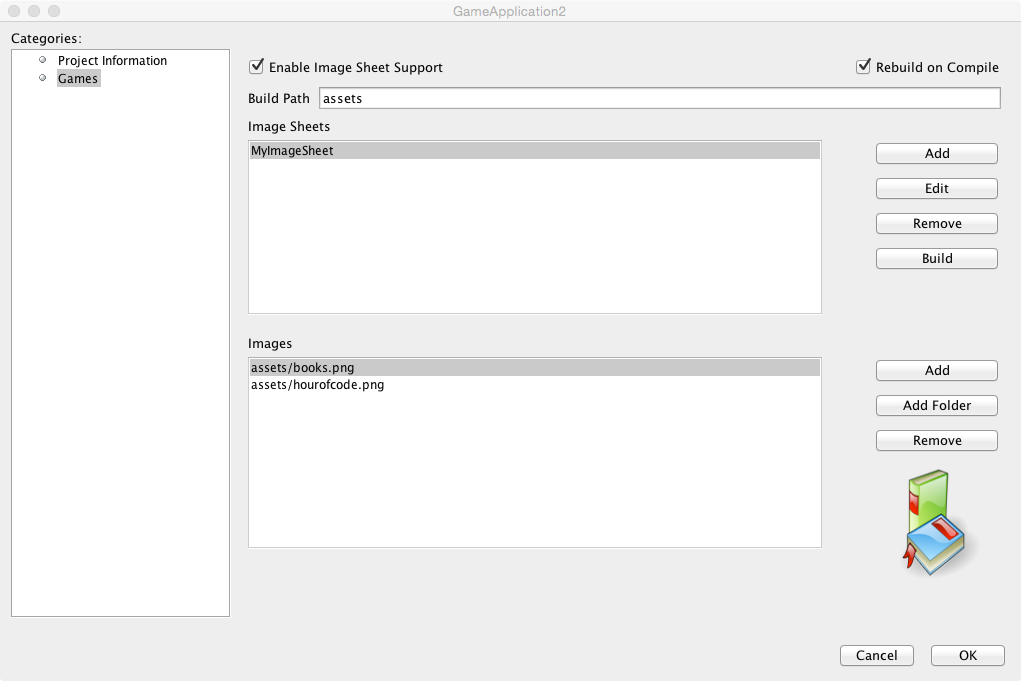
For our example, we will fill out our ImageSheet to include both the books image and the hour of code image. Our window will have a build path of "assets" (although it can be anything we want), with one ImageSheet, which we will call "MyImageSheet", and two files in that sheet. Our window appears like this:
Once the ImageSheet generator is enabled, Quorum will create them on each build (each time we hit Run) if that option was selected. When this is done, Quorum creates two files, MyImageSheet.png and MyImageSheet.atlas. First, MyImageSheet.png combines both images onto one (or several if they will not fit on one) image that looks like this:

Besides the image, a second file is also generated, called an atlas file. This file is generated by the excellent tool LibGDX. Normally, we do not need to interact with this file directly, but the engine needs to know about it. In other words, barring a user has specialized needs for a particular application, we can ignore the contents of this file. The file is needed in order to let Quorum know where each sub-image is in the larger ImageSheet. For reference, here is what the file looks like in this example:
MyImageSheet.png
size: 512,256
format: RGBA8888
filter: Nearest,Nearest
repeat: none
books
  rotate: false
  xy: 2, 32
  size: 200, 130
  orig: 200, 130
  offset: 0, 0
  index: -1
hourofcode
  rotate: false
  xy: 204, 2
  size: 160, 160
  orig: 160, 160
  offset: 0, 0
  index: -1
Once our ImageSheets are generated, we can then use them in a program, similarly to how we used Drawable's before. First, we add a use statement for ImageSheets:
use Libraries.Game.Graphics.ImageSheetNext, where we create our Drawables (books and bunny), we also create an ImageSheet from which we will extract the Drawables.
class Main is Game
    Drawable books
    Drawable bunny
    ImageSheet sheet
Then in the CreateGame action, we load the files from the ImageSheet into the Drawables and Add them to the game:
action CreateGame
    sheet:Load("assets/MyImageSheet.atlas")
    books = sheet:GetDrawable("books")
    bunny = sheet:GetDrawable("hourofcode")
    Add(books)
    Add(bunny)
end
In this example, these images will draw over each other because we have not changed their position, but you can see how we can now load multiple Drawable objects onto the screen. We explain how to position objects in the next tutorial.
Here's what our final code looks like for loading two images from an ImageSheet and displaying them on the screen:
use Libraries.Game.Game
use Libraries.Game.Graphics.Drawable
use Libraries.Game.Graphics.ImageSheet
class Main is Game
//store a placeholder in memory for books and the bunny
//by saying these are undefined, we are telling Quorum not to make the objects
//the reason we do that is because the ImageSheet will make the objects for us
Drawable books = undefined
Drawable bunny = undefined
//create an ImageSheet object we can use in our create game action.
ImageSheet sheet
action Main
StartGame()
end
action CreateGame
//this loads the atlas file into the ImageSheet. Importantly, we load
//the .atlas, not the .png. The reason is because our atlas generator may
//generate multiple images, which means the system should load them all.
sheet:Load("assets/MyImageSheet.atlas")
//load the two Drawables from the ImageSheet.
books = sheet:GetDrawable("books")
bunny = sheet:GetDrawable("hourofcode")
//add the Drawables to the game.
Add(books)
Add(bunny)
end
action Update(number seconds)
end
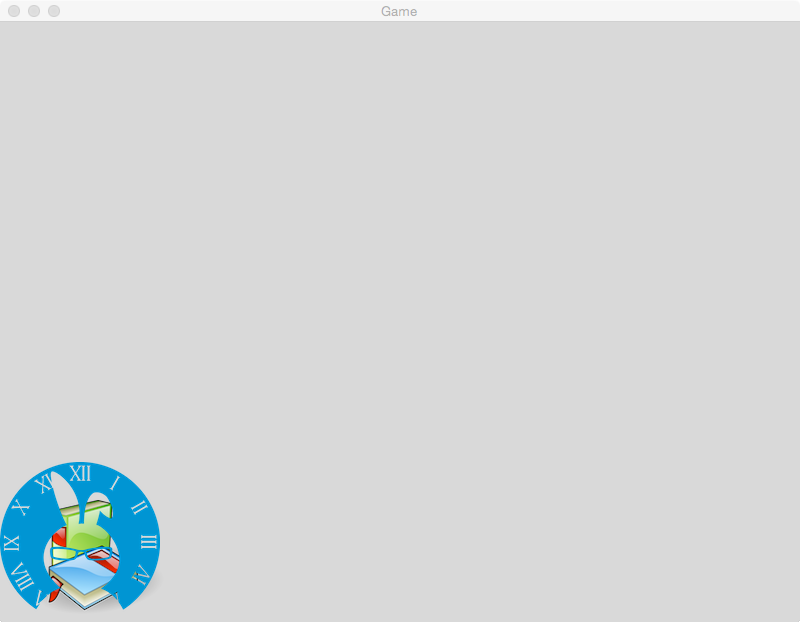
endHere's what this code will render:
Next Tutorial
In the next tutorial, we will discuss Animation in 2D, which describes how to use animation in 2D.