Tutorial: Menu
This tutorial tells you how to use Menus in QuorumAn Introduction to Menus in Quorum
In this tutorial, we will learn how to use Menus in the Quorum Game Engine. Menus are GUI tools very similar to Trees in that the items have a similar hierarchical structure, but the MenuItems are arranged on a MenuBar differently than TreeItems on a Tree. You will typically see MenuBars run horizontally while trees run vertically. Another key difference is that only one submenu can be open at a time, whereas multiple subtrees can be expanded at a time. Typically, MenuBars are located at the top of an application and common headers found on those MenuBars are File, Edit, View, and so on.
For this tutorial, we will create a simple Menu with several operations for editing a Drawable. Specifically, our Menu will allow us to scale, rotate, color, and reset a triangle. To start, create a new Game Application project.
Creating a Menu
Setup
For our main class, we will need the libraries for MenuBar, MenuItem, FlowLayout, Array, Dawable, and Color, adding the following use statements:
use Libraries.Game.Game
use Libraries.Interface.Controls.MenuBar
use Libraries.Interface.Controls.MenuItem
use Libraries.Interface.Layouts.FlowLayout
use Libraries.Containers.Array
use Libraries.Game.Graphics.Drawable
use Libraries.Game.Graphics.Color
We need the FlowLayout library because the container of the menu needs to have a FlowLayout set for the menu to render properly. For this tutorial, we will not be making a container for the menu, since giving the game window a FlowLayout will work for our example. We will write the remaining code for the main class in the CreateGame action. To start, we will set a FlowLayout, declare our MenuBar and Array that will hold the highest-level headers, and create our triangle Drawable with the following lines of code:
FlowLayout flow
SetLayout(flow)

Array<MenuItem> headers
MenuBar menu

Drawable triangle
triangle:LoadFilledTriangle(0, 0, 150, 80, 200, 25)
triangle:SetPosition(100, 100)
Add(triangle)
In this example, setting the game to have a FlowLayout will work properly, but if you need the game to have a ManualLayout in your own applications, look at the Layout tutorial where we go over how to make a container hold items in a FlowLayout.
Creating Headers with Arrays
To start, we need to create our MenuItems for our first header. But there are two ways of adding the headers to the MenuBar and submenus: we can either call the Add action for each one individually, or we can add them to an Array and then add the Array of MenuItems to the MenuBar. Both methods will achieve the same results, the only thing to be careful of is that the Array must already be populated before you try to add it to a MenuItem or MenuBar. For this tutorial, only the first header's submenus will and the highest-level headers will be in an Array.
We will declare the MenuItems for header1 and create three Arrays of MenuItems, which will be used to create our submenus. Our declarations are as follows:
MenuItem header1        //size
MenuItem header1_1          //increase size
MenuItem header1_1_1            //horizontal
MenuItem header1_1_2            //vertical
MenuItem header1_1_3            //both
MenuItem header1_2          //decrease size
MenuItem header1_2_1            //horizontal
MenuItem header1_2_2            //vertical
MenuItem header1_2_3            //both

Array <MenuItem> head1
Array <MenuItem> head1_1
Array <MenuItem> head1_2
Note that the comments indicate the organization of our Menu, where submenus have an extra indentation level than their parent menu. For example, this means that header1_1_3 is one of the three submenus under header1_1, and header1_1 itself is a submenu under header1.
Before we can Add our MenuItems, we need to set up our Arrays. The Arrays will contain the headers that will form a submenu in our MenuBar. The following code block shows which header goes to which array. Also note the order you add MenuItems because that will affect the order that they will be seen in the MenuBar.
head1:Add(header1_1)
head1:Add(header1_2)
head1_1:Add(header1_1_1)
head1_1:Add(header1_1_2)
head1_1:Add(header1_1_3)
head1_2:Add(header1_2_1)
head1_2:Add(header1_2_2)
head1_2:Add(header1_2_3)
With our Arrays created, we can Add them to the higher level MenuItems. The MenuItems header1, header1_1, and header1_2 will have Array of MenuItems Added to them. And header1 will be added to the headers Array since it is a top level MenuItem.
header1:Add(head1)
header1_1:Add(head1_1)
header1_2:Add(head1_2)
headers:Add(header1)
Now that the MenuItems are added to the MenuBar we can use the SetName action to give a name to each Menu Item which will be the Text that is displayed when viewing the MenuBar. This is done with the following lines:
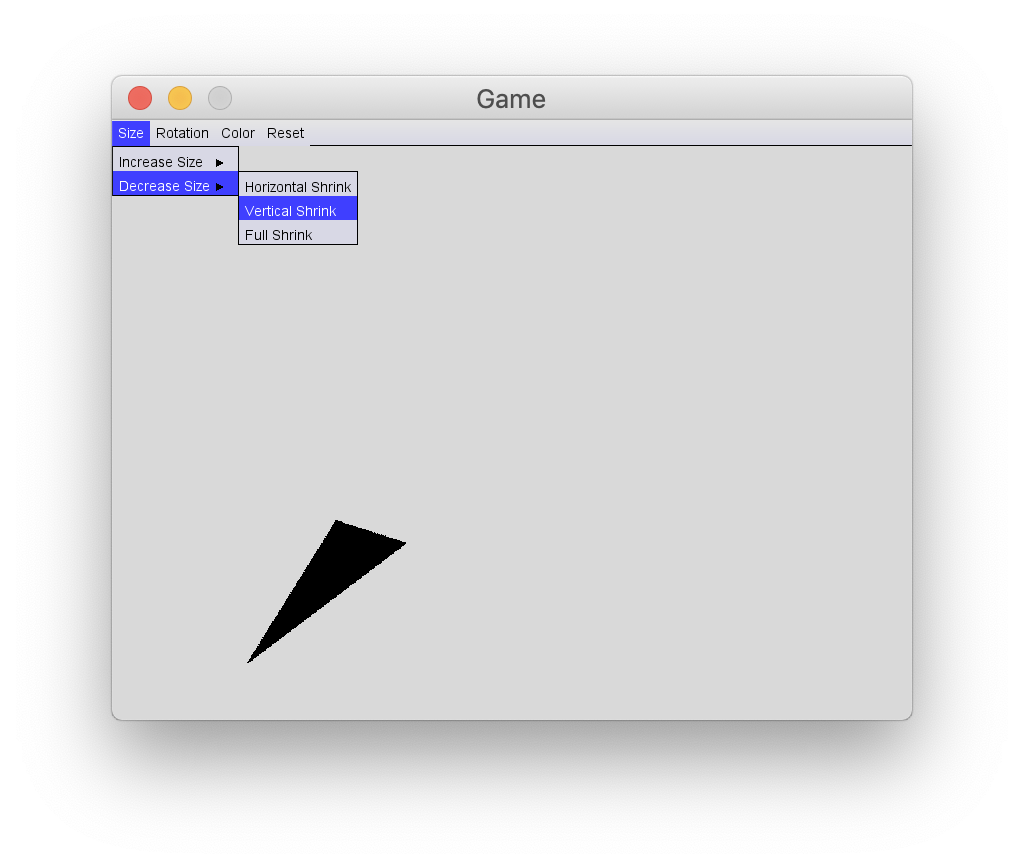
header1:SetName("Size")
header1_1:SetName("Increase Size")
header1_1_1:SetName("Horizontal Scale")
header1_1_2:SetName("Vertical Scale")
header1_1_3:SetName("Full Scale")
header1_2:SetName("Decrease Size")
header1_2_1:SetName("Horizontal Shrink")
header1_2_2:SetName("Vertical Shrink")
header1_2_3:SetName("Full Shrink")
Creating Headers with Add
In addition to the Arrays method from the last section, we can also use the Add action to create submenus. This allows us to avoid having to set up an Array for different groups of MenuItems. We will be creating our second header and its submenus using this method. Below are our declarations of the MenuItems:
MenuItem header2        //rotation
MenuItem header2_1          //clockwise rotation
MenuItem header2_1_1            //30 degrees
MenuItem header2_1_2            //45 degrees
MenuItem header2_2          //counter-clockwise rotation
MenuItem header2_2_1            //30 degrees
MenuItem header2_2_2            //45 degrees
Next, to add the MenuItems to one another, we will use the Add action as follows:
headers:Add(header2)
header2:Add(header2_1)
header2:Add(header2_2)
header2_1:Add(header2_1_1)
header2_1:Add(header2_1_2)
header2_2:Add(header2_2_1)
header2_2:Add(header2_2_2)
Now we set the names for each header with the following lines of code:
header2:SetName("Rotation")
header2_1:SetName("Clockwise")
header2_1_1:SetName("30 Degrees")
header2_1_2:SetName("45 Degrees")
header2_2:SetName("Counter-Clockwise")
header2_2_1:SetName("30 Degrees")
header2_2_2:SetName("45 Degrees")
Next, let's add the last two headers, one for changing the Color and one to reset the triangle.
We will create MenuItems for the third header, name them, and add them to the menu bar in the same manner as before, giving the following code:
MenuItem header3        //color
MenuItem header3_1          //red
MenuItem header3_2          //green
MenuItem header3_3          //blue

header3:SetName("Color")
header3_1:SetName("Red")
header3_1:SetName("Green")
header3_2:SetName("Blue")

header3:Add(header3_1)
header3:Add(header3_2)
header3:Add(header3_3)
headers:Add(header3)
Now we'll add the final header. We will create MenuItems, name them, then add the header to the MenuBar and, giving us the following lines of code:
MenuItem header4        //reset
MenuItem header4_1          //reset all

header4:SetName("Reset")
header4_1:SetName("Reset All")

header4:Add(header4_1)
headers:Add(header4)
Now we have all of the submenus created and our top-level headers in an Array so all we need to now is add the headers array to the MenuBar and add the MenuBar to the game which can be done with these lines of code:
menu:Add(headers)
Add(menu)
Accessibility
We will now make our Menu accessible and when working with menus it is important to understand how a Menu interacts with Focus. What we will do make a hidden Button that will start with Focus and then you can Tab or Shift + Tab to Focus on the Menu. We will do it this way because when a Menu is closed or a MenuItem is activated, the Menu will return the Focus to whatever the last Item in Focus was. In our case it will be our Button. To do this for our example we will add the following lines of code:
Button focuser
focuser:SetName(" ")
focuser:Hide()
focuser:SetNextFocus(menu)
focuser:SetPreviousFocus(menu)
SetFocus(focuser)
Add(focuser)
Now when we run the program, the menu bar will be at the top of the screen and only the highest-level headers will be visible. You can hover over the headers with your mouse or with the menu in Focus you can navigate the menu with the keyboard. Hovering over or navigating to a MenuItem will its submenu if it has one. However, you might notice that trying to activate a MenuItem will only close the submenus and do nothing else. This is because we have not set any behaviors for the MenuItems to use which we will do in the next section.
Setting Behaviors
Now we simply need to add Behaviors to our lowest-level MenuItems. Although any MenuItem can have a set behavior, typically, if a MenuItem has any submenus under it, it will not have a Behavior, as its purpose is only to open and show the related submenus. For this tutorial we only set behaviors for the lowest-level MenuItems.
We will be using 4 behaviors for our MenuItems and they will be defined in their own files. The next 4 code blocks show the behaviors we will be using along with the name and brief description for each Quorum class.
SizeBehavior will take a Drawable and scale it by a set factor on the X and Y axis. SizeBehavior.quorum:
use Libraries.Interface.Behaviors.Behavior
use Libraries.Interface.Events.BehaviorEvent
use Libraries.Game.Graphics.Drawable
use Libraries.Sound.Speech

class SizeBehavior is Behavior

    Drawable triangle = undefined
    number scaleX = 1.0
    number scaleY = 1.0

    action Run(BehaviorEvent behavior)
        if triangle not= undefined
            triangle:SetScale(scaleX, scaleY)
            Speech speech
            speech:Say("Scaled by a factor of " + scaleX + " horizontally, and a factor of " + scaleY + "vertically.")
        end
    end

    action SetDrawable(Drawable newTriangle)
        triangle = newTriangle
    end

    action SetScale(number newScaleX, number newScaleY)
        scaleX = newScaleX
        scaleY = newScaleY
    end
end
RotationBehavior will take a Drawable and rotate it by a specified number of degrees. RotationBehavior.quorum:
use Libraries.Interface.Behaviors.Behavior
use Libraries.Interface.Events.BehaviorEvent
use Libraries.Game.Graphics.Drawable
use Libraries.Sound.Speech

class RotationBehavior is Behavior

    Drawable triangle = undefined
    number degrees = 0.0

    action Run(BehaviorEvent behavior)
        if triangle not= undefined
            triangle:Rotate(degrees)
            Speech speech
            speech:Say("Rotated " + degrees + " degrees.")
        end
    end

    action SetDrawable(Drawable newTriangle)
        triangle = newTriangle
    end

    action SetDegrees(number newDegrees)
        degrees = newDegrees
    end
end
ColorBehavior takes a Drawable and changes its color. ColorBehavior.quorum:
use Libraries.Interface.Behaviors.Behavior
use Libraries.Interface.Events.BehaviorEvent
use Libraries.Game.Graphics.Drawable
use Libraries.Game.Graphics.Color
use Libraries.Sound.Speech

class ColorBehavior is Behavior

    Drawable triangle = undefined
    Color color = undefined
    text colorName = undefined

    action Run(BehaviorEvent behavior)
        if triangle not= undefined
            triangle:SetColor(color)
            Speech speech
            speech:Say("Color changed to " + colorName + ".")
        end
    end

    action SetDrawable(Drawable newTriangle)
        triangle = newTriangle
    end

    action SetColor(Color newColor, text newName)
        color = newColor
        colorName = newName
    end
end
ResetBehavior will reset the triangle Drawable to its defaults. ResetBehavior.quorum:
use Libraries.Interface.Behaviors.Behavior
use Libraries.Interface.Events.BehaviorEvent
use Libraries.Game.Graphics.Drawable
use Libraries.Sound.Speech

class ResetBehavior is Behavior

    Drawable triangle = undefined

    action Run(BehaviorEvent behavior)
        if triangle not= undefined
            triangle:SetRotation(0)
            triangle:SetScale(1)
            triangle:LoadFilledTriangle(0, 0, 150, 80, 200, 25)
            Speech speech
            speech:Say("Reset")
        end
    end

    action SetDrawable(Drawable newTriangle)
        triangle = newTriangle
    end
end
Now we go back to our main class and make our Behavior objects and call their Set actions so can edit the triangle properly. With the behaviors made we then simply call SetBehavior for each MenuItem that we will use to alter the triangle. This is done whit the following lines of code:
//header1 behaviors
SizeBehavior horizontalScale
SizeBehavior verticalScale
SizeBehavior fullScale
SizeBehavior horizontalShrink
SizeBehavior verticalShrink
SizeBehavior fullShrink

horizontalScale:SetDrawable(triangle)
verticalScale:SetDrawable(triangle)
fullScale:SetDrawable(triangle)
horizontalShrink:SetDrawable(triangle)
verticalShrink:SetDrawable(triangle)
fullShrink:SetDrawable(triangle)

horizontalScale:SetScale(1.25, 1.00)
verticalScale:SetScale(1.00, 1.25)
fullScale:SetScale(1.25, 1.25)
horizontalShrink:SetScale(0.75, 1.00)
verticalShrink:SetScale(1.00, 0.75)
fullShrink:SetScale(0.75, 0.75)

header1_1_1:SetBehavior(horizontalScale)
header1_1_2:SetBehavior(verticalScale)
header1_1_3:SetBehavior(fullScale)
header1_2_1:SetBehavior(horizontalShrink)
header1_2_2:SetBehavior(verticalShrink)
header1_2_3:SetBehavior(fullShrink)

//header2 behaviors
RotationBehavior clockwise30
RotationBehavior clockwise45
RotationBehavior counter30
RotationBehavior counter45

clockwise30:SetDrawable(triangle)
clockwise45:SetDrawable(triangle)
counter30:SetDrawable(triangle)
counter45:SetDrawable(triangle)

clockwise30:SetDegrees(30)
clockwise45:SetDegrees(45)
counter30:SetDegrees(-30)
counter45:SetDegrees(-45)

header2_1_1:SetBehavior(clockwise30)
header2_1_2:SetBehavior(clockwise45)
header2_2_1:SetBehavior(counter30)
header2_2_2:SetBehavior(counter45)

//header3 behaviors
Color color
ColorBehavior redBehavior
ColorBehavior greenBehavior
ColorBehavior blueBehavior

redBehavior:SetDrawable(triangle)
greenBehavior:SetDrawable(triangle)
blueBehavior:SetDrawable(triangle)

redBehavior:SetColor(color:Red(), "Red")
greenBehavior:SetColor(color:Green(), "Green")
blueBehavior:SetColor(color:Blue(), "Blue")

header3_1:SetBehavior(redBehavior)
header3_2:SetBehavior(greenBehavior)
header3_3:SetBehavior(blueBehavior)

//header4 behaviors
ResetBehavior resetBehavior
resetBehavior:SetDrawable(triangle)
header4_1:SetBehavior(resetBehavior)
Now when we run our program, you can still navigate the menu, but when you activate a one of the lowest-level MenuItems the triangle Drawable will change depending on the behavior you activated.
MenuSelection and MenuPath
In Quorum, Menus use their own selection class, MenuSelection, to keep track of information regarding the currently selected MenuItem. In particular, the MenuSelection keeps track of the unique and specific path to the current selection, causing another similarity between Trees and Menus. This path is stored in the form of an Array of MenuItems and Menus allow for us to easily get this Array with the GetMenuPath action. To demonstrate this, we will add a small amount of code to each of our Behavior classes we created in the tutorial thus far.
To start, we will need the libraries for MenuItem and Array, adding the following use statements:
use Libraries.Interface.Controls.MenuItem
use Libraries.Containers.Array
Next, we will add to the end of the Run action, outside of the conditional if statement. First, we need to obtain the currently selected MenuItem. This can be done with BehaviorEvent's GetItem action, but this returns an Item, not a MenuItem, so we will need to cast it. This is done with the following line:
MenuItem tempItem = cast(MenuItem, behavior:GetItem())Now that we have the MenuItem that called the behavior we can use its GetMenuPath action to get the Array of MenuItems. This gives the following line:
Array<MenuItem> items = tempItem:GetMenuPath()Now that we have the path to the currently selected MenuItem, we can traverse the Array from the beginning to the end to obtain the full path. We will simply output this as text, so we will use each MenuItem's GetName action as we go through the Array in a repeat while loop. This is gives the following code:
integer counter = 0
integer size = items:GetSize()
text path = ""
repeat while counter < size
    path = path + items:Get(counter):GetName() + "\"
    counter = counter + 1
end

output path
As an example, the updated SizeBehavior class is as follows:
use Libraries.Interface.Behaviors.Behavior
use Libraries.Interface.Events.BehaviorEvent
use Libraries.Interface.Controls.MenuItem
use Libraries.Containers.Arrayuse Libraries.Game.Graphics.Drawable
use Libraries.Sound.Speech

class SizeBehavior is Behavior

    Drawable triangle = undefined
    number scaleX = 1.0
    number scaleY = 1.0

    action Run(BehaviorEvent behavior)
        if triangle not= undefined
            triangle:SetScale(scaleX, scaleY)
            Speech speech
            speech:Say("Scaled by a factor of " + scaleX + " horizontally, and a factor of " + scaleY + "vertically.")
        end

        MenuItem tempItem = cast(MenuItem, behavior:GetItem())
        Array<MenuItem> items = tempItem:GetMenuPath()

        integer counter = 0
        integer size = items:GetSize()
        text path = ""
        repeat while counter < size
            path = path + items:Get(counter):GetName() + "\"
            counter = counter + 1
        end
        output path
    end

    action SetDrawable(Drawable newTriangle)
        triangle = newTriangle
    end

    action SetScale(number newScaleX, number newScaleY)
        scaleX = newScaleX
        scaleY = newScaleY
    end
end
Now, when the SizeBehavior is run, it will output the path to the currently selected MenuItem. This change is done the same way for all five Behavior classes we made, so the use statements and addition to the Run action can simply be copied into the other classes.
Try making a User Interface
Next Tutorial
In the next tutorial, we will discuss ScrollPanes, which describes how to use ScrollPanes.