Tutorial: ScrollPane
This tutorial tells you how to use ScrollPanes in QuorumAn Introduction to ScrollPanes in Quorum
What is a ScrollPane?
In this tutorial, we will learn how to use ScrollPanes in the Quorum Game Engine. ScrollPanes are interface tools which allows users to look at portion of a large region by use of a smaller pane and then navigate that region to change what part of the region they see by use of scroll bars. For example, the webpage for this tutorial is a ScrollPane with a vertical scrollbar and can be scrolled up or down to display only a portion of the webpage. In this webpage example, the pane would be the area of the window where the webpage is displayed, and the region would be the entire webpage.
For this tutorial, we will create a ScrollPane that only displays a small portion of a much larger region, with Buttons located at the center and each corner of the region. Thus, the user must navigate the region using the vertical and horizontal scrollbars to find each Button. To start, create a new Game Application project.
Creating a ScrollPane
In order to use a ScrollPane, we must include the ScrollPane library. In addition, we will need the libraries for Color, ManualLayout, and Button, requiring the following use statements:
use Libraries.Game.Game
use Libraries.Interface.Controls.ScrollPane
use Libraries.Game.Graphics.Color
use Libraries.Interface.Layouts.ManualLayout
use Libraries.Interface.Controls.Button
Since we want the ScrollPane to be usable as soon as the game begins, we’ll add our code to the CreateGame class. To start, we’ll simply declare the variables we’ll be using. We also need to set our game’s layout so the ScrollPane will render to the screen. We will need two ManualLayouts, which we will set to the Game and the ScrollPane. By default the Scrollpane has a FlowLayout, but we will manually lay out our Buttons so we will change that. Then we need a ScrollPane, and a Color variable, giving us the following lines of code:
ManualLayout layout
SetLayout(layout)
ManualLayout layoutScroll

ScrollPane scrollpane
scrollpane:SetLayout(layoutScroll)
Color color
Next, we will take our ScrollPane and set its Background, Size, and Position. We are only setting its background for appearance to differentiate the region of the ScrollPane with the Background of the Game window. Also note that changing the Size and Position of the ScrollPane only affects the Pane and not the Region. After we set those values, we can Add our pane to the Game giving us the following code:
scrollpane:SetBackgroundColor(color:Gray())
scrollpane:SetSize(600, 400)
scrollpane:SetPosition(100, 100)
Add(scrollpane)
If we were to run the program now, there would only be a Gray region in the center of the game window. You might be able to scroll through it due to the default size of the region, but you will find nothing in it. This is because we have not added anything to the region, and we will do that now by making the buttons that will be on different positions on the screen.
Buttons on a ScrollPane
Button Behavior
Before we begin with the main class, we will create a Behavior class for our Buttons, which we will call "ButtonBehavior.quorum." This class will use the libraries for Behavior, BehaviorEvent, and Speech. We need the Item library because we will be using the GetItem action from the BehaviorEvent.
The ButtonBehavior class will inherit the Behavior class and in the Run action, we need to have the program output and say the button's name. To get the name we use GetItem action from event and since it returns an Item, we save it to an Item variable. For this example, we do not need any casting because the GetName action from the Button is inherited from the Item class.
This gives us the completed ButtonBehavior class as follows:
use Libraries.Interface.Behaviors.Behavior
use Libraries.Interface.Events.BehaviorEvent
use Libraries.Sound.Speech
use Libraries.Interface.Item

class ButtonBehavior is Behavior
    action Run(BehaviorEvent event)
            Item item = event:GetItem()
            Speech speech
            speech:Say(item:GetName())
            output item:GetName()
    end
end
Adding to our ScrollPane
Now with a behavior for the buttons made we can go back to the main class and add our buttons. You can start by adding these declarations:
Button topLeft
Button topRight
Button center
Button bottomLeft
Button bottomRight
Before we add our Buttons to the ScrollPane, we’ll make a behavior object for all of them to have set and we will set their names. This is done with the following lines of code:
ButtonBehavior behavior

topLeft:SetName("Top Left")
topLeft:SetBehavior(behavior)

topRight:SetName("Top Right")
topRight:SetBehavior(behavior)

center:SetName("Center")
center:SetBehavior(behavior)

bottomLeft:SetName("Bottom Left")
bottomLeft:SetBehavior(behavior)

bottomRight:SetName("Bottom Right")
bottomRight:SetBehavior(behavior)
Now that our Buttons are created, we can add them to the ScrollPane with the following code:
scrollpane:Add(topLeft)
scrollpane:Add(topRight)
scrollpane:Add(center)
scrollpane:Add(bottomLeft)
scrollpane:Add(bottomRight)
Now we need to set the position of each Button within the ScrollPane. Because we added each Button to the ScrollPane, that these positions are relative to region within the ScrollPane, not the game window. For example, since we set the ScrollPane’s position to the (x, y) coordinate of (100, 100), calling "bottomLeft:SetPosition(0, 0)" will place the Button at the relative position of (0, 0) in region of the ScrollPane. Our Button positions are as follows:
topLeft:SetPosition(0, 2000 - 30)
topRight:SetPosition(2000 - 100, 2000 - 30)
center:SetPosition((2000 / 2) - 50, (2000 / 2) - 15)
bottomLeft:SetPosition(0, 0)
bottomRight:SetPosition(2000 - 100, 0)
Finally, we will call the FitRegionToContents action to automatically resize the region to fit all that we added to it. For example, we used "topRight:SetPosition(2000 - 100, 2000 - 30)" to place our topRight Button. Thismoves the Button to the (x, y) coordinate of (1900, 1970). So, FitRegionToContents will make the region for the ScrollPane extend to (2000, 2000) since it will also account for the size of the button. The call will look like this:
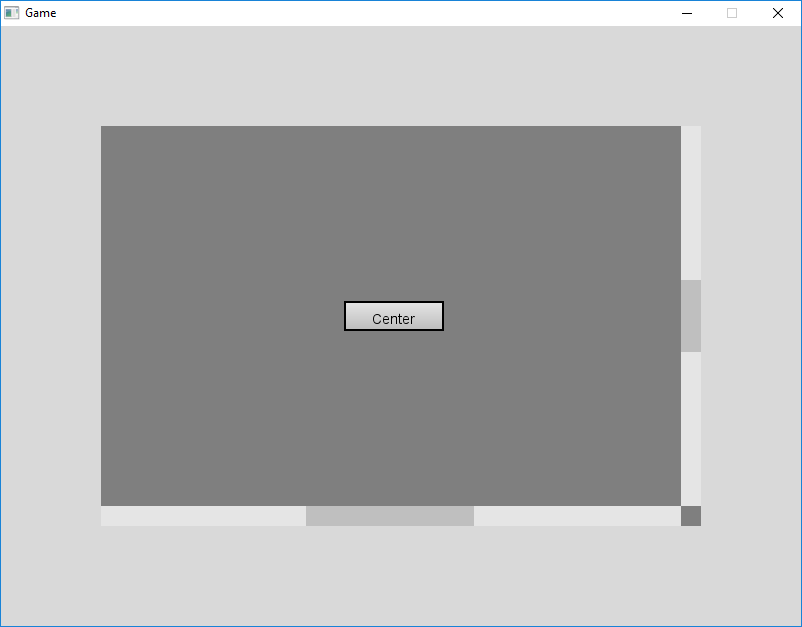
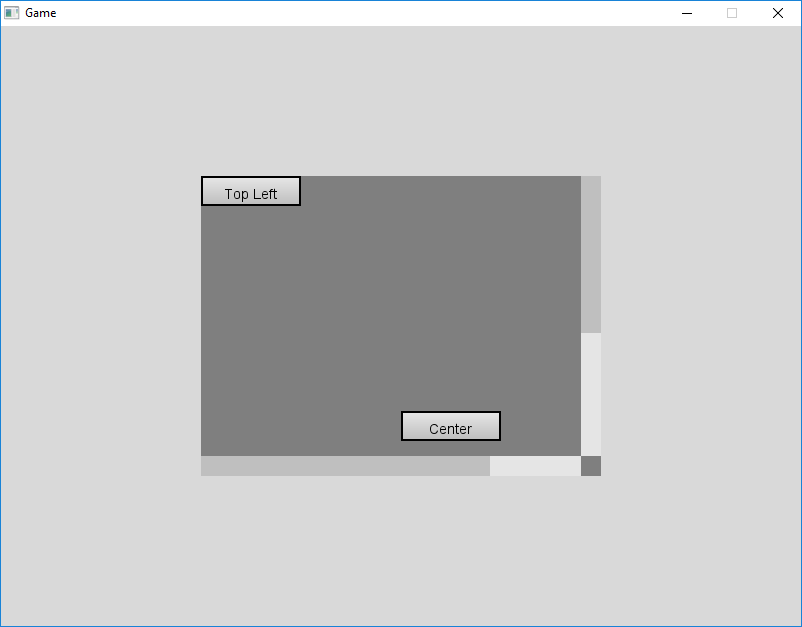
scrollpane:FitRegionToContents()Now when the program is run, it has a ScrollPane showing only a 600 x 400 portion of the 2000 x 2000 region. Thus, the scrollbars can be used to display other parts of the 2000 x 2000 region. For example, below is an image of the ScrollPane at the top left of the region and near the center of the region. When a Button is activated, the program will output and say its name aloud.
Manually Setting the Region Size
Suppose we wanted to move the Buttons closer together now. We can move the Buttons again by simply calling the SetPosition action again, using the following lines:
topLeft:SetPosition(0, 500 - 30)
topRight:SetPosition(500 - 100, 500 - 30)
center:SetPosition((500 / 2) - 50, (500 / 2) - 15)
bottomLeft:SetPosition(0, 0)
bottomRight:SetPosition(500 - 100, 0)
By using 500 in our calculations instead of 2000, we've shrunk down the area containing all five buttons by a factor of 4. If we were to run the program now, the vast majority of the region for our ScrollPane would be unnecessary. As such, it is reasonable to shrink down the region itself to match our Buttons. Fortunately, Quorum allows you to manually set the region size, using the ScrollPane's SetRegionSize action with a width and height. Thus, we will add the following line:
scrollpane:SetRegionSize(500, 500)However, recall that when we made our ScrollPane, we gave it the view area of 600 x 400. We cannot view more area than exists for our ScrollPane, so we need to change the view area as well. Fortunately, this is done by simply calling the SetSize action again, giving us the following line:
scrollpane:SetSize(400, 300)Lastly, to fit the ScrollPane to the middle of our game window, we will add the following line of code:
scrollpane:SetPosition(200, 150)Now, when we run the program, the area is much smaller, as shown in the following image:
Indicies
In Quorum, ScrollPanes have an additional tracking feature: indices. An index is simply an integer, starting from 0, associated with an object added to the ScrollPane. In the previous section, we added our Buttons to the ScrollPane without indicies, which simply gives an index in the order that objects were added. For example, since topLeft was the first thing we added, it has the index value of 0. Similarly, bottomLeft was the fourth thing we added, so it has the index value of 3. We could have also used the Add action with an index specified, in the form of "scrollpane:Add(0, topLeft)." For example, the following Add actions would have given us the same indicies as the section above:
scrollpane:Add(0, topLeft)
scrollpane:Add(1, topRight)
scrollpane:Add(2, center)
scrollpane:Add(3, bottomLeft)
scrollpane:Add(4, bottomRight)
However, note that using the Add action this way must either use the very next index value, or a previous value, otherwise it will crash the program. For instance, starting with "scrollpane:Add(1, topLeft)" instead would crash, as would finishing with "scrollpane:Add(5, bottomRight)."
As for specifying a previously assigned index, the new object will push the preexisting object, and everything following it, up by 1. For example, consider the following Add actions:
scrollpane:Add(0, topLeft)
scrollpane:Add(0, topRight)
scrollpane:Add(1, center)
scrollpane:Add(0, bottomLeft)
scrollpane:Add(2, bottomRight)
In this case, the order of events is as follows:
- topLeft is assigned to index 0.
- topRight is assigned to index 0, and topLeft is pushed from index 0 to index 1.
- center is assigned to index 1, and topLeft is pushed from index 1 to index 2.
- bottomLeft is assigned to index 0, topRight is pushed from index 0 to index 1, center is pushed from index 1 to index 2, and topLeft is pushed from index 2 to index 3.
- bottomRight is assigned to index 2, center is pushed from index 2 to index 3, and topLeft is pushed from index 3 to index 4.
- topLeft = Index 4
- topRight = Index 1
- center = Index 3
- bottomLeft = Index 0
- bottomRight = Index 2
In particular, indicies are used to remove objects from ScrollPanes. For example, if we wanted to Remove the Center Button using the previous example, we could either use "scrollpane:Remove(center)" or "scrollpane:Remove(3)." While we just call the Remove action like this, note that the Remove action with an Item parameter will return a boolean, True if the item was in the ScrollPane and successfully removed or False if the item was not in the ScrollPane. The Remove action with an integer parameter will return the Item that was previously contained at that index.
The action of removing an object also has an impact on the indicies of other objects, though in this case, it will change the following indicies by 1 to fill in the space left by the removed object. Using the previous example again, consider the following Removes:
scrollpane:Remove(3)
scrollpane:Remove(0)
In this case, the order of events is as follows:
- center (index 3) is removed, and topLeft is pulled down from index 4 to index 3.
- bottomLeft (index 0) is removed, topRight is pulled down from index 1 to index 0, bottomRight is pulled down from index 2 to index 1, and topLeft is pulled down from index 3 to index 2.
Final Indicies are:
- topLeft = Index 2
- topRight = Index 0
- center = N/A (Removed)
- bottomLeft = N/A (Removed)
- bottomRight = Index 1
Try making a User Interface
Next Tutorial
In the next tutorial, we will discuss the Focus, which describes how to use the Focus.