Hour 14: Create an Accessible App - Part 2: Behaviors
This lesson is to teach you about adding functionality using Behaviors in a Form app.Overview
In a previous lesson, you created the interface for an app. While designing the user interface of an app is important, apps that do nothing are not particularly useful. In this lesson, you will learn how to make an app respond when the user interacts with it.
Goals
You have the following goals for this lesson:
- Learn how to create a Behavior
- Add a Behavior to a Button in your app
- Think about programming in teams
Warm up
Imagine you recently acquired funds to create a tech startup. Your focus could be on anything. It could be education focused, or maybe it is based on a hobby or interest of yours. Maybe your focus is on an issue you wish there was a better solution for.
You need to form a team to start working on a product. What would your product cater towards, and who might use it? As for your team, what kinds of people would you want to work with? How do you think this team would work together while creating this product?
Vocabulary
You will be learning about the following vocabulary words:
| Term | Definition |
|---|---|
| Pair Programming | A technique in software engineering where two programmers work together. |
| Event Driven Programming | A style of programming where code runs in response to user input. |
| Inheritance | A system where a "child" class gains the properties of a "parent" class. |
| Behaviors | Inside a Form app, behaviors represent code that will run in response to an event occurring. |
Code
You will be using the following new pieces of code:
| Quorum Code | Code Example | Explanation |
|---|---|---|
| use NAME | use Libraries.Interface.Controls.Button | A use statement for the Button object. A button is a selectable user interface component. |
| Button buttonObject | Button button | Creates a button object on the form |
| use NAME | use Libraries.Interface.Events.BehaviorEvent | A use statement for the BehaviorEvent object. A BehaviorEvent is sent to you when a button is clicked. |
| use NAME | use Libraries.Interface.Forms.FormBehavior | A use statement for the FormBehavior object. FormBehavior is a special class for handling events. |
| action Run(BehaviorEvent event) end | action Run(BehaviorEvent event) // behavior code runs in this action end | This action is the heart of a Behavior. It will run if a Button is clicked with this Behavior attached to it. |
| GetForm() | Form form = GetForm() | Returns a Form object representing the form in the app. |
| GetPage() | Page page = GetPage() | Returns a Page object representing the current page of the app. |
| behaviorEvent:GetItem() | event:GetItem() | Identifies the element (perhaps a button) that triggered a Behavior. |
| buttonObject:SetBehavior() | button:SetBehavior(behave) | Attaches a behavior to a button. When the button is clicked, the behavior runs. |
| buttonObject:GetName() | text typeOfButton = button:GetName() | Retrieves the specific button name from the button click in order to perform a specific action. |
CSTA Standards
This lesson covers the following standards:
- 2-CS-01: Recommend improvements to the design of computing devices, based on an analysis of how users nteract with the devices.
- 1B-CS-02: Model how computer hardware and software work together as a system to accomplish tasks.
- 3A-AP-15: Justify the selection of specific control structures when tradeoffs involve implementation, readability, and program performance, and explain the benefits and drawbacks of choices made.
Explore
Over the past several lessons, you have learned a variety of different concepts and techniques, including how to store and modify data, how to use conditional statements to change what code is run, and how to write actions and classes. In a previous lesson, you learned how to design the user interface of an app. Now it is time to bring all of your knowledge together to make an app respond to your input.
Using Behaviors in the Form Library
Recall in your previous Form app where you learned how to create an app. You developed the user interface, adding text, a banner, and buttons. The app itself was not functional yet, though. If you pressed the button on the app, nothing happened.
Now that you have learned about actions and classes, you are ready to add Behaviors to your app. Behaviors are special classes in Quorum that handle the actions your app takes when a user interacts with it. Behaviors are an example of event-driven programming, meaning code will run when users trigger an event.
Behaviors work using a concept called inheritance. In computer science, the term "inheritance" means that a class gains the properties of a different class. The custom behaviors you will write for your apps will inherit from the FormBehavior class, which handles complicated event handling. You do not need to know exactly how this class works, or the fine details of inheritance. For now, you only need to know that inheritance will let you use the event handling functionality of Behaviors without having to write it all yourself.
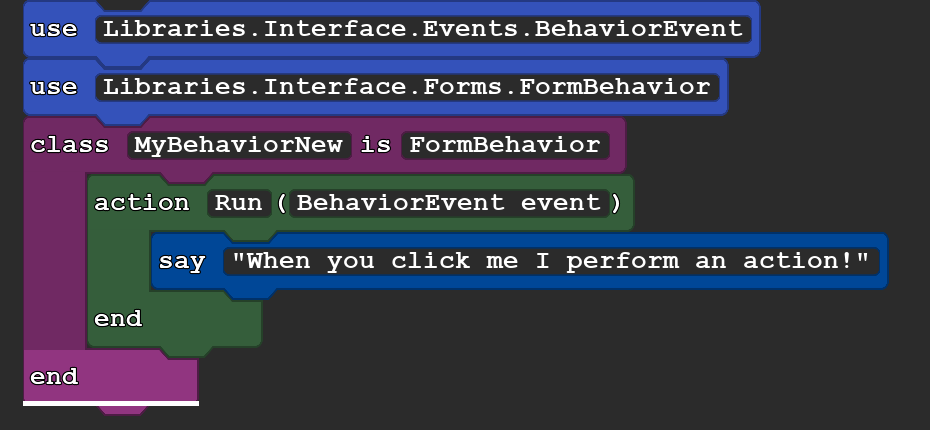
You will need Behaviors to make your app respond to user input. Like any class, your custom Behavior class will need to go in a separate file from your Main form app. Consider the following example:

- Line 1: This line contains a use statement that gives you access to the BehaviorEvent library. BehaviorEvent objects include information about the event that caused the Behavior to run.
- Line 2: This line contains a use statement that gives you access to the FormBehavior library. Inheriting from the FormBehavior library will let your class respond to events.
- Line 3: This line creates a custom class that inherits from FormBehavior, using the "is" keyword. Your new behavior will gain the properties of the "parent" class it is inheriting from.
- Line 4: This line creates a new action. Importantly, the name must be “Run”, and it must take exactly one BehaviorEvent parameter. The class you are inheriting from expects an action with exactly this name and parameters to use when events occur.
- Line 5: When the action is run, it will say the text "When you click me I perform an action."
- Line 6: This line encloses the action block.
- Line 7: This line encloses the class block.
All behaviors follow the same code format, so if you have one Behavior written, you can reuse it as a template when you want to add more functionality to your apps. The only parts you need to change are the class name and the code inside the "Run" action.
Creating an App with Behaviors
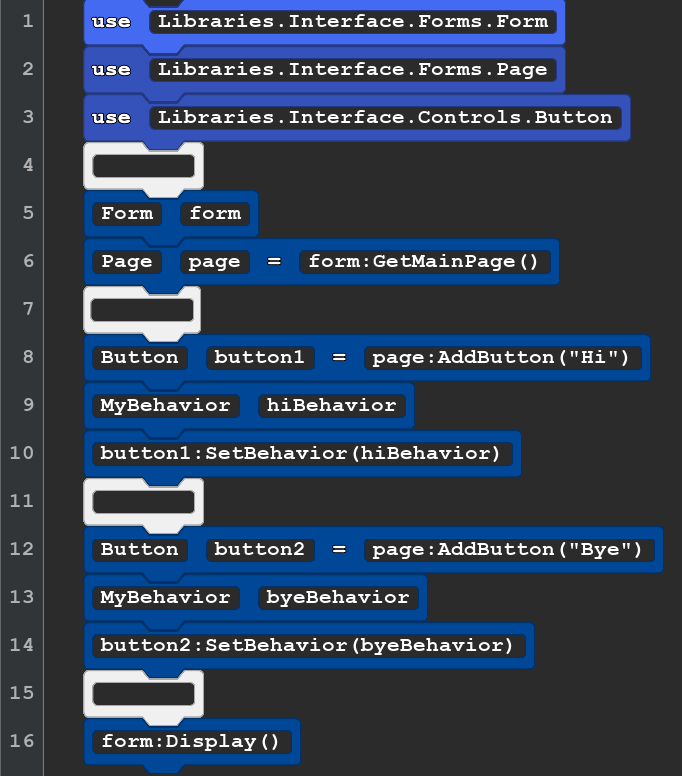
Examine the example below. It shows the Main file of a Form program, which includes two buttons named "Hi" and "Bye." You have already seen how to create an interface using Forms before, but there are a few important additions on lines 8 to 14.
First, when the buttons are created on lines 8 and 12, they are now assigned to variables. Since you need to store the Button objects, you also need a use statement for them on line 3, "use Libraries.Interface.Controls.Button."
Second, on lines 9, 10, 13, and 14, the program creates new "MyBehavior" objects, and then associates those behaviors with the buttons. Now, when a button is clicked, the behavior will run.

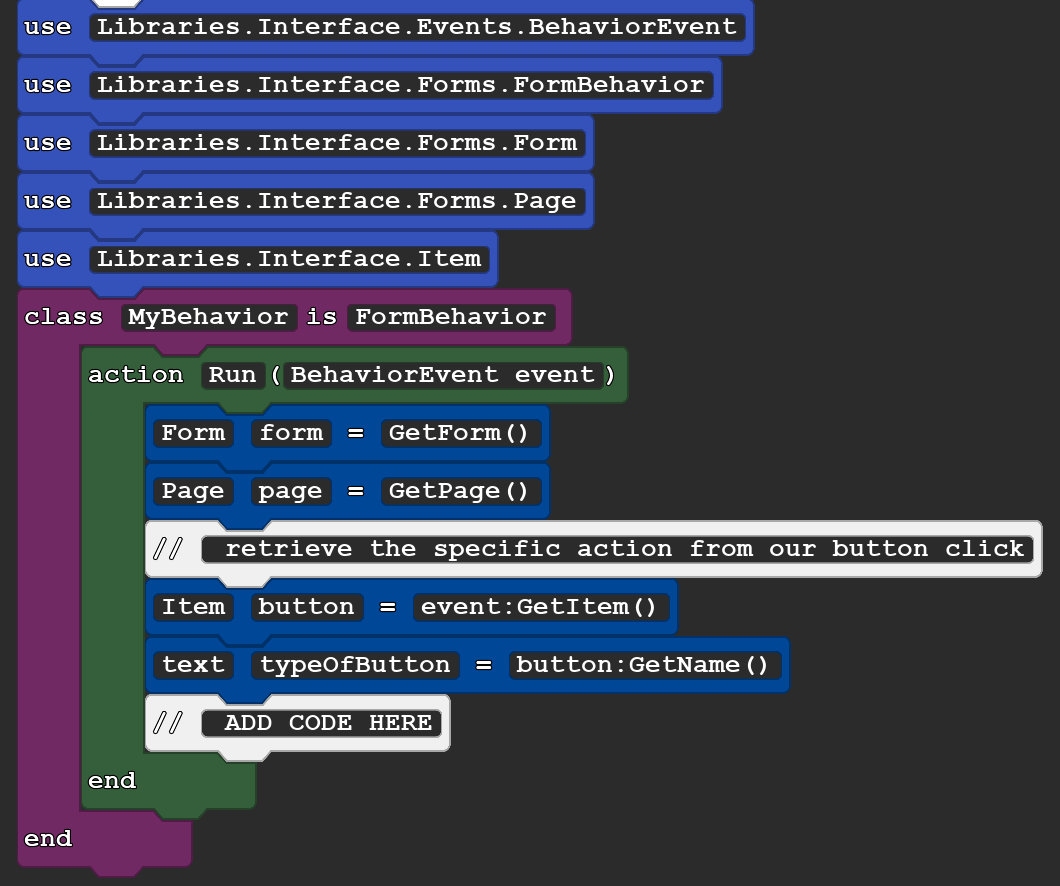
Now, examine the code for the "MyBehavior" class:

The code in this example is a template, and is incomplete, marked by the "ADD CODE HERE" comment at the end of the action. Still, there are several important things happening in the "Run" action.
First, the "Run" action uses the "GetForm" and "GetPage" actions. These return the objects that represent the Form and the currently displayed Page, respectively. These are helpful if you need to get or modify any values in the app or in the user interface.
Second, the action uses "GetItem" from the BehaviorEvent parameter. The BehaviorEvent is a special object that contains lots of information about the input that triggered your behavior. In this case, "GetItem" returns an object representing whatever interface element triggered the behavior. In practice, this will be a Button.
The action also gets the button's name and stores it in a variable. A button's name will be the text that you provided when you made it in the Form. In the current example, because there are only two buttons, the name will either be "Hi" if the first button was clicked, or "Bye" if the second button was clicked. You can use this information to decide how your behavior should react, depending on which button it is. The end of the template, with the comment that reads "ADD CODE HERE," is where you will add more code to determine what your behavior actually does.
Code Templates
Here are another set of templates for a form and its behavior file. Notice that if you were to copy and paste these two files of code into Quorum Studio and try running the program, it would automatically turn into blocks from text if you are in that mode. If the name of the button was hi, it would then say hello.
Main.quorum
use Libraries.Interface.Forms.Form
use Libraries.Interface.Forms.Page
use Libraries.Interface.Controls.Button

Form form
MyBehavior behave
Page page = form:GetMainPage()

Button button  = page:AddButton("Hi")
button:SetBehavior(behave)
MyBehavior.quorum
use Libraries.Interface.Events.BehaviorEvent
use Libraries.Interface.Forms.FormBehavior
use Libraries.Interface.Forms.Form
use Libraries.Interface.Forms.Page
use Libraries.Interface.Item
class MyBehavior is FormBehavior
    action Run(BehaviorEvent event)
        Form form = GetForm()
        Page page = GetPage()
        // retrieve the specific action from our button click
        Item button = event:GetItem()
        text typeOfButton = button:GetName()
        // ADD CODE HERE
        if typeOfButton = "Hi"
            say "Hello"
        end

    end
end
Collaborating with Code
As code becomes more complex, collaborating with others becomes increasingly important. When dealing with commercial software, there are often large teams of software engineers that work together on the same project. This often means splitting up work across multiple people, but team members are also often encouraged to collaborate and work together to solve difficult problems.
A practice that is common among software engineers is a collaboration method known as pair programming. To Pair Program means that two programmers work together on a single computer. It is a similar practice in learning how to drive: one person writes the code (referred as the driver) and the other person reviews the teammate's code and offers feedback (referred as the navigator).
Engage
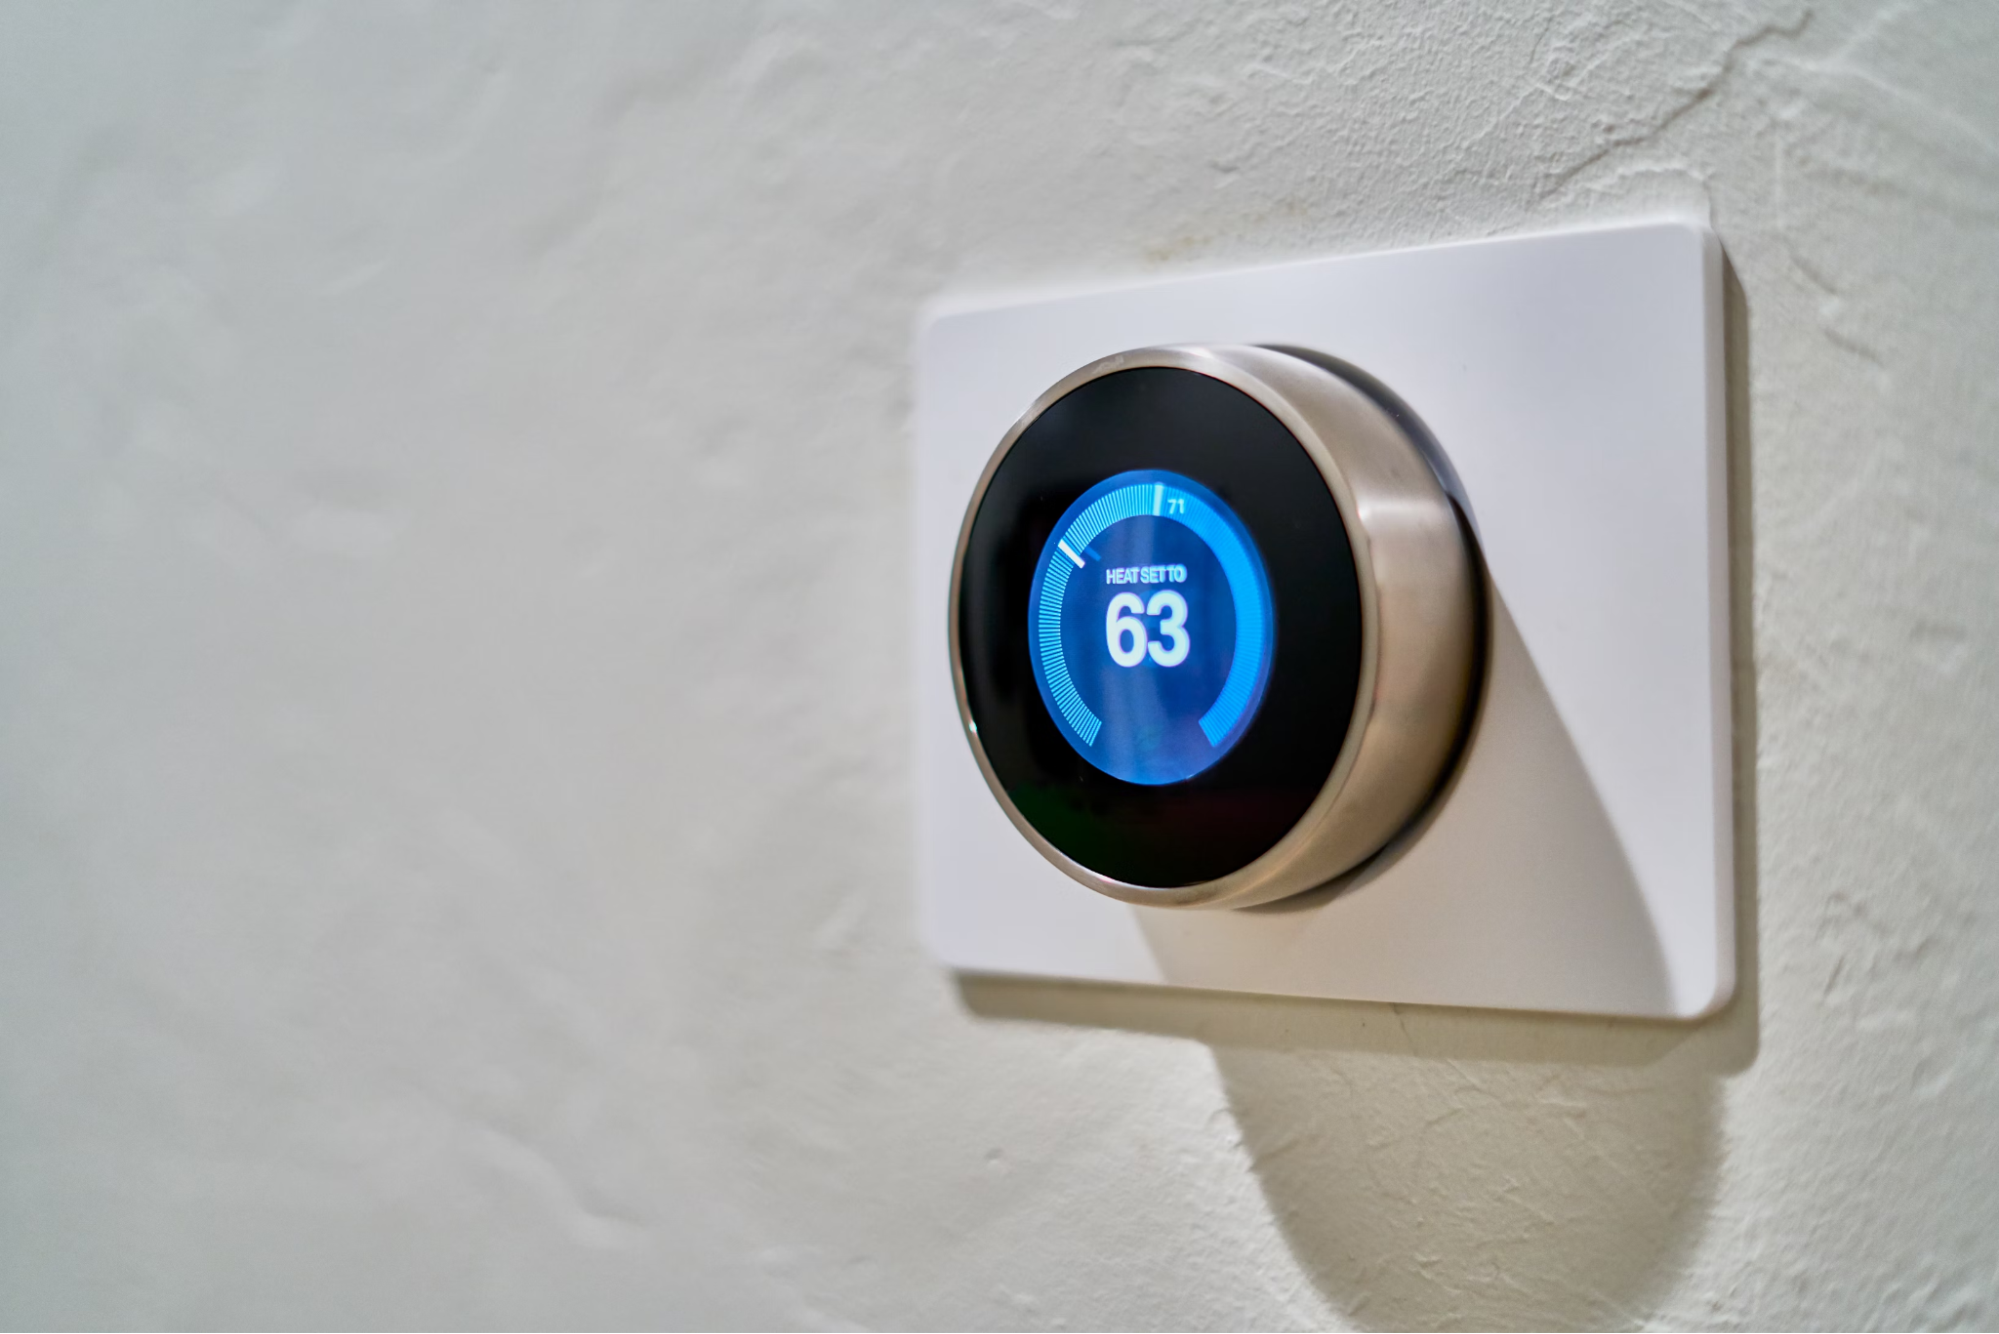
Previously, you designed the interface of an app, but it was not yet interactive. Now, you will work together with a partner to make a thermostat app respond to your input.
Directions
You are an app developer and you want to build a product that allows you to control your home thermostat from your phone. A friend has sent you their work in progress. Their draft has the app's look and feel handled, but when you try to interact with the buttons, they do not do anything yet. Your friend has some ideas of where there is code missing, though, and they have marked the spots. Your job is to examine the existing code with a partner and add code so the buttons work.
Start by selecting a partner to work with, if one is available. Decide who will start as the “driver” (who is writing code) and the "navigator" (who is providing feedback and guidance). Make sure to periodically swap roles as you are working on your project.

Download the folder with the code before starting. Inside of Quorum Studio, open the project inside the File menu once you are ready to work. Before trying to modify the code, run the program first to examine what it does at a high level..
Examine the Code Template
Luckily, your friend has already worked on this app and given you most of the structure you will need. You should have two files in this project: Main.quorum and TemperatureBehavior.quorum. Take a few minutes to familiarize yourself with the code by running it and seeing how it works. Notice the areas that are marked with "YOUR CODE GOES HERE." While there are many new parts to this code, you only need to modify small parts of this project. You do not need to change anything outside of the marked areas.
Main.quorum
use Libraries.Interface.Forms.Form
use Libraries.Interface.Forms.Page
use Libraries.Interface.Forms.Grouping
use Libraries.Interface.Forms.Banner
use Libraries.Interface.Controls.Button
use Libraries.Game.Graphics.Label

// Create the Form app and get the main page.
Form form
Page homePage = form:GetMainPage() // Just an example using page instead of form for things. Anything you can do to a form you can do to a page, basically.
Banner banner = homePage:AddBanner("Home Thermostat App", "Press the buttons to raise or lower the temperature!")

// Add the icons in a single row.
Grouping imageGroup = homePage:AddGrouping("images")
imageGroup:AddIcon("Sun","Images/sun.png")
imageGroup:AddIcon("Thermometer","Images/thermometer.png")
imageGroup:AddIcon("Cloud","Images/angyCloud.png")
imageGroup:SetDescription("Image of a sun, a thermometer, and a cloud")

// Creates a variable inside the Form for modifying the temperature.
// Forms can store variables in a special way that lets other classes access them.
integer temperature = 70
form:SetInteger("temperature", 70)

// Make a Label to display the current temperature.
Label currTemp =  homePage:AddLabel("CurrentTemperature")
currTemp:SetText(temperature + " F")
currTemp:SetFontSize(24)

/*
	TemperatureBehavior objects can be used to make the Raise and Lower
	buttons react when they are clicked.
*/
Button up = homePage:AddButton("Raise")
// YOUR CODE GOES HERE

Button down = homePage:AddButton("Lower")
// YOUR CODE GOES HERE

form:Display()
TemperatureBehavior.quorum
use Libraries.Interface.Events.BehaviorEvent
use Libraries.Interface.Forms.FormBehavior
use Libraries.Interface.Forms.Form
use Libraries.Interface.Forms.Page
use Libraries.Game.Graphics.Label
use Libraries.Interface.Item

class TemperatureBehavior is FormBehavior
	action Run(BehaviorEvent event)
    	// Get the Form and Page for our app.
    	Form form = GetForm()
    	Page page = GetPage()
// Get the specific button that was triggered.
    	Item button = event:GetItem()
    	text typeOfButton = button:GetName()
    	// Get the temperature variable stored in the Form.
    	integer temp = form:GetInteger("temperature")
    	// Check which button was clicked, then change the temp as needed.

    	// YOUR CODE GOES HERE

    	// After we set the variable, it is essential to update the variable stored in the Form too.
    	form:SetInteger("temperature", temp)

    	// Update the temperature label.
    	Label label = page:GetLabel("CurrentTemperature")
    	label:SetText(temp+ " F")
	end
end
Fill in the Code
There are three spots marked "YOUR CODE GOES HERE" in the project. Two of them are in Main.quorum, and one is in TemperatureBehavior.quorum. Fill in the three spots, making sure to periodically swap who is acting as driver and navigator in your pair. In Main.quorum, create your behaviors and set them on the buttons.
In TemperatureBehavior.quorum, add code to control what happens when a button is pressed. When you click the "Raise" button, increase the temperature value by 1. If you click the "Lower" button, reduce the temperature value by 1 instead.
Bonus: I'm Feeling Lucky
If you want an extra challenge, once you have completed the rest of your app, try adding a new feature to your app:
- Add a new button to your app named "I’m Feeling Lucky"
- When the button is pressed, use the
Libraries.Compute.Randomlibrary to randomly set the temperature to an integer between 60 and 90 degrees.
Wrap up
This completes the entire chapter of learning block-based Quorum Language. Reflect on how you have used Quorum and working with the development environment. What was most successful while you were working and what do you think could have improved while tinkering?
Have a discussion with a partner next to you and discuss these questions in further detail: If you were a student, what pieces of Quorum would stick with a student? Where would you see students struggling the most?
Next Tutorial
In the next tutorial, we will discuss Solutions Guide, which describes access solutions to the PD lessons.