Hour 1: Introduction to Computer Science
This lesson is to teach you about the basics of Quorum Studio and familarize yourself with a programming environment.Overview
In this lesson, you will be introduced to the field of computer science. The focus is on the big picture, from what the field of study is, to some of the activities you might do as a participant in it. You will also engage with a programming language, the building block whereby any software is created.
Goals
You have the following goals for this lesson:
- Learn the basics of computer science and why learning about it can be helpful
- Learn about Quorum Studio and some of its features
- Create a project for inventing your own software
Warm up
Consider all of the technologies that you use on a daily basis. Many of them today include some form of computer chip, which allows a device to work. This can include fridges, toasters, cars, gaming systems, televisions, phones, or any number of items. For some of these devices, adding chips has substantially changed how society uses them, while others less so. What kind of devices do you think have seen the most pros, and the most cons, from the addition of computers?
Vocabulary
You will be learning about the following vocabulary words:
| Term | Definition |
|---|---|
| Computer Science | The study of computers and computational systems. This includes issues like information processing, automation, and algorithms. |
| Project | An organized set of files, like source code files, images, movies, graphics scenes, sounds, or other items, that work together when creating software. |
| Integrated Development Environment | Software that includes many common functions involved in the process of creating your own inventions. |
| Console | A text-based interface that allows you to interact with the programs on a computer |
Code
You will be using the following new pieces of code:
| Quorum Code | Code Example | Explanation |
|---|---|---|
| say | say "Hello, World" | A command that talks out loud through the computer's speaker |
| output | output "Hello, World" | A command that sends text to the computer's console |
CSTA Standards
This lesson covers the following standards:
- 3A-CS-01: Explain how abstractions hide the underlying implementation details of computing systems embedded in everyday objects.
- 3A-CS-02: Compare levels of abstraction and interactions between application software, system software, and hardware layers.
Explore
In this lesson, you are going to explore the field of computer science. Many of you may be familiar with computers. They are part of your daily life in many ways, from cars, to tablets, or even refrigerators. These devices have hardware, like the car itself, and this hardware is built by electrical engineers, mechanical engineers, and others. You, however, will be focusing these lessons on the software, which is the piece that computer scientists create. This split, the hardware and the software, allows a physical device to stay the same, while meaningfully changing what it can do or how a user interacts with it.
One common misconception with computer science, however, is that it is about using software. For example, you may be familiar with Microsoft Word or Excel. Computer scientists generally want people to know about how to use such software and many do, but a crucial skill in computer science is how to invent software. Inventing software requires a very different way of thinking than using it does, because you need to learn one of the many languages that computer's speak.
Fortunately, modern computer scientists do not start from scratch. They have invented software for, weirdly, inventing: tools called Integrated Development Environments (IDE). Such environments come in many forms and are created by many manufacturers for many purposes. In this course, you will use one called Quorum Studio. Explore a picture of this environment for a moment:
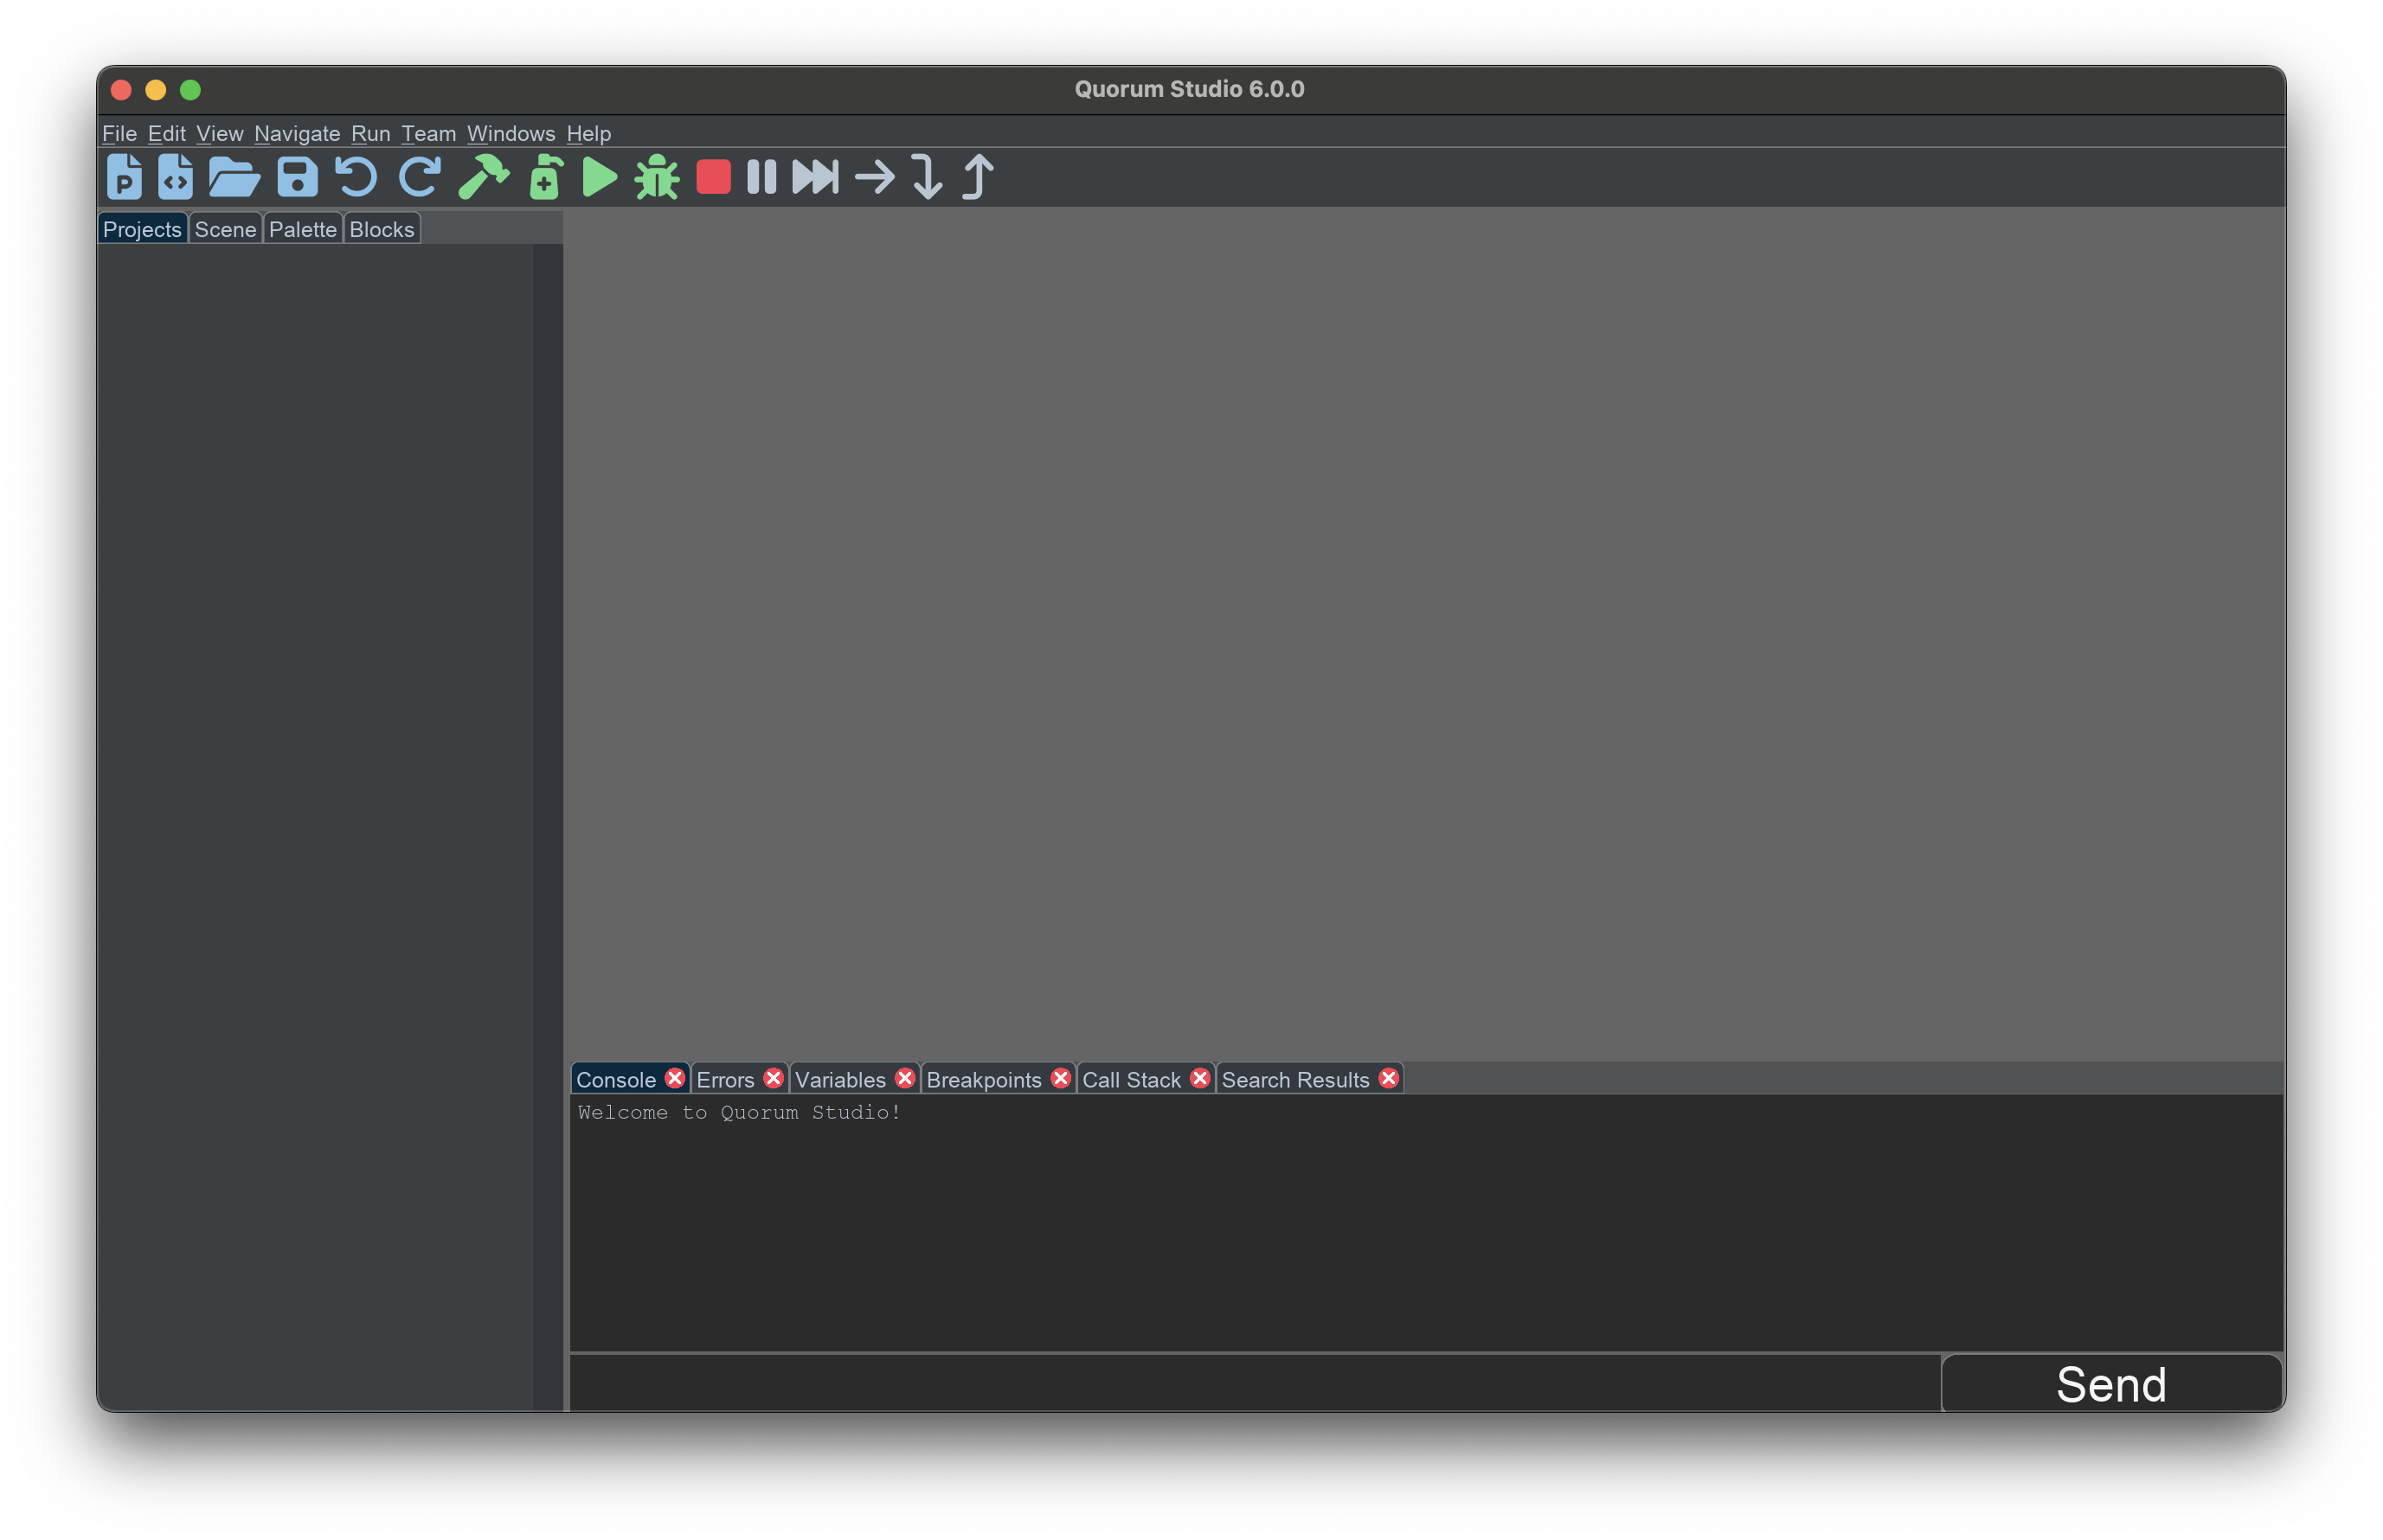
Quorum Studio has a variety of functions you can use to create your software. Many of these functions you can learn as you go. You will shortly explore a few of these functions next.
Downloading Quorum Studio
As mentioned previously, throughout these future lessons, you will be using Quorum Studio to complete various lessons in learning about the fundamentals of computer science.
To download Quorum Studio, you may press on the following link to take you to the downloads page. By pressing the blue button that says "Download Quorum Studio" your computer should automatically configure the installer in order to use the software. Once downloaded, be sure to run the Quorum Studio installer until completion to confirm that the software is on your computer.
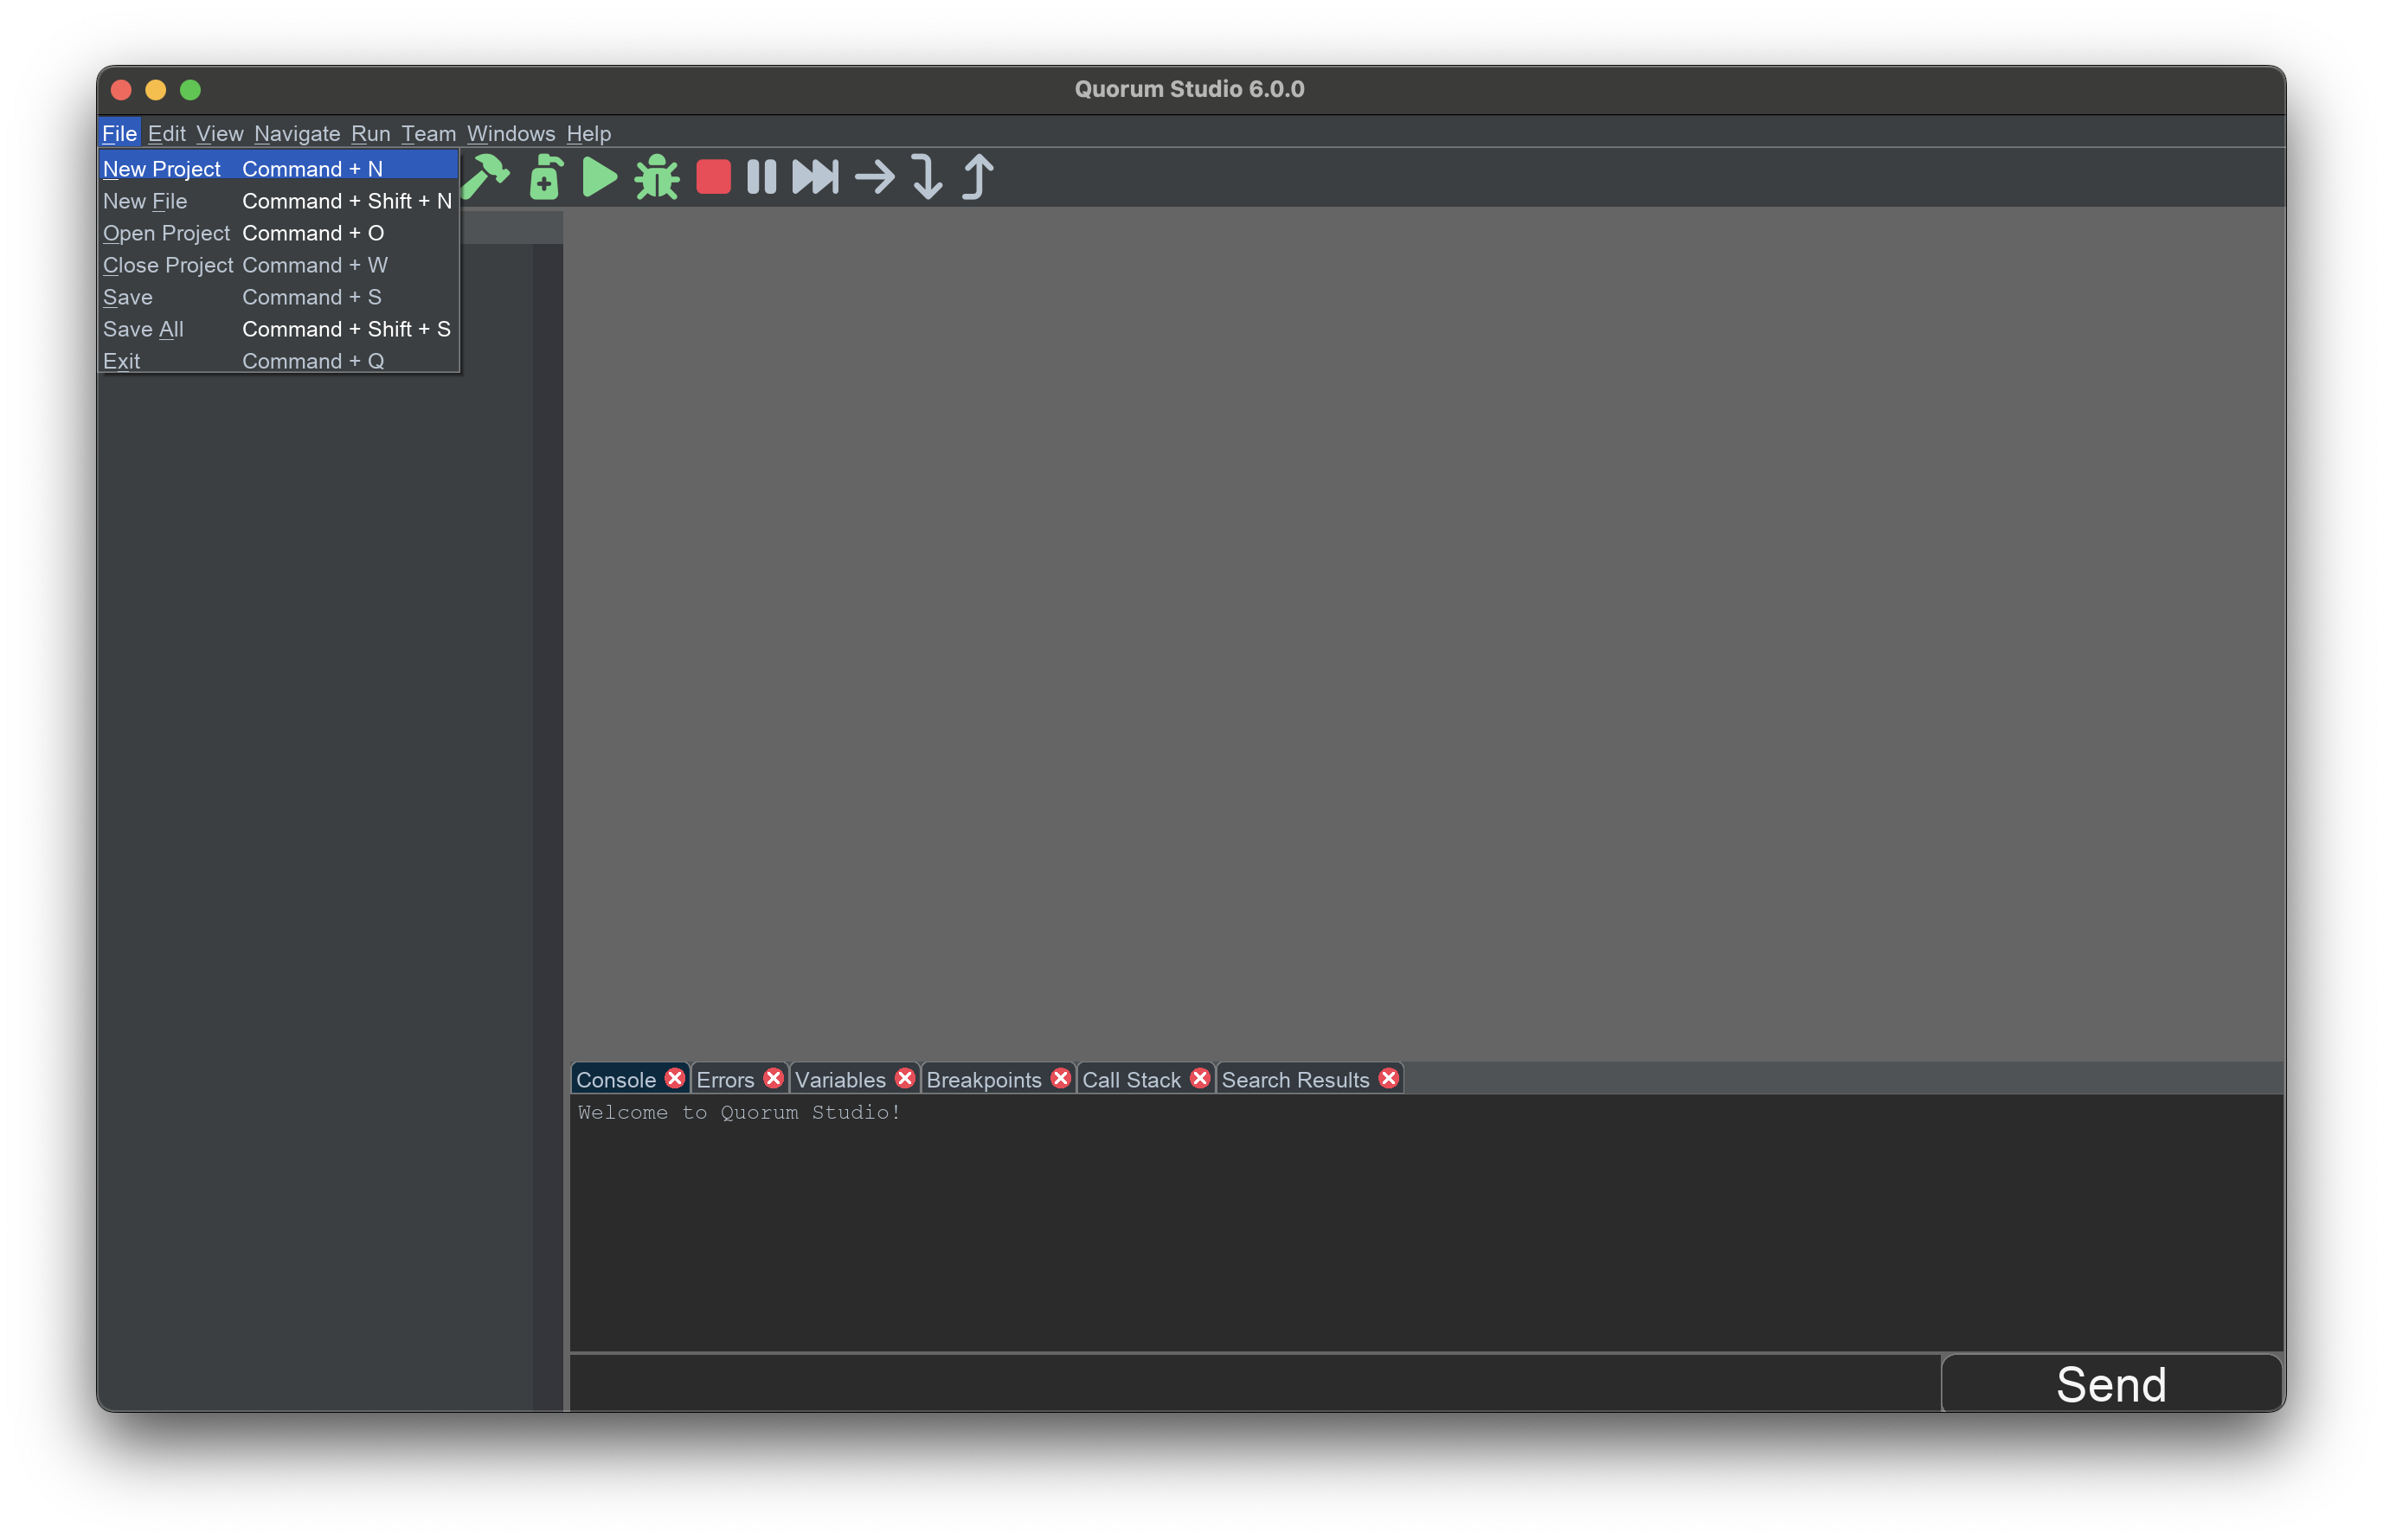
Menus and Toolbar
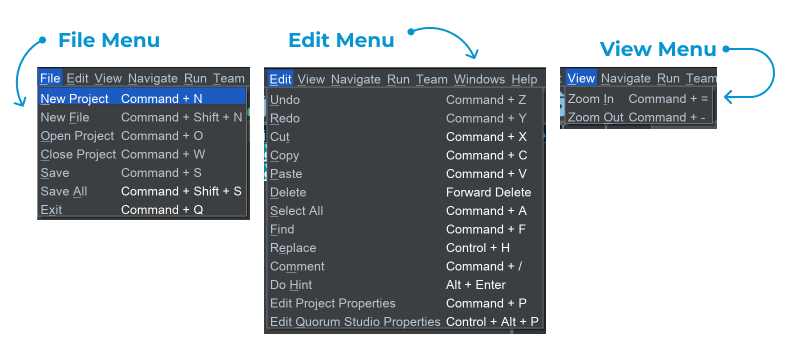
There are several menus in Quorum Studio. These include the File menu, for creating, opening, and closing projects. There is also an Edit menu and view menu, for cut/copy/paste operations and resizing the environment. The Edit menu also allows you to change properties in Quorum Studio or the project you are working on. The navigation menu provides ways of controlling the screen, especially in the editor, from the keyboard or mouse.
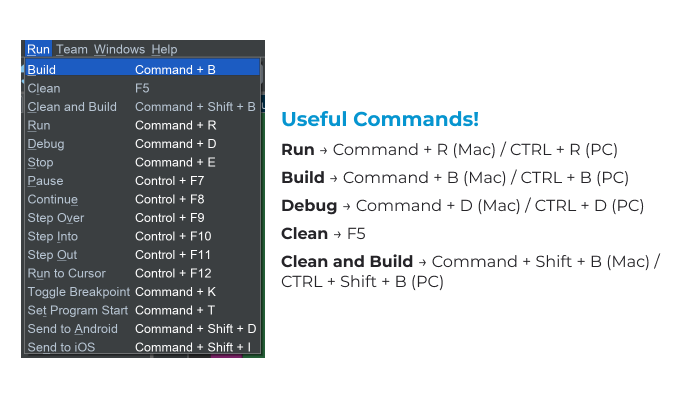
One important menu you may use a good deal is Run. In this one, you control the programs you invent by running it, debugging it, or stopping it. The final three menus are used less often. That said, the teams menu is used for controlling various versions of the software you write on popular websites like Github, whereas the window and help menus provide navigation controls across the application and some extras like automatically checking for updates.
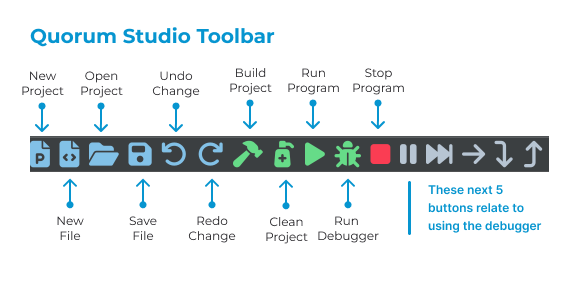
The toolbar serves as a set of buttons that meet the same needs as the menu. From left to right, the buttons make a new project, a new file, open a project, or save a file. The next two allow you to undo or redo a change.
The green buttons hold a purpose related to running the software you are making. The hammer builds your program, while the soap dispenser cleans it, which means it deletes anything the environment has made for you behind the scenes and starts over. The rightward triangle, called the play button, runs your program, while the bug runs the debugger. The red stop button stops a running program.
The final five buttons on the toolbar are gray and related to running a debugger, which is a program for finding errors in a program. These buttons will be explored in more detail when discussing debugging later.
Project Tabs
Below the toolbar on the left hand side, available with the hotkey COMMAND + 1 on Mac or CTRL + 1 on Windows, are the project tabs. There are four such tabs, the Projects tab, the Scene tab, the Palette tab, and the Blocks tab. The project tab is where you can observe any open projects you are working on. Loading many projects at once, or just a few, is normal and reasonable.
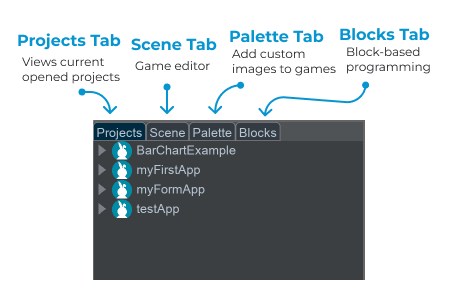
While not discussed in this curriculum, one type of project you can make is 2D or 3D accessible games. In doing so, while you can program them manually, you can also create custom scenes. In Quorum, scenes are the fundamental concept of creating graphics through programming. Such scenes might be, for example, a 3D medieval castle that you can navigate with the keyboard and even use with devices for accessibility (e.g., screen readers or Braille devices). The palette, while also not used in this curriculum, is a location for storing any of the options for adjusting scenes.
Finally, the blocks tab is for block-based programming. In many kinds of programming environments, you learn to invent by reading documentation. As you continue to work with Quorum Studio more, you will notice that the blocks tab adapts to give you "hints" while you are working on code. The IDE provides documentation, code completion, and information about errors that you face while programming.
The Editor
In the screenshot of Quorum Studio above, the editor is a light gray region that is used for creating, manipulating, and adjusting the software you are inventing. You will be able to know how to use the editor to create programs in the next lesson, but it is important to become familiar with the environment's regions.
Editors in programming environments have many helpers to assist in learning. Modern environments are often categorized as either using visualization, such as shaped blocks that snap together, or raw text, which you have to memorize and type. Quorum Studio features versatile learning on how to program through text or block-based programming without losing information upon translating the two forms. What this means is that anything you can invent in text mode you can invent with blocks and vice versa. Further, the blocks are accessible. Graphical elements in the editor do use graphics, but they send reasonable and appropriate messages to accessibility devices on multiple platforms.
Information Tabs
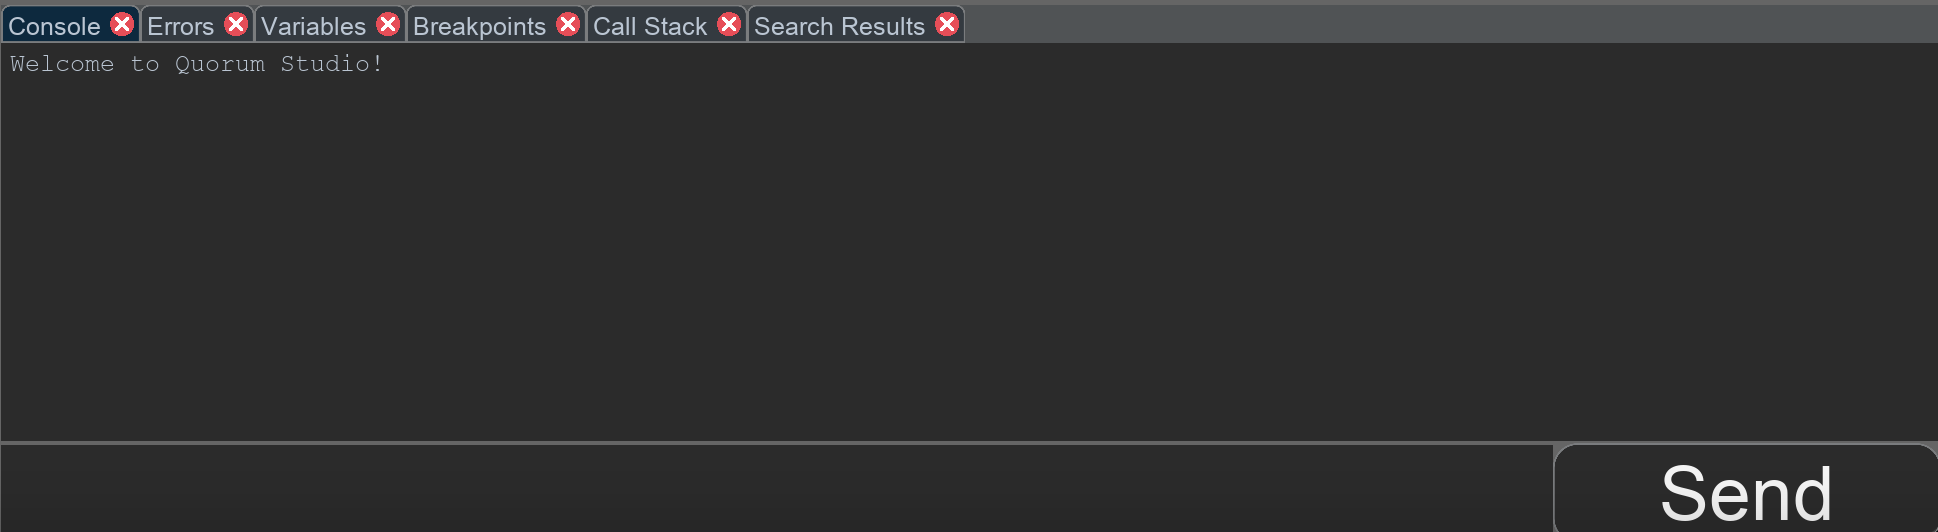
On the bottom of the environment are six tabs: console, errors, variables, breakpoints, call stack, and search results. These less used tabs will be partially discussed later, but one to be aware of is console. Typically, when you want to output information (such as sound, text, or graphics) on your programs, it would be shown in this area.
Engage
In this first part of the lesson, you will start to familiarize yourself with Quorum Studio and create your very first project. Your task for this program is to be able to output a funny phrase of your choosing either through text or through your computer’s audio system. You are to be using Quorum’s commands such as output and say in order to successfully complete your task.
Directions
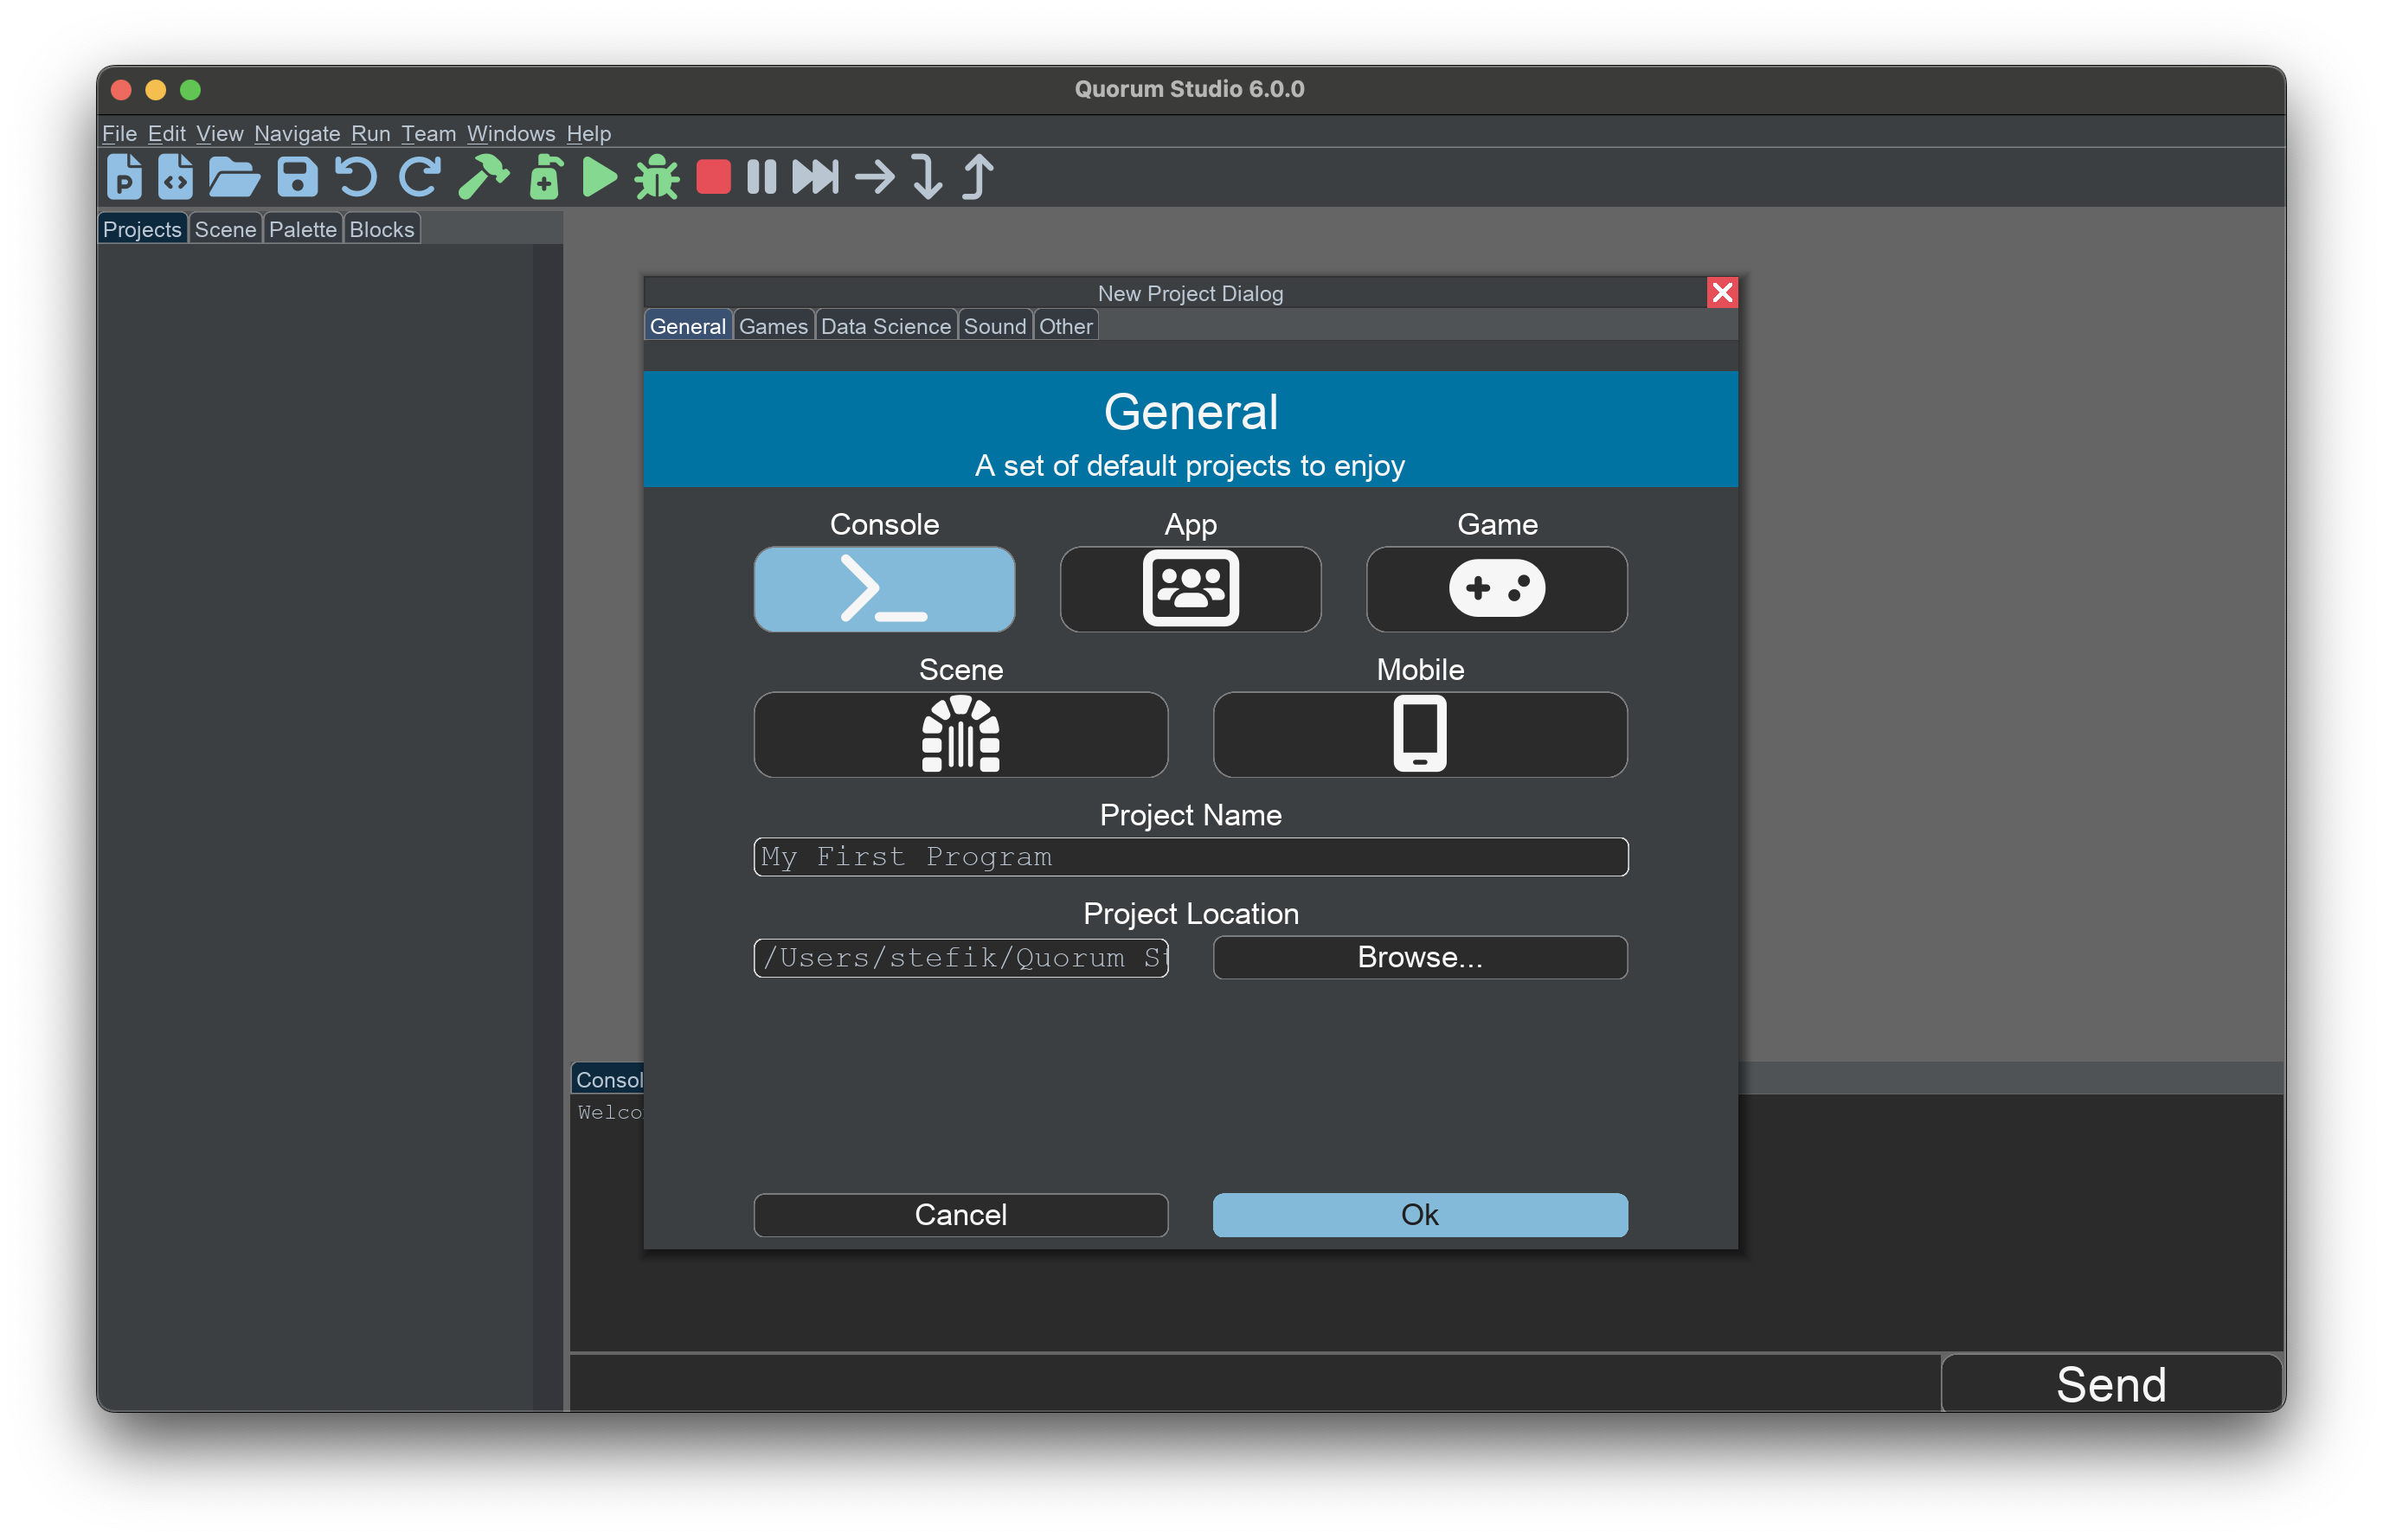
Computers often have multiple ways to output information to a user. There are graphics, like pictures on the screen, in addition to speech, text, or sometimes feel (e.g., vibration on a tablet). To invent anything though, you first need to create a project. For this, you first go to the File Menu and select the New Project button.
After you do so, a window will appear that lets you select from various kinds of programs. You will select a Console Application, give it a name, and press the ok button. This will create a new project, put it on your hard drive wherever you want, and place your new piece of software in the Projects Tab. There are many kinds of projects beyond console applications, such as games, apps, data science programs, robots, or others. However, you will be focusing on console applications for now first to build your computer science foundations.
Once you have created your new project, it should appear underneath the projects tab. Your project name may be different to the one below but all the contents should be the same. You will want to navigate down the tree structure of the project opening the source code folder and access the file: Main.quorum. Be sure to double press on the file itself to open it on the editor. This .quorum file is where you will be writing your very first program.

Once your project opened, you have opened the source code folder and selected the editor, open the Blocks tab, which will then give a screen like so:
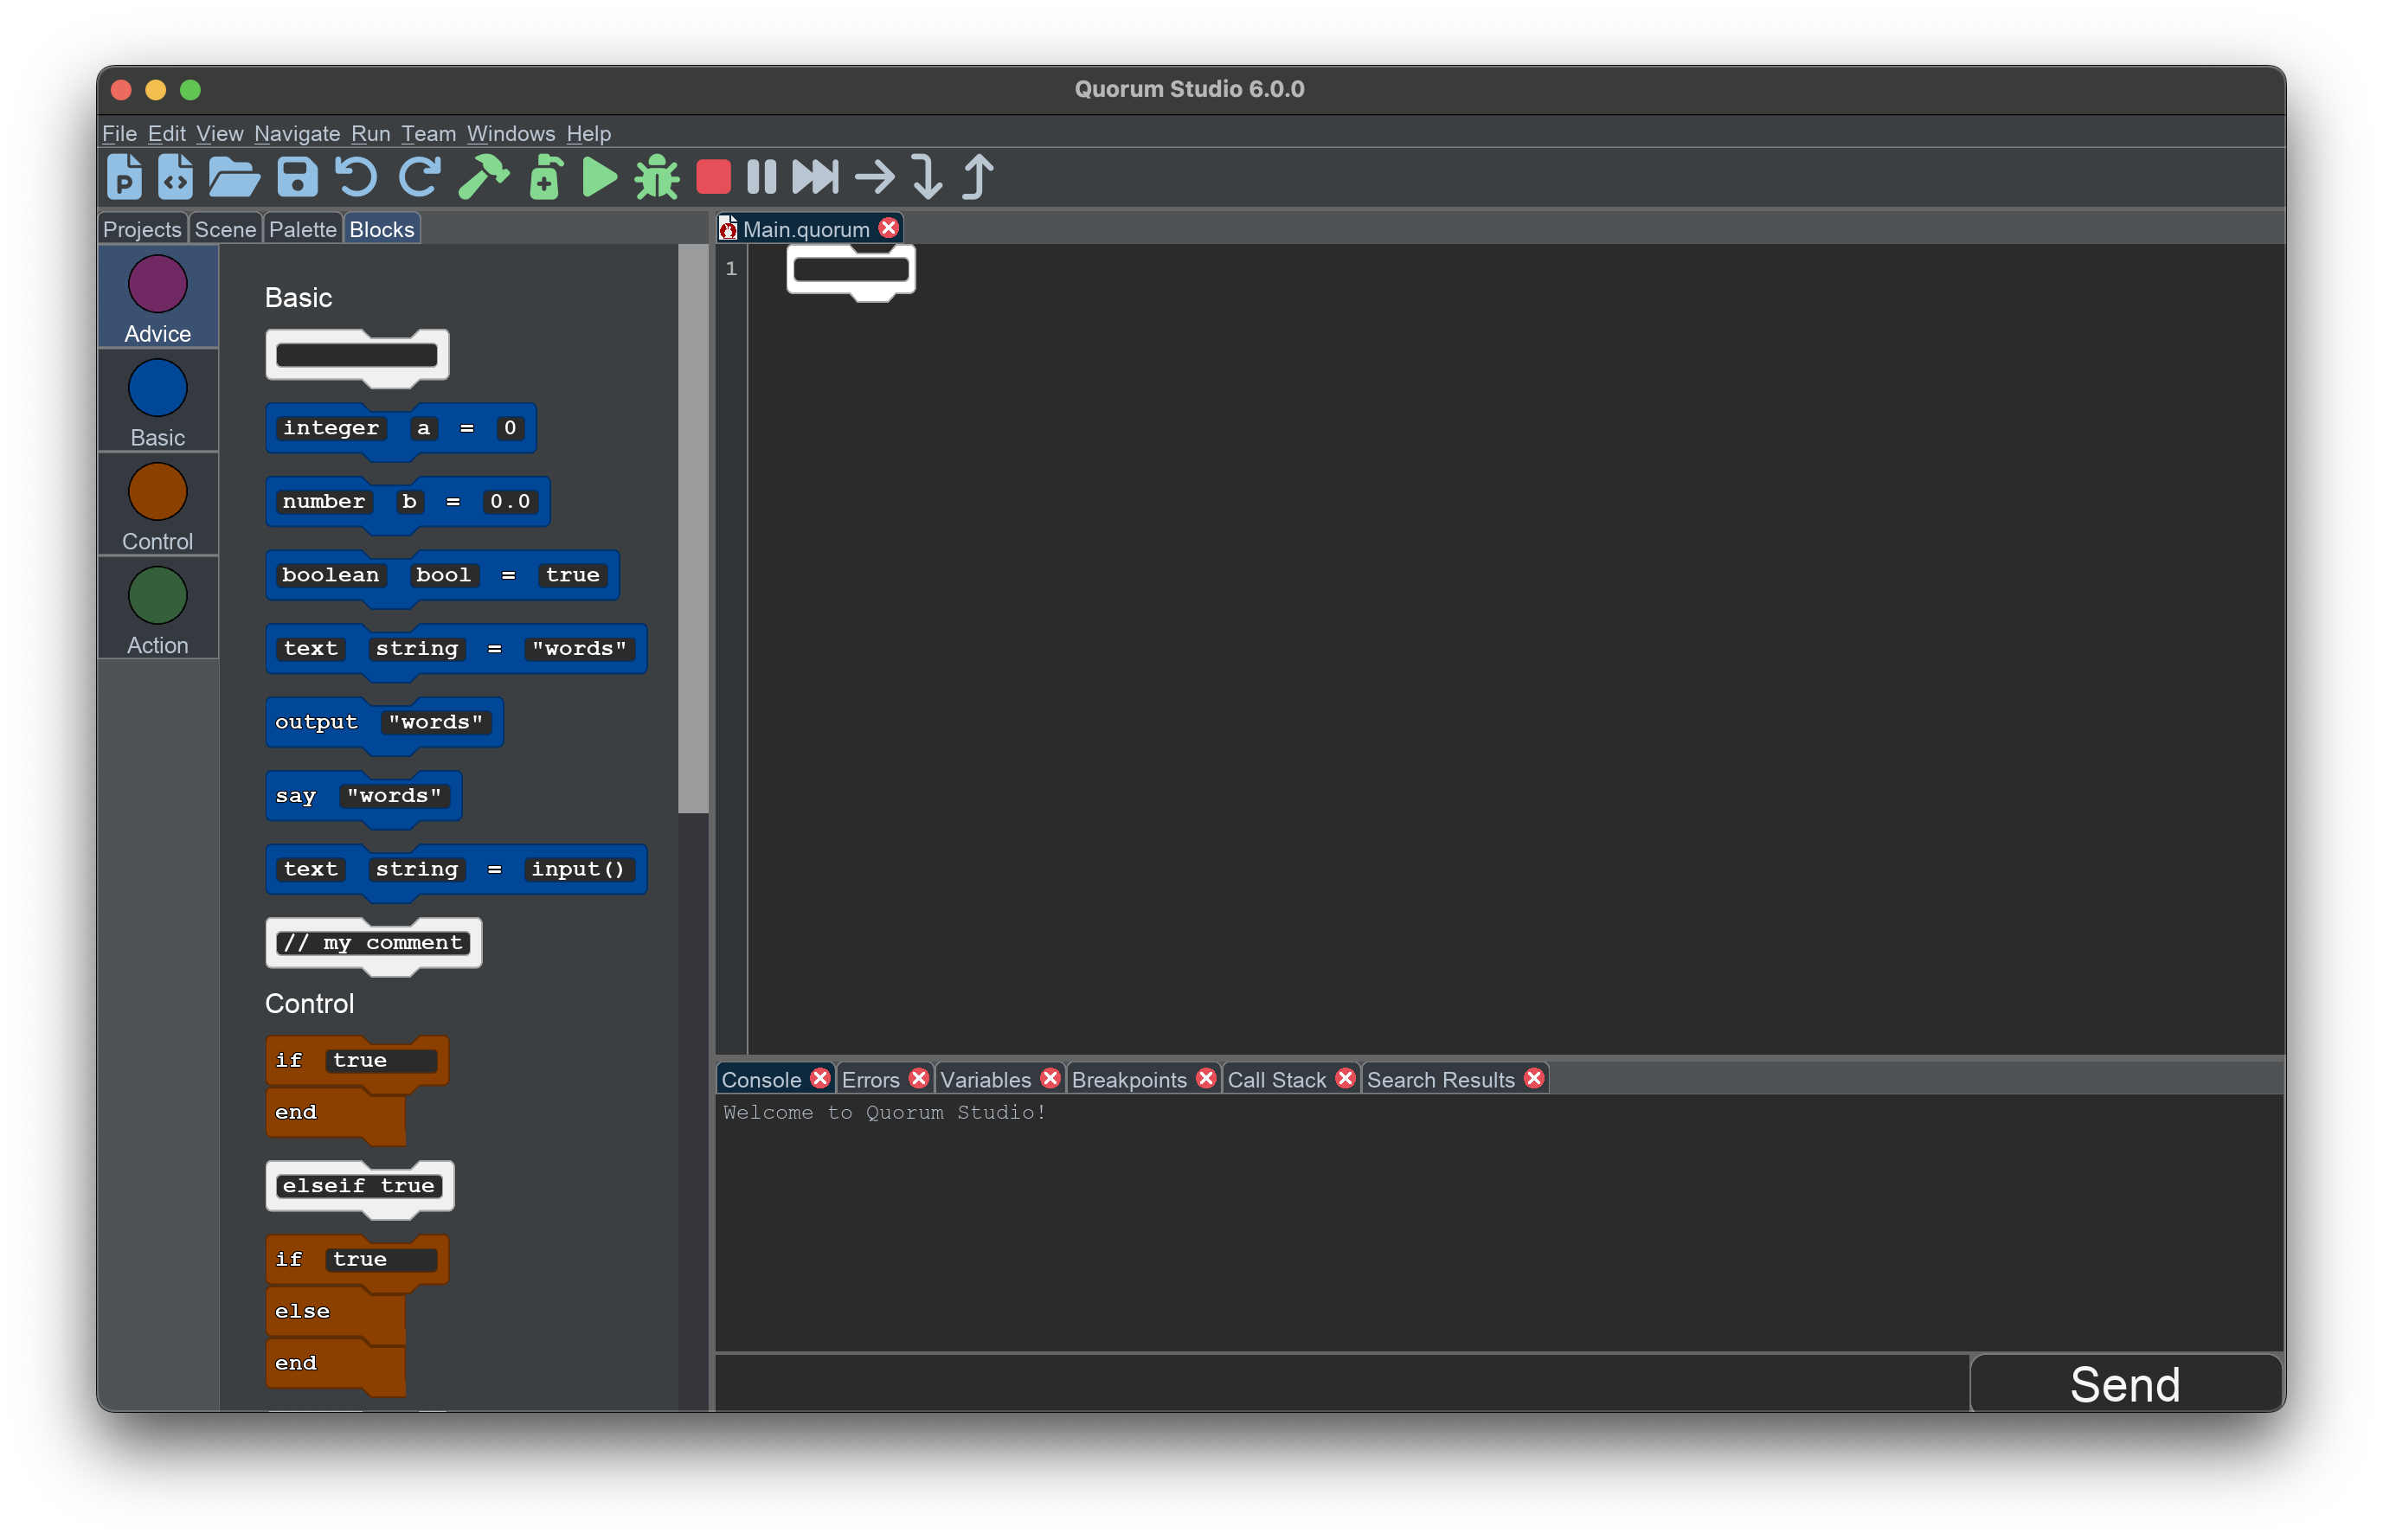
Notice how the gray editor region now looks different as it has a file that you can use to start typing or building your programs through blocks.
On the blocks tab, it is sectioned off into four categories:
- Advice is for more advanced blocks that utilize the blank block (AKA the white block) and will show more blocks and functions to use such as when you learn more about objects. This section also shows all the available options of blocks as well.
- Basic blocks are used for simple output and variable creation.
- Action blocks are used when you want to create functions in your programs.
Although these concepts may seem overwhelming upon first glance, you will start to become more familiar with these concepts as you continue to invent more programs!
When you are in the Advice category, notice that there are many options on the left hand side of the screen that allows you to know what kinds of operations are available. As the first goal, find the commands for say or output and choose which one you want to use. You can use the keyboard or the mouse for these operations using commands like the following:
| Operation | Command | What does it do? |
|---|---|---|
| Go to the Blocks Tab | COMMAND + 1 or CTRL + 1 | Jumps the focus to the block palette |
| Go to the editor | COMMAND + 2 or CTRL + 2 | Jumps the focus to the code editor |
| Move to a new block | Tab Key or SHIFT + Tab key | In the block palette, it moves the focus to a new region |
| Select a block in the block palette | Press enter then move up or down | Puts a new block in the code editor |
Through whatever mechanism works for you, like drag and drop or the keyboard, move a block from the block palette to the code editor.
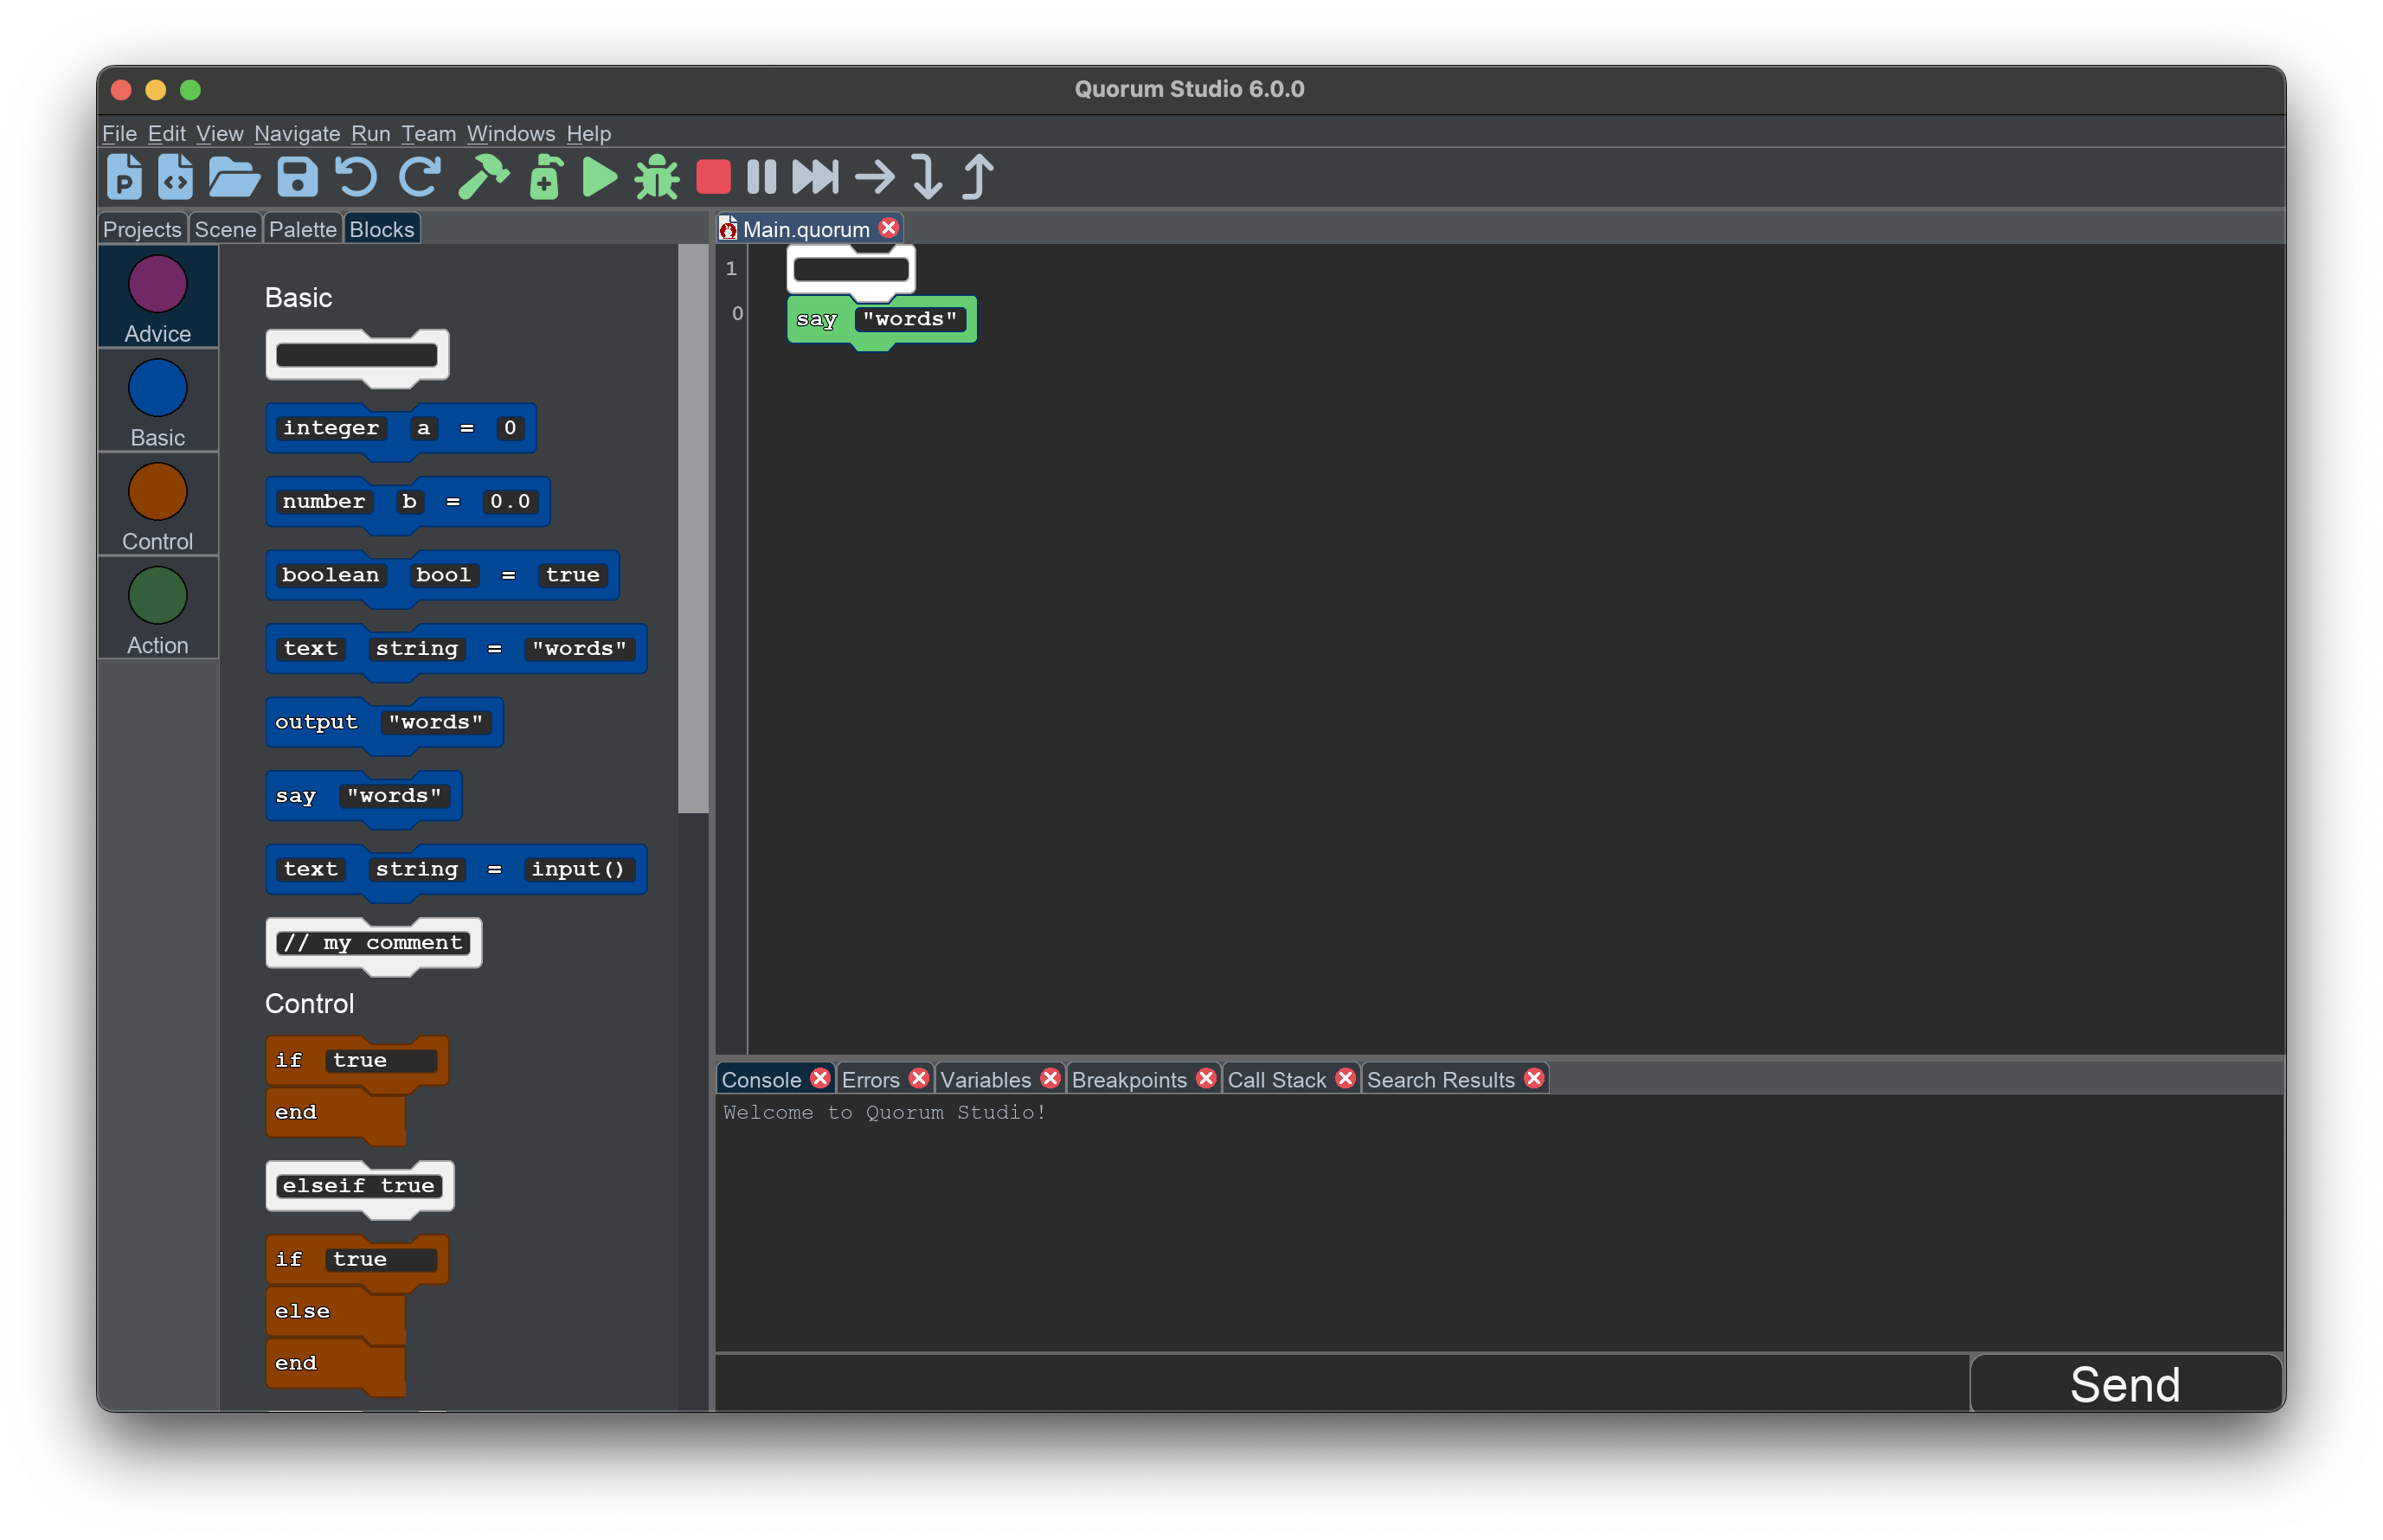
The example below demonstrates what a say block might look like on the screen once finished. Note that this single block is exactly equivalent, in text, to having a single line of code. In fact, under the hood, it really is exactly the same thing. Put another way, even if a professional programmer used blocks, it would make no difference. The output and code would be identical under the hood. If you want to use blocks, or text, and not tell anyone, it can be your little secret.
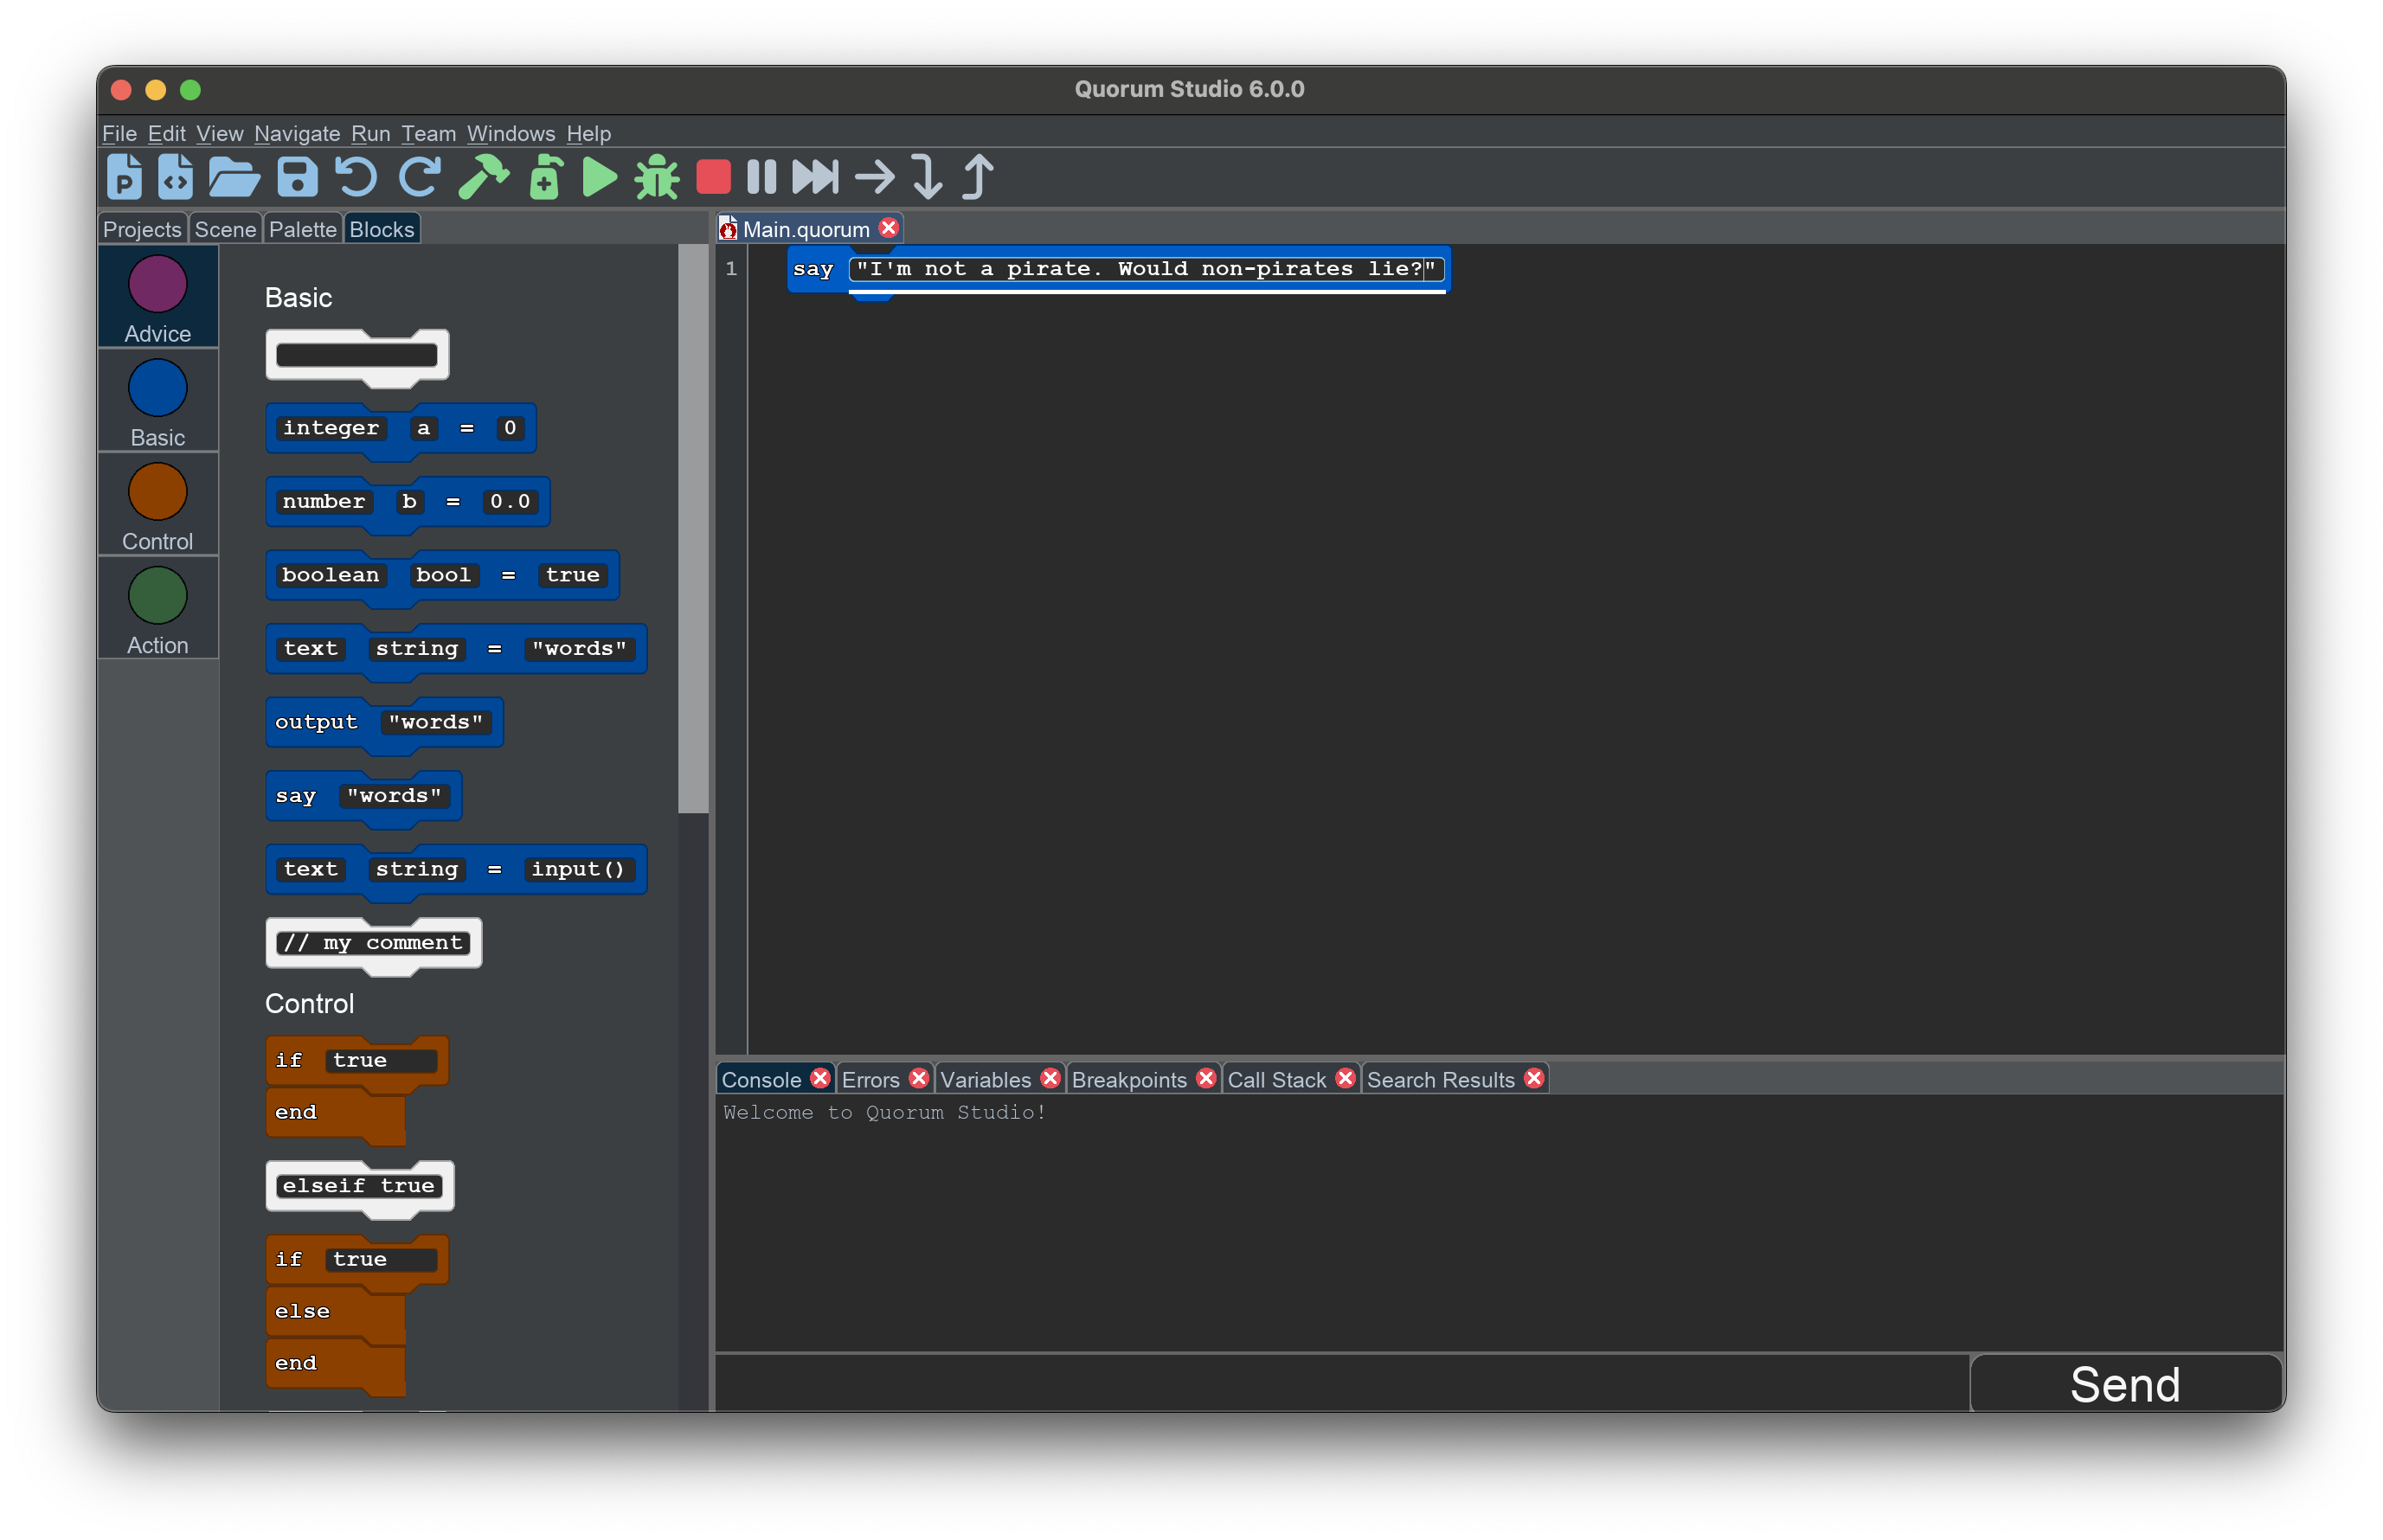
As a final task, choose the phrase you would like the computer to speak, or output, and run your program.
Now, run your program. Remember, you can run your program from the Run menu by selecting the Run option, or by clicking the green "play" button on the toolbar, or by using the hotkey (Ctrl+R on Windows, or Cmd+R on Mac).
Wrap up
Work with a partner to follow the directions in the introduction. If either of you is stuck, ask each other or the instructor how to proceed. Once you are done, run your program and demonstrate what it does to your partner.
Next Tutorial
In the next tutorial, we will discuss Scaffolded Blocks Programming, which describes how to use the blocks templates in Quorum.