Hour 13: Classes and Actions - Part 2
This lesson is to teach you about actions and classes.Overview
Libraries such as the Math library, the DataFrame library, and the Form library allow you to create different types of projects and there are many more. These libraries all use a particular mechanism to organize themselves, called classes. In this lesson, you are going to learn how to create your own custom class and identify all the different parts.
Goals
You have the following goals for this lesson:
- Learn what distinguishes a class from an object
- Learn how to use "class" blocks to create a class
- Create actions within your class
- Learn about how to create your own documentation
Warm up
A common metaphor in computer science is to think of actions as verbs and classes as nouns. What do you think this metaphor might mean or imply?
Vocabulary
You will be learning about the following vocabulary words:
| Term | Definition |
|---|---|
| Class | An organizing structure that can contain variables and actions that acts as a blueprint for custom data types to use in a program. |
| Members | Variables and functions contained within a class. |
Code
You will be using the following new pieces of code:
| Quorum Code | Code Example | Explanation |
|---|---|---|
| class MyClass end | class FishClass end | Creates a class inside of Quorum |
| // Comment | // This explains something! | A single line of text that is ignored by the computer, but can be used to describe the code. |
| /* Comment */ | /* This explains something, even on multiple lines! */ | Multiple lines of text between asterisks that are ignored by the computer, but can be used to describe the code. |
CSTA Standards
This lesson covers the following standards:
- 3A-AP-17: Decompose problems into smaller components through systematic analysis, using constructs such as procedures, modules, and/or objects.
- 3A-AP-15: Justify the selection of specific control structures when tradeoffs involve implementation, readability, and program performance, and explain the benefits and drawbacks of choices made.
- 3A-AP-18: Create artifacts by using procedures within a program, combinations of data and procedures, or independent but interrelated programs.
Explore
You have already used a number of different objects. While you have not had to worry about how these objects work so far, under the hood objects are made using code just like the programs you have been writing. At their core, objects are collections of variables and actions. You have already learned about actions in depth, and now it is time to learn how they can be brought together into objects using classes.
Object-Oriented Programming
Objects are used to break up complex programs into much more manageable pieces that work together to solve a complex program. The concept of using objects to make programming easier is formally known as Object-Oriented Programming. When considering object-oriented programming, there are two related, but distinct, concepts to keep in mind. These are classes and objects.
Classes and Objects
A class is like a schematic or a recipe that describes a data type. You can think of it like a blueprint for a house. It can describe the shape and the dimensions of the building, and it can describe the way you use the rooms. At the end of the day, though, you need to actually build the house before you can use it.
You have already seen a little bit of what classes are like. They are a block that can contain variables and actions. Below is an example of a class. This particular example, the RoboDuck class, contains a single variable and a single action.
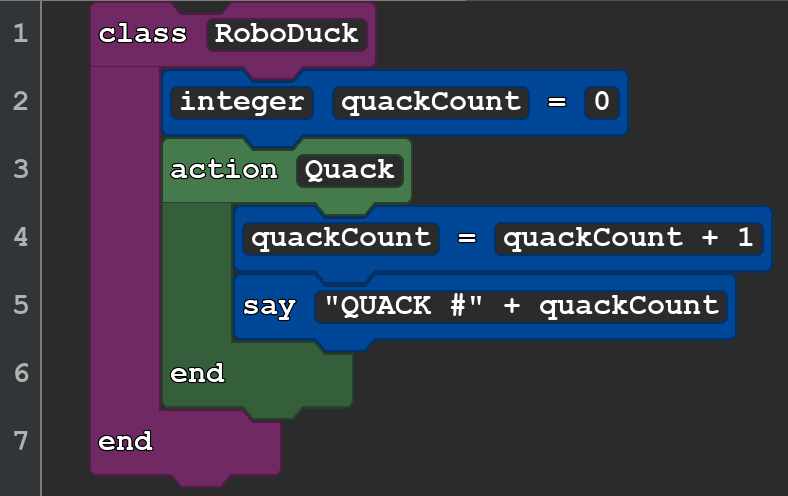
While a roboduck is silly, it is ok to be silly. Classes are just a way to organize code. An object is a specific piece of data. If a class is a schematic for a house, an object is a specific house made with that schematic. You could use the same schematic to build other identical houses.
The example below shows how you can make an object. This looks similar to other objects you have created before, but this time there is no “use” statement. That is because you are not retrieving a class from a library, but instead, you have written it yourself in your program.
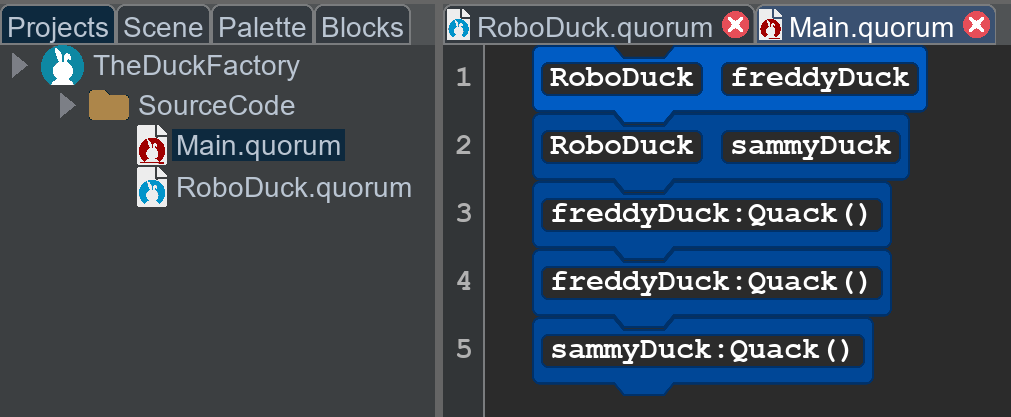
In this program, two RoboDuck objects are made, and stored in the variables "freddyDuck" and "sammyDuck." When this program is run, it says the following:
QUACK #1
QUACK #2
QUACK #1
Examine the previous example again, where the RoboDuck class is created. Each RoboDuck contains a counter variable that increases each time the "Quack" action is called. Each object contains a copy of the variables and actions that are declared in the class. Even though both objects share the same class, they store their own information. At the end of this program, Freddy duck's counter is at 2, while Sammy's is at 1.
The values inside of a class are known as its members. These come in two basic varieties:
- Member Variables: Local variables that are unique to a class and represent the data or characteristics of the objects created from the class.
- Member Actions: The actions that an object created from the class can perform.
Creating a Class
To create a class, you can use the “class” block found in the Actions tab of the palette.
Class blocks have a few rules that they must follow:
- A Quorum file can not have more than one class block. Not all programming languages have this restriction, but Quorum does
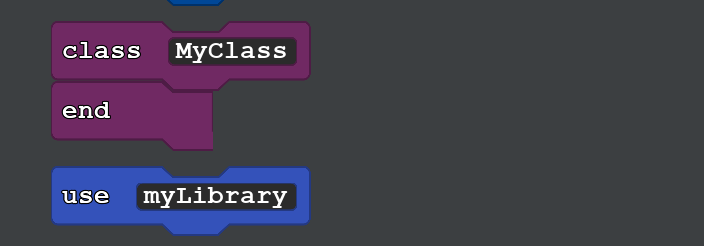
- If a file has a class block, the only code that can go outside of it are use blocks. All other code must go inside the class block.
- Use blocks must go above a class, not below it
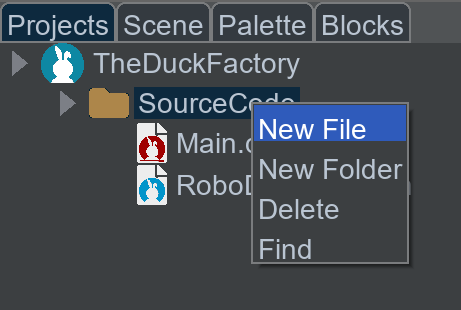
Because of these restrictions, if you are using classes, you will need more than one file in your program. To add a file to your program, you can right click the "SourceCode" folder of the project in the tree on the left side. Alternatively, you can select "New File" from the File menu (hotkey Command + Shift + N on Mac, or Control + Shift + N on Windows).
Documentation
In programming, documentation is commonly written directly into the code using comments. Comments are lines of text that are explicitly ignored by the computer. They serve no purpose to the code, but they can be very helpful to the humans reading it.
There are two different ways to comment code:
- Single Line Comments
- Multi-line Comments
The format for single line comments would be:
// This is a comment for one line of code.
// This is a comment for another line of code.
The format for multi-line comments would be:
/*
In between these two asterisks, you can write comments about your code. This could be one line, or ten, or as many as you want.
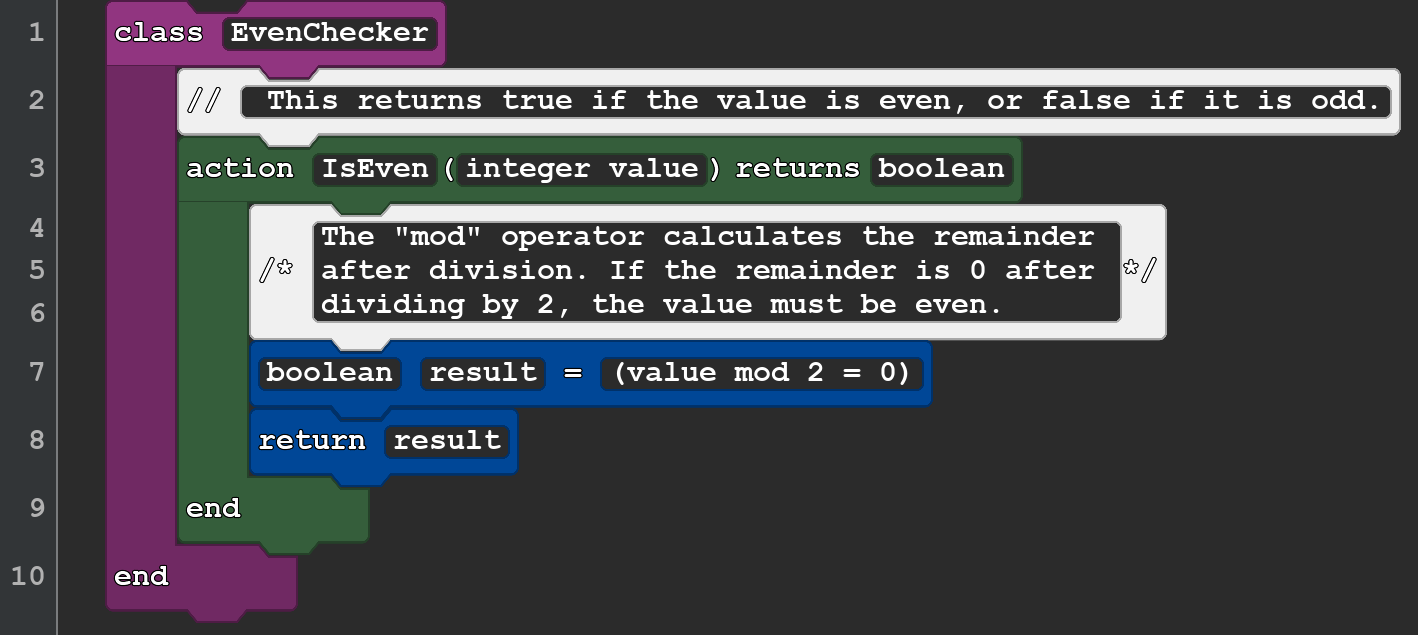
*/There is no right or wrong way to use the different formats, but generally you can use single line comments to describe the little details and multi-line comments to give a general overview. The example below shows the EvenChecker class, which can check if an integer is even or odd. It has comments explaining the action’s purpose and how it works.
Make Your Classes Make Sense
When creating your own class, consider writing documentation. The big benefit is that comments written on top of a class (block or text), automatically show up in the palette, which lets others observe your documentation. Here are some rather general tips about writing documentation:
- Start with a Clear Description: Begin with a concise description of what the class does and its purpose within the application.
- Document the Intent: Explain not just what the class does, but why it exists. What problem does it solve? How is it intended to be used?
- Be Consistent: Use a consistent style and format throughout your documentation. This makes it easier to read and understand.
- Use Descriptive Names: Choose clear and descriptive names for methods and variables, which can often reduce the need for extensive documentation.
- Include Usage Examples (if needed): Especially when the code must be shared with others, it can be helpful to know not only what the purpose of a class or action is, but what code using it might look like.
Engage
Welcome back to Bogmort’s School of Mathcraft and Calculatry. As you continue your wizardly education, you will need more than just your brain to remember your spells. What you need is a spellbook. Your "spellbook" will be a custom class that you will store all your actions inside.
Directions
You will be creating a custom class that represents a spellbook.
Inside your Spellbook class, include the previous spells you have made in your first wizardry session:
- Incremento: Add 1 to a value.
- Subtractio: Subtract 3 from a value.
- Multifour: Multiply a value by 4.
- Dividenadd: Divide a value by 2, then add 10.
Then, add 3 additional actions to keep inside your spellbook:
- Incredimento: Add 10 to a value.
- Twomos: Add two to a value, then multiply by 2.
- Addava Subtrava: If the value is even, add 3 to it. If the value is odd, subtract 1 from it.
Once you have finished creating your spellbook, it is time to use it. This time, you will be cultivating mathdrakes. These scientific plants are very particular, and must be harvested under very precise conditions. Each mathdrake begins as an infinitesimally small sprout that is, somehow, 0 cm tall. You will use your spells to grow the mathdrakes to the optimal size before you harvest them.

To harvest the mathdrakes:
- Create a class for your spellbook.
- Add all 7 spells as actions to your spellbook. Like last time, each action should also announce the spell’s name using an output or say statement.
- Add a comment for your class, and one for each of your actions in your spellbook.
- In your main file, create a spellbook object, along with an integer variable for each of the mandrakes.
- In your main file, use your spellbook and its spells to grow the four mandrakes to their ideal sizes for harvesting. Output the growth of each mathdrake when you are done to verify your results.
Mathdrake 1: Harvest the mathdrake when it reaches 60 cm.
Mathdrake 2: Using each of your new spells exactly once, harvest the mathdrake at 17 cm.
Mathdrake 3: Harvest when the mathdrake is greater than 100 cm but less than 140 cm tall, while casting spells 5 times or fewer.
Mathdrake 4: Harvest the mathdrake when it reaches 49 cm, while casting spells 8 times or fewer.
Wrap up
Take a look at your code and reread the documentation you have written for your Spellbook. Does your documentation make sense? Do you think if you gave your program to someone else, they could understand your code using your comments?
Next Tutorial
In the next tutorial, we will discuss Create Accessible Apps, which describes how to add behaviors in a Form app in Quorum.